The goal of this article is to document all LiveView optimizations we have designed and employed over the last 5 years.
As we will learn, most optimizations here come for free to LiveView developers and are only made possible thanks to the Erlang VM’s ability to hold millions of stateful WebSocket connections at once.
But first things first.
LiveView is a library for the Phoenix web framework that allows you to write rich, real-time user experiences with server-rendered HTML. Your LiveView code runs on the server and LiveView comes with a small JavaScript client that connects the two.
When LiveView was announced, one of the examples Chris McCord presented was the “rainbow” demo:
The idea is that we could animate a rainbow on a web page, by rendering div
s with style
attributes on the server and sending them to the client at 60 frames per second. To make rendering efficient on the client, Phoenix LiveView used (and still uses) the morphdom
library. morphdom
parses new HTML sent by the server and morphs the browser’s DOM accordingly. Prior to the conference, we tried the demo between Poland and East Coast, and it worked without jitters or stutters.
Immediately after the presentation, I remember talking to Chris and Dan McGuire that we could do better. If you looked at the rainbow demo, the template would roughly look like this:
<h1>Silky Smooth SSR</h1>
<p>Fast enough to power animations [on the server] at 60FPS</p>
<div>
<%= for bar <- @rainbows do %>
<div style="color: <%= bar.color %>; height: <%= bar.height %>px" />
<%= end %>
</div>
<p>The above animation is <%= @count %> <div> tags</p>
<p>...</p>
The LiveView demo would send the whole template on every frame and the browser would patch it onto the page. However, if we look at the template, we can see only parts of the template actually change! By sending the whole template over and over again, we are just wasting bandwidth.
While bandwidth was a concern, I was worried that the programming model would not scale: the larger the page, the more boilerplate the server will send on every single update. If you take a complex page with forms, widgets, etc, it is just not acceptable to send several KBs of data, every time the user presses a key inside an input, only to show an error message.
Unfortunately, this is still the programming model that many server-rendered applications implement: they send whole HTML chunks and use libraries like morphdom
to update the page. While morphdom
can handle those chunks just fine, the costs in latency and bandwidth can quickly become too steep, either leading to inferior user experiences or requiring the developer to spend countless hours fine-tuning their applications to acceptable metrics.
Let’s learn how LiveView addresses these concerns for us.
The first optimization we applied to LiveView is to split statics from dynamics. Let’s start with a smaller template and then we will revisit the rainbow demo. Take this template:
<p>counter: <%= @counter %></p>
We can see from this template that, <p>counter:
and </p>
are static. They do not have interpolated content and therefore they won’t ever change. @counter
is the dynamic bit. Can we somehow leverage this?
Historically, Phoenix used .eex
templates, which stands for “Embedded Elixir”, to render pages. In a very simplistic way, you could think that the compiler for .eex
templates would convert the template above to something like this:
Enum.join(["<p>counter: ", @counter, "</p>"], "")
Once you render the template, you execute the code above, and you get a string back (actually, we don’t build a string but an IO list, which provides many other performance and memory benefits).
To address the problems above, we introduced .leex
templates, which stand for “Live Embedded Elixir”. The idea is that we would compile the template above to this:
%Phoenix.LiveView.Rendered{
static: ["<p>counter: ", "</p>"],
dynamic: [@counter]
}
In other words, we build a rich data-structure that splits the statics and dynamics from the template. Now, when you render a page with LiveView, we convert that rendered structured into JSON. Assuming the value of @counter
is 13, we would get:
{
"s": ["<p>counter: ", "</p>"],
"0": "13"
}
The client will store this data and render it. The data structure is built in a way that guarantees that length(statics) == length(dynamics) + 1
. This way, for the client to stitch the actual HTML back together, all you need to do is to intersperse the dynamics, given by numeric indexes, within the statics.
Now comes the important part: when we bump the value of @counter
to 14, we don’t need to send the statics again. The next JSON we send will be simply this:
{
"0": "14"
}
The client will merge the new dynamics above into its existing set of statics, resulting in the following:
{
"s": ["<p>counter: ", "</p>"],
"0": "14"
}
And to render, once again, we intersperse statics and dynamics, rebuilding the HTML structure, and update the page with morphdom
!
At this point, it is worth noting .leex
templates were not aware of the HTML structure. A template like this:
<p class="<%= @class %>">counter: <%= @counter %></p>
would compile to:
%Phoenix.LiveView.Rendered{
static: ["<p class=\", "\">counter: ", "</p>"],
dynamic: [@class, @counter]
}
This was an explicit design choice. We have experimented with returning a Virtual DOM from the server, but that actually increased the bandwidth usage, because a richer data structure led to bigger and more complex payloads. Representing templates as flat lists which are assembled on the client was the perfect spot.
While this provides a good enough starting point, it would be hardly useful in practice, let’s learn why.
In practice, templates have complex logic in them, such as conditionals, function calls, and so on. Let’s make our template slightly more complex:
<%= if @counter == 0 do %>
<p>Nobody clicked the button yet.</p>
<% else %>
<p>counter: <%= @counter %></p>
<% end %>
<%= render_button(@counter) %>
If we convert the template above to our rendered structure, this is what we would get:
%Phoenix.LiveView.Rendered{
static: ["", "\n\n\n", ""],
dynamic: [
if(@counter == 0, do: ..., else: ...),
render_button(@counter)
]
}
As you can see, pretty much all content is dynamically generated! To solve this, we must build a tree of Rendered
structures. In particular, we want to:
do
and else
branches also return rendered structures render_button(@counter)
, to uses templates and return rendered structures, instead of strings What we want to have in practice, is this:
%Phoenix.LiveView.Rendered{
static: ["", "\n\n\n", ""],
dynamic: [
if(@counter == 0) do
%Rendered{
static: ["<p>Nobody clicked the button yet.</p>"],
dynamic: []
}
else
%Rendered{
static: ["<p>counter: ", "</p>"],
dynamic: [@counter]
}
end,
render_button(@counter) #=> returns %Rendered{}
]
}
Now, when we first render the page, assuming counter is 0, this is what we get:
{
"s": ["", "\n\n\n", ""],
"0": {
"s": ["<p>Nobody clicked the button yet.</p>"]
},
"1": {
"s": ["<button phx-click=\"bump\">Click me!</button>"],
}
}
Rendering this page uses the same process as before, except it is now recursive. We start at the root, interpersing statics and dynamics. If any of the dynamics is also a JavaScript object, we apply the same rendering, and so on.
Now, if we bump the counter to 12, you could assume we should send this back:
{
"0": {"0": "12"},
"1": {}
}
As we changed rendering to be recursive, we need to also change the merging to be recursive. If we merge the above, we will get this:
{
"s": ["", "\n\n\n", ""],
"0": {
"s": ["<p>Nobody clicked the button yet.</p>"],
"0": "12"
},
"1": {
"s": ["<button phx-click=\"bump\">Click me!</button>"]
}
}
However, the above has an error in it. Can you spot it?
The representation of the conditional is mixed: it uses the statics from when @counter == 0
with the dynamics of the else
branch ("0" => "13"
). Effectively, there is no place to intersperse the new counter value because we have the old statics.
This is a quite tricky issue: because a dynamic expression, such as a conditional, may fully change the rendered template at any time, the rendered structure on the server may no longer match the structure on the client!
This is not only an issue with conditionals inside templates. The render_button(@counter)
can also use runtime behaviour to change its template. Imagine you have a really sassy button:
def render_button(@counter) do
case rem(@counter, 3) do
0 -> ~H"<button phx-click=\"bump\">Click me!</button>"
1 -> ~H"<button phx-click=\"bump\">I dare you to click me!</button>"
2 -> ~H"<button phx-click=\"bump\">Please don't click me!</button>"
end
end
All of the templates above have different statics and, failing to send the updated statics to the page will effectively render the wrong thing.
We can address this by adding template fingerprinting. Each %Rendered{}
structure has a fingerprint, computed at compile-time, which is a 64bit integer representing the MD5 of the template statics and dynamics.
Now, when the server first renders a template, the server stores the fingerprint of the whole rendering tree. For example, when we first render the template, the server will keep this:
{123, #=> this is the fingerprint of the root
%{0 =>
{456, %{}}, #=> this is the fingerprint of the if in the conditional
1 =>
{789, %{}}, #=> this is the fingerprint of one of the buttons
}}
The fingerprint tree is a tree of two-element tuples, the first element being the fingerprint, the second is a map with indices of nested rendered structures inside the dynamics.
Now, when there is an update on the page, we compare the %Rendered{}
structure with our fingerprint tree, if a fingerprint changes, it means that subtree has changed, and we must send both static and dynamic to the client! With these changes in place, once @counter
goes from 0 to 12, we will actually send this:
{
"0": {
"s": ["<p>counter: ", "</p>"],
"0": "12"
},
"1": {}
}
The fingerprint from the conditional code changed, so we send the new statics. The button fingerprint is the same, so nothing new there.
It is worth noting this is only possible because LiveView uses stateful WebSocket connections. This means LiveView can keep the fingerprint tree per WebSocket connection in memory, which is a very lightweight representation of the template the client currently has, and know exactly when the client needs a new template or not.
Without stateful connections (or without an efficient implementation of them), you must always render the statics, defeating the purpose of the optimization. Another option is to send the fingerprints to the client, and let the client request any fingerprint it is missing, however this adds latency as rendering updates may require multiple round-trips. None of those options were acceptable to us.
This is the foundation of our optimization work. Let’s keep on moving.
When we split statics from dynamics, the main insight is that there are parts of templates that never change. We can also extend this insight to the dynamic parts themselves!
Imagine you are building a Twitter clone in 15 minutes with LiveView. To render a tweet, you would most likely have this template:
<div class="tweet-author">
by <%= @author %>
</div>
<div class="tweet-body">
<%= @body %>
</div>
<div class="tweet-bottom">
Replies: <%= @replies_count %>
Retweets: <%= @retweets_count %>
Likes: <%= @likes_count %>
</div>
A highly engaging tweet would quickly rack up several replies, retweets, and likes. However, if we want to update these counters as they arrive, every reply, retweet, or like would require us to send this JSON (note it is already without the statics):
{
"0": "John Doe",
"1": "Whole body of the tweet...",
"2": "243",
"3": "1.5k",
"4": "2.3k"
}
We would send the tweet body, the username, over and over again, while they rarely change. The more content, the more duplication. While tweets are typically short, we may broadcast this thousands of times to thousands of connected users, quickly multiplying the costs.
Given LiveView is stateful, we can also track exactly when each of the assigns (i.e. @body
, @replies_count
, etc) change. In your LiveView, you would most likely have this code:
def handle_info(:new_reply, socket) do
{:noreply, update(socket, :replies_count, fn count -> count + 1 end)}
end
Once the socket is updated, we need to render a new page. However, we know the only data that changed was replies_count
. We use this information in our templates by slightly changing how we compile them. Broadly, we transform the tweet template to something akin to:
<div class="tweet-author">
by <%= if changed[:author], do: @author %>
</div>
<div class="tweet-body">
<%= if changed[:body], do: @body %>
</div>
<div class="tweet-bottom">
Replies: <%= if changed[:replies_count], do: @replies_count %>
Retweets: <%= if changed[:retweets_count], do: @retweets_count %>
Likes: <%= if changed[:likes_count], do: @likes_count %>
</div>
If only the replies count change, here is what we send to the browser:
{
"2": "244"
}
Now we run the same merging algorithm on the client (no changes required), build the new HTML, and render it again with morphdom
.
As you can see, by tracking how @assigns
are used in your templates and change overtime, LiveView automatically derives minimal data to be sent. This tracking is made trivial thanks to Elixir’s immutable data structures. With first-class immutability, it is not possible to change any of the tweet data behind the scenes. Instead, you must explicitly update data through the socket API, which allows LiveView to precisely track how data changes over time.
Achieving such tiny payloads in other stacks often require writing specialized code and/or carefully synchronizing data between client and server. With Phoenix LiveView, you get those for free!
If you have been keeping track, our dynamics may have two distinct values so far:
We have one more trick up our sleeve. In the rainbow example, we had to render 80 <div>
s to power our animation. This was done with a for-comprehension
:
<%= for bar <- @rainbows do %>
<div style="color: <%= bar.color %>; height: <%= bar.height %>px" />
<%= end %>
You could imagine that, if we have three bars, we would send this JSON to the client:
[
{
"s": ["<div style=\"color: \"", "; height: ", "px\" />"],
"0": "blue",
"1": "60"
},
{
"s": ["<div style=\"color: \"", "; height: ", "px\" />"],
"0": "orange",
"1": "50"
},
{
"s": ["<div style=\"color: \"", "; height: ", "px\" />"],
"0": "red",
"1": "40"
}
]
However, doing so would be quite silly! It is obvious that everything inside a comprehension will have the exact same statics. We optimized this by compiling for-comprehensions into a new struct called Phoenix.LiveView.Comprehension
. In a nutshell, the template above is compiled to:
%Phoenix.LiveView.Comprehension{
static: ["<div style=\"color: \"", "; height: ", "px\" />"],
dynamics: [
for bar <- @rainbows do
[bar.color, bar.height]
end
],
fingerprint: 798321321
}
And our JSON becomes this:
{
"s": ["<div style=\"color: \"", "; height: ", "px\" />"],
"d": [
{"0": "blue", "1": "60"},
{"0": "orange", "1": "50"},
{"0": "red", "1": "40"}
]
}
We introduced a new key, “d”, which the client must now detect. It is an indicator that we have a comprehension. Rendering comprehensions is quite trivial: for each entry in the “d” key, we intersperse its indexes with the static structure, and render each of them as we’d render a regular Rendered
structure.
One curious aspect is that this optimization also applies when navigating across distinct LiveViews. For example, imagine you are on a LiveView page which shows a single tweet. When you navigate to the main timeline with dozens of tweets, if both are LiveViews, it performs a live navigation. The live navigation reuses the existing WebSocket connection and does not require a new HTTP request, no need to redo authentication, etc. Instead, live navigation starts a new LiveView, computes its new rendered tree, and sends its JSON representation. If the tweet timeline uses comprehensions, instead of repeating the markup of every tweet, we only send the compact representation seen above!
In other words, even if you are using LiveView to mostly navigate across pages, without any of its dynamic features, your users will still benefit from a faster user experience. Of course, for the particular optimization of comprehensions, page compression algorithms would also give really good results. However, with LiveView, we apply these optimizations reliably when compiling your code, instead of spending additional CPU cycles at runtime.
Now is a good time to revisit our rainbow example! Here is what our initial template looked like:
<h1>Silky Smooth SSR</h1>
<p>Fast enough to power animations [on the server] at 60FPS</p>
<div>
<%= for bar <- @rainbows do %>
<div style="color: <%= bar.color %>; height: <%= bar.height %>px" />
<%= end %>
</div>
<p>The above animation is <%= @count %> <div> tags</p>
<p>...</p>
On every frame, 60 frames per second, without any of the optimizations we discussed, we would send this to the client:
<h1>Silky Smooth SSR</h1>
<p>Fast enough to power animations [on the server] at 60FPS</p>
<div>
<div style="color: blue; height: 40px" />
<div style="color: blue; height: 45px" />
<!-- 76 similar lines -->
<div style="color: red; height: 60px" />
<div style="color: red; height: 65px" />
</div>
<p>The above animation is 80 <div> tags</p>
<p>...</p>
As you can imagine, this is a lot of content, even for a relatively small example. With our optimizations, here is what we emit on every frame instead:
{
"0": {
"d": [
{"0": "blue", "1": "40"},
{"0": "blue", "1": "45"},
# 76 similar lines
{"0": "red", "1": "60"},
{"0": "red", "1": "65"},
]
}
}
At the end of the day, LiveView does not send “HTML over the wire”, it sends “diffs over the wire”, and it is easy to see how this can send less data by orders of magnitude on complex pages.
All optimizations I have described so far were actually part of the initial .leex
templates (Live Embedded Elixir) implementation, introduced back in December 2018, roughly 3 months after LiveView announcement.
We have a few more to go through.
As LiveView usage grew, developers felt the need for better abstractions to compartmentalize markup, state, and events. So LiveComponents were born.
Soon after, it became clear to us that LiveComponents opened up the way for new and interesting optimizations. The way a LiveComponent works is that you define a separate module, with its own state and code:
defmodule TweetComponent do
use Phoenix.LiveComponent
def render(assigns) do
~H"""
<div class="tweet">
<div class="tweet-author">
by <%= @tweet.author %>
</div>
...
</div>
"""
end
end
Once defined, you render them like this:
Here is a tweet: <.live_component module={TweetComponent} id={tweet.id} tweet={tweet} />
And here is what is sent over the wire:
{
"c": {
"1": {
"s": ["<div class=\"tweet\">\n <div class...", ...],
"0": "John Doe",
...
}
},
"s": ["Here is your tweet: ", ""],
"0": 1
}
Instead of nesting the component inside the rendering tree, we give a unique ID (which we call CID) to each rendered component and we return the component under a special key called “c”. In this case, the CID of our rendered tweet is 1.
Now, wherever we are meant to inject the contents of the LiveComponent, we will see an integer representing its CID. For example, the before-last line of the JSON has "0": 1
. This means the dynamic at index 0 must render the component with CID=1 in its place.
By placing LiveComponents outside of the rendering tree, we gain many new properties.
So far, whenever anything changed on the page, we would merge the diffs, build the whole HTML of the page, and send it to morphdom
to parse and patch it. With LiveComponents, if only LiveComponents change, instead of patching the whole page, we locate the LiveComponents on the page and update them directly. Furthermore, when patching the whole page, if we find a LiveComponent and it did not change, we tell morphdom
to skip it.
In order to do so, we need to able to efficiently locate LiveComponents on the page. We had different implementations of this mechanism over the last years, so I will describe the last iteration, which is simpler and more robust.
At the beginning, LiveViews rendered regular .eex
(Embedded Elixir) templates. Then we wanted to separate static from dynamic and perform changing tracking, so we introduce .leex
(Live Embedded Elixir). However, it quickly became clear .eex
nor .leex
were not expressive enough for writing rich HTML templates: all they do is text substitution. Meanwhile, users of JavaScript frameworks were enjoying the benefits of more expressive templating languages with custom components, slots, and more.
Not only that, because LiveView relies on morphdom
, if you have an invalid template (for example you forgot to close a tag), the browser would attempt to render the template anyway, which mixed with morphdom
‘s patching, would change the page in ways that made it often hard to find the simplest of bugs.
To address all of the needs above, Marlus Saraiva contributed .heex
templates (HTML + EEx) to LiveView. It is EEx with semantic understanding of HTML. With HEEx, we enforce LiveComponents
have a single root tag, as seen in our TweetComponent
above. And then, when rendering the LiveComponent
in browser, we automatically annotate its root tag with a data-phx-cid
attribute:
<div data-phx-cid="1" class="tweet">
<div class="tweet-author">
by John Doe
</div>
...
</div>
Now finding, patching, or skipping updates on LiveComponents is extremely easy!
Before moving on to our next optimization, there is another cool property of components. For example, imagine you have this page:
<h1>Timeline</h1>
<%= for tweet <- @tweets do %>
<.live_component module={TweetComponent} id={tweet.id} tweet={tweet} />
<% end %>
If you are listing 5 tweets on a page, the data over the wire will be this:
{
"c": {
"1": {...},
"2": {...},
"3": {...},
"4": {...},
"5": {...}
},
"s": ["<h1>Timeline</h1>\n\n", ""],
"0": {
"s": ["", ""],
"d": [[1], [2], [3], [4], [5]]
}
}
In other words, we render 5 entries inside a comprehension. Each of these entries points to their CID, which we can find under the “c” key. Now, imagine you also have a button that allows you to sort the timeline, in this case, reversing the order of the tweets. Can you guess which diff will be sent over the wire?
Here it is:
{
"0": {"d": [[5], [4], [3], [2], [1]]}
}
And, when applying the patch, LiveView knows those components did not change, so it will simply move them around the page, without reparsing their HTML or recreating DOM elements!
The fact LiveView will automatically build this tiny payload, without requiring any additional instructions from developers - besides well-organizing their code with LiveComponent
- is mind-blowingly awesome. And, if you need fine-grained precision over this, you can always use streams with explicit insert/delete operations, which we won’t cover today.
There is another optimization specific to LiveComponents worth discussing. In the previous section, we rendered 5 tweets, each as a LiveComponent.
When we first introduced LiveComponents, here is how they looked like:
{
"c": {
"1": {
"s": ["<div class=\"tweet\">\n <div class...", ...],
"0": "John Doe",
...
},
"2": {
"s": ["<div class=\"tweet\">\n <div class...", ...],
"0": "Jane Doe",
...
},
"3": {
"s": ["<div class=\"tweet\">\n <div class...", ...],
"0": "Joe Armstrong",
...
},
...
}
}
As you can see, we are sending the same statics over and over again! We solved a similar problem when optimizing comprehensions and, this time around, we can do something even better.
Given we keep fingerprint trees on the server, when we render a LiveComponent, we check if we have already rendered another component with the same name, such as TweetComponent
. If yes, and the fingerprint of the component we are currently rendering matches the fingerprint of the one previously rendered, then we annotate the component to reuse the statics.
This is done by setting the "s"
key of the JSON to an integer. However, there is a trick: we first attempt to find a matching fingerprint of a component that we already sent to the client. If there is one, we avoid sending the statics altogether by setting the "s"
key to -CID
. Otherwise, we set the key to the CID
of a component that is being sent in the same JSON response.
Overall, on the first render with five tweets, we would get this:
{
"c": {
"1": {
"s": ["<div class=\"tweet\">\n <div class...", ...],
"0": "John Doe",
...
},
"2": {"s": 1, "0": "Jane Doe", ...},
"3": {"s": 1, "0": "Joe Armstrong", ...},
...
}
}
Now, whenever the “s” key is an integer, the client must copy the statics of the matching component.
If you later push another tweet to the client, we skip sending the statics altogether, since we know the client already has them. The payload would look like this:
{
"c": {
"6": {"s": -1, "0": "Jane Doe", ...}
}
}
You may wonder why the positive/negative CID. Because a component may be updated at any time, include its rendering tree, we could have a payload like this:
{
"c": {
"1": {
"s": ["<div class=\"mega-tweet\">\n <div class...", ...],
"0": "John Doe"
},
"6": {"s": -1, "0": "Jane Doe", ...}
}
}
As you can see, the component with CID=1
is updating the statics on the page. Therefore, which statics should we use for CID=6
? The sign of the integer tells us if we should use the old (negative) or new (positive) version. This is also why, since the beginning of the article, we started counting CIDs from 1. The more you know!
Finally, as the title of this optimization says, we are not only sharing the immediate statics of the component, but the whole component tree.
After a trip down the memory lane, we are finally ready to discuss the optimization we recently added to LiveView. This optimization uses several techniques previously discussed but, unlike them, it benefits the client exclusively. The initial idea for this optimization came to life after watching one of Fireship videos on client-side frameworks (unfortunately I can no longer recall which one).
We know the JSON we send to the client is a tree of rendered structures. When we talked about nesting, we showed this example:
<%= if @counter == 0 do %>
<p>Nobody clicked the button yet.</p>
<% else %>
<p>counter: <%= @counter %></p>
<% end %>
<%= render_button(@counter) %>
In an actual page, we may have several conditionals, each branch with their rendered structs. Each function call or each component that we call in the template, may have their own subtrees too. We also know that, if part of the template does not change, the server won’t send an update for it.
Let’s slightly change the template above to show this in practice:
<p>Hello, <%= @username %></p>
<%= if @counter == 0 do %>
<p>Nobody clicked the button yet.</p>
<% else %>
<p>counter: <%= @counter %></p>
<% end %>
The first time we render it, assuming @counter
is 13
and @username
is "John Doe"
, we will get this:
{
"s": ["<p>Hello, ", "</p>\n\n", ""],
"0": "John Doe",
"1": {
"s": ["<p>counter: ", "</p>"],
"0": "13"
}
}
Now, if only @username
changes, this is the diff we get:
{
"0": "Jane Doe"
}
In other words, by not sending "1": ...
, the server is telling us that a whole subtree did not change. If the subtree did not change, could we perhaps avoid building all of its HTML and stop asking morphdom
to parse and morph something that, we know for certain, stays the same?
However, we cannot simply remove the element from the HTML. We still need to track its position in the overall page. Effectively, what we need to do, is to find a way to uniquely identify the subtree and render only its root tag.
Wait a second, this sounds suspiciously close to what we did LiveComponents?
If the server can tell us which rendered structure has a single root tag (which the server knows, thanks to HEEx templates), then we can use this information to annotate DOM elements with unique IDs. And if the elements represented by unique IDs did not change, we can tell morphdom
to skip them.
Alright, let’s see how this is done in practice. When we first render the page above, once again assuming @counter
is 13
and @username
is "John Doe"
, this is the JSON we get:
{
"s": ["<p>Hello, ", "</p>\n\n", ""],
"0": "John Doe",
"1": {
"r": 1,
"s": ["<p>counter: ", "</p>"],
"0": "13"
}
}
The only difference is a new "r": 1
annotation, which informs us that the subtree is wrapped by a single root element. Given this is the initial render, we can build its HTML directly, without morphdom
:
<p>Hello, John Doe</p>
<p data-phx-magic-id="1">counter: 13</p>
Due to the root annotation, we slightly modified how the root tag is rendered, giving it a data-phx-magic-id
. Each new root tag gets a new auto-incrementing “magic-id”.
Now, when the username updates, since the subtree did not change, here is what we will give to morphdom
:
<p>Hello, John Doe</p>
<p data-phx-magic-id="1" data-phx-skip></p>
We only render the root tag, without any of its contents, nor any of its other attributes. We then instruct morphdom
to, when it finds an element with a matching “magic-id”, it should ignore the update and keep the previous element as is. There is no need to build, parse, or traverse its DOM structure!
This optimization applies every time a rendered structure has a root tag and it does not change. In the example above, the benefits seem to be minimal, but in practice this optimization triggers all the time. For example, if you look at the CoreComponents generated by Phoenix, you can see all default function components, the amount of markup they have, all wrapped in a single root tag. All of them are now skipped by the client whenever they don’t change.
We tried this optimization in LiveBeats, TodoTrek, and Livebook and we saw 5-10x improvements on full patch time, as measured by liveSocket.enableProfiling()
(call that in your browser console to measure for yourself). Community members have reported gains between 3-30x!
And, once again, LiveView developers don’t have to modify a single line of code to benefit from this. We literally had to change only a single line of code on LiveView server code to make it possible. All thanks to all of the infrastructure and optimizations we built in these last 5 years.
Amazing!
This was quite a long post, but I hope it highlights and documents all the engineering work put into LiveView’s rendering stack. From a debugging point of view, you can invoke liveSocket.enableProfiling()
and liveSocket.enableDebug()
in your browser console to get more visibility into the optimizations we discussed today.
The combination of the Erlang VM, immutable data structures, and LiveView’s unique integration between the server and the client, yields massive benefits on latency, bandwidth, and client rendering, which put together are hard - and sometimes even impossible - to replicate elsewhere.
Personally speaking, I am really proud of this work. It leverages data-structures and compiler techniques that go beyond the developer experience and directly translates to better user experiences.
I have also enjoyed the countless hours and conversations I had with Chris McCord on these topics, alongside the great memories we built along the way (and thank you for writing all of the JavaScript, so I don’t have to!).
Give Phoenix a try to experience LiveView and all of its performance benefits. Maybe someday you will have a new optimization (without having to modify a single line of code)!
]]>As we will see, this is a transitional period of our Machine Learning effort. As our Data and Machine Learning foundations become solid and stable, we are now seeing an increased focus on the scalability, integration, and productivity of our tools, many of them guided by production feedback.
Let’s get started!
Nx is the project that started it all. It plays a similar role as Numpy within the Elixir community, with support for just-in-time compilation to both CPUs and GPUs. With v0.6, further improve its abilities to parallelize and stream data. Let’s start with some context.
The Nx library comes with its own tensor serving abstraction, called Nx.Serving
, allowing developers to serve both neural networks and traditional machine learning models within a few lines of code.
When you are running code on the GPU, you often want to process entries in parallel for performance. Instead of classifying one image, you want to classify 8 at once. Rather than summarizing one text, you want to summarize 16 simultaneously, and so on. To allow this, Nx.Serving
automatically performs batching of requests. Nx.Serving
is also capable of distributing requests across multiple nodes and multiple GPUs with a single line of code change, something we call “Distributed² Serving”.
However, the features above are already 5 months old. :) In the last month or so, Nx.Serving
added two notable features.
The first one is batch keys. When working with text, we often need to pad the texts. Imagine you want to summarize different texts, one has 100 characters, the other 500 characters, and the other 1000 characters. Of course, you could always pad the text to the largest one, but ideally you want to batch small texts with smaller ones, and larger with large ones. Batch keys allow you to effectively define different queues, based on the text size. You can see the discussion that led to the implementation of this feature for charts and insights.
We also added streaming support to Nx.Serving
, of both inputs and outputs. When you use ChatGPT, have you noticed how the response is streamed as it arrives? That’s output streaming and is now supported out-of-the-box in Nx. We will see a practical usage of these features when talking about the Bumblebee project down below.
Finally, the other major feature in Nx is auto-vectorization. Remember when I said that, when working with the GPU, we want to process entries in parallel? However, in order to classify or summarize 32 images/texts at once, you must write your code in a way that can handle your input in batches. With Nx v0.6, you can write your code in a way that classifies or manipulates a single image, and we automatically make it work on a batch of images through a process called vectorization (as in, we are converting a scalar into a vector). Not only that, vectorization often allows developers to simplify existing complex code, as shown here and here.
In summary, Nx v0.6 comes with large improvements on writing and deploying numerical code efficiently.
Another key project is Explorer, which provides series and dataframes for Elixir. While playing a similar role as Pandas, its biggest inspiration is Tidyverse’s dplyr
.
The latest versions of Explorer do a tremendous job in the integration department. You can now access .csv
, .ndjson
, .parquet
and other formats directly from S3, URLs, and other sources. In particular, for columnar formats such as Parquet
, you can lazily stream data in and out of S3 bucket, tailored to your queries.
Latest Explorer also features integration with ADBC, a database connectivity specification based on the Apache Arrow columnar format. This allows you to query databases such as PostgreSQL, SQLite3, Snowflake, and others, and directly load the results into your dataframe. Shout out to Cocoa Xu for implementing the low-level ADBC bindings for Elixir.
Not only that, Explorer provides zero-copy integration with Nx. This means you can load external data into your dataframes and send them to the GPU trivially. The only times the data will be copied is when crossing the boundaries from IO to memory and then from memory to GPU.
In summary, Explorer v0.7 brings elegant querying and efficient data transfers across a huge variety of projects and needs.
Bumblebee brings pre-trained models to Elixir, inspired by 🤗 Transformers.
Bumblebee v0.4 brings support for both GPT-NeoX and LLaMA models, including LLaMA 2, as well as built-in text and image embedding servings. It also supports the new .safetensors
format from Hugging Face.
Furthermore, Bumblebee builds on top of the latest Nx features to add streaming to several of its text-generation models.
The Whisper model, which provides speech-to-text, was the one to benefit the most from Nx advancements. Originally, Whisper can only transcribe up to 30 seconds of audio, leaving it up to the user to break large files into smaller chunks.
Now, thanks to Jonatan Kłosko’s work, a Whisper-serving can automatically split and stream audio chunks, and results are streamed as they arrive, now also including timestamps. Not only that, once a large file is split, its different chunks are processed in parallel, resulting in excellent speech-to-text performance, specially on the GPU. We are working on some exciting demos for Livebook’s upcoming launch week, meanwhile here is a sneak peek.
While deep learning was a major driver behind Nx, Mateusz Słuszniak has been focused on traditional machine learning techniques with the Scholar project (akin to scikit-learn
).
In the latest release, Scholar got several new models, such as affinity propagation, t-SNE, model selection techniques (cross validation, grid search, k-folds, etc), DBSCAN, and more.
Since Scholar is built on top of Nx, it means all models also run on the GPU and can be deployed using Nx.Serving
.
Sean Moriarity has published the much awaited Machine Learning in Elixir book, which is an excellent way to get started with Machine Learning in Elixir.
Although they were released back in Q2 2023, it is worth calling out Andrés Alejos’ work on EXGBoost (which provides distributed gradient boosting) and Mockingjay. The latter is able to compile decision trees into tensor operations, bringing Nx.Serving
and GPU support to decision trees. Checkout his talk at ElixirConf US 2023 to learn more.
Paulo Valente, from DockYard, has released the first version of Rein, a library that brings reinforcement learning tooling to Nx.
Panagiotis Nezis has published Tucan, a high-level plotting library on top of Vega-Lite, similar to matplotlib
and seaborn
. The project deserves special highlight for its excellent documentation, which includes plenty of examples and plots.
Finally, two weeks ago, Mark Ericksen released his port of LangChain for Elixir. At their core, LLM Agents have to perform tasks and communicate with services. Given the Erlang VM roots in telecomunications, Elixir is an excellent platform for carrying these out, efficiently and concurrently. Check out Charlie Holtz talk on Building AI Apps with Elixir, which explores these concepts with insightful and entertaining demos.
There is still a lot I have not mentioned, including many other Machine Learning talks at ElixirConf US 2023. We invite you to dig deeper, discover, and learn more!
For the next steps, optimization areas are likely to gain further attention. We want to bring first-class quantization, MLIR support, optimizations to pre-trained models (such as Flash Attention), and more. We also hope to further streamline the experience for fine-tuning existing models in the future.
The future is bright for Elixir and Machine Learning, enjoy!
]]>In other words, Elixir has this:
some_fun = fn x, y -> x + y end
some_fun.(1, 2)
#=> 3
Note the dot between the variable and the arguments. The main reason for this choice is because functions in Elixir have to be identified by name and arity (the number of arguments it receives).
In order to understand why the dot is required, let’s consider a fictional language that runs on the Erlang VM. Functions in the Erlang VM are identified by their name and their arity. In other words, we don’t have functions that receive a variadic number of arguments, they are always fixed.
Consequently, the following is not possible in Elixir:
plus = fn
() -> 0
(a, b) -> a + b
end
plus() #=> 0
plus(1, 2) #=> 3
But let’s imagine for a second this actually worked. Our functions have multiple arities and we don’t need a dot to call them. Now let’s proceed and define a function, called sum
, that adds all elements in a list. Our initial implementation could look like this:
def sum(list) do
plus = fn
() -> 0
(a, b) -> a + b
end
Enum.reduce(list, plus(), fn x, y -> plus(x, y) end)
end
Notice how I am calling plus
with a variadic number of arguments: first to get the initial reduce
argument and then to reduce each element. Calling sum([1, 2, 3])
would return 6.
Let’s keep moving forward with this fictional language. We figure out the plus
implementation is actually quite useful and decide to move it to its own function:
def plus(), do: 0
def plus(a, b), do: a + b
def sum(list) do
Enum.reduce(list, plus(), fn x, y -> plus(x, y) end)
end
The refactoring was a success as we just moved the definition out and everything still works. Note we didn’t have to change the actual sum
logic, as we can use plus()
to call a function stored in a variable or a function defined in the same module/context.
This is how languages like Clojure and Scheme behave. You could even go as far as doing something akin to:
def plus(), do: 0
def plus(a, b), do: a + b
def sum(list) do
# A one-off plus implementation
plus = fn
() -> 1
(a, b) -> a + b
end
Enum.reduce(list, plus(), fn x, y -> plus(x, y) end)
end
And now sum([1, 2, 3])
will return 7 due to the wrong initial value. In the example above, we introduced a variable plus
and it shadowed the call to the plus
function defined in the module. In other words, identifiers in those languages refer to both variables and functions and they can be used interchangeably. You know if a variable or a function will be used by analyzing the scope.
These languages are similar to Lisp-1 languages because there is a single namespace for both variables and function names. Other languages, such as Haskell, also have a single namespace, but they do not support overloading on the arity.
In order to understand the limitation within Elixir, let’s try to do the same change. Imagine we have this code, which is valid Elixir:
def plus(), do: 0
def plus(a, b), do: a + b
def sum(list) do
Enum.reduce(list, plus(), fn x, y -> plus(x, y) end)
end
And we want to introduce a one-off sum implementation without changing the actual sum
call, as we did in the previous section:
def sum(list) do
plus = ???
Enum.reduce(list, plus(), fn x, y -> plus(x, y) end)
end
Unfortunately, there is no possible implementation of ???
in Elixir that makes the code above work. That’s because anonymous functions in Elixir only have a single arity… so we can implement plus()
or plus(x, y)
but not both. In other words, because functions in the Erlang VM are identified by name and arity, such that definitions with the same name and different arities are effectively different functions, we can’t fully leverage the benefits of Lisp-1 languages.
With the context above, I had to answer the following question when designing Elixir: should anonymous functions have a dot when invoked or not?
We could skip the dot when calling anonymous function in Elixir but I believe doing so would be a net negative. If plus()
allowed invoking a module function and calling a function in a variable, we would introduce the ambiguity found in Lisp-1 languages but without its upsides.
Therefore, Elixir is a Lisp-2 language, where variables and function names live in two distinct namespaces. That’s ultimately the difference between Lisp-1 and Lisp-2, the number of “namespaces” they offer. Since they live in different namespaces, we need distinct function call syntaxes for each namespace. In turn, this comes with benefits for code readability and maintainability. Let’s take a look at our sample code again but with a different perspective:
def sum(list) do
plus = ???
Enum.reduce(list, plus(), fn x, y -> plus(x, y) end)
end
In Elixir, it is not possible to introduce a variable named plus
that will change the behaviour of the plus(...)
function calls right below it. This eliminates the chance of naming conflicts and can be a comforting guarantee when reading and writing code! On the other hand, Lisp-1 languages require you to analyze what is in scope in order to determine what is the exact code that plus(...)
will invoke. Which approach you prefer, expressiveness vs clarity, is the crux of the Lisp-1 vs Lisp-2 debate.
If we didn’t have the dot when calling anonymous functions in Elixir, we would have the worst of both worlds: we would lose clarity but be unable to fully leverage the expressiveness found in Lisp-1 languages.
At this point, developers familiar with Erlang may point out that the dot is not required in Erlang. That’s because variables and function names in Erlang have different syntaxes, which puts them in distinct namespaces by definition. Variables start in uppercase, while function names in lowercase. Here is how an anonymous function in Erlang looks like:
Var = fun(X, Y) -> X + Y end,
Var(1, 2).
Similarly, Erlang has the same guarantees as Elixir in that it is not possible to introduce a variable that affects function calls happening within the same function - as the syntaxes differ:
plus() -> 0.
plus(A, B) -> A + B.
sum(List) ->
Plus = ???, % no such thing
lists:foldl(fun(X, Y) -> plus(x, y) end, plus(), Plus).
Similarly, to pass a module function as an anonymous function, explicit conversion is required (as in Lisp-2 languages):
Var = fun plus/2,
Var(1, 2).
Which is the same as in Elixir:
var = &plus/2
var.(1, 2)
In other words, the languages semantics are precisely the same. They simply use different syntactical constructs to disambiguate. The fact Elixir uses the dot and Erlang does not, does not add new capabilities to any of them. Other languages may not require the dot when calling anonymous functions either, but they may still use different syntaxes when calling those different namespaces.
Does this mean all languages running on the Erlang VM need to have those exact same semantics? Not necessarily. A statically typed language, for example, could support multiple arities in the same anonymous function and track how the different arities are used statically to still emit efficient code. Or even forbid multiple arities for the same name altogether!
I hope this clarifies one of the most asked parts about the Elixir syntax and answers “Why the dot?”.
Truth be told, even if Elixir could have a single namespace for variables and funcfions, I would still keep the dot when calling anonymous functions, as the benefits if offers for those reading code are more important than flexibility in specific idioms.
TL;DR: given the lack of Tabs vs Spaces discussions nowadays, I resurface the Lisp-1 vs Lisp-2 debate to keep programming forums active.
]]>For the past few months, Hugo Baraúna and I (Alex Koutmos) have been working on a new book for Elixir called Elixir Patterns. When we started brainstorming about what topics we should cover in the book and what the layout should be, Hugo had the brilliant idea of also creating Livebook documents to augment what was being covered in the book. Prior to that, I had only used Livebook a handful of times for some small PoC type things. While my impressions of Livebook were positive from my initial experimentation, I had no idea how amazing a tool it was until we started writing Elixir Patterns.
In fact, since we started writing the book, I now find myself reaching for Livebook more and more as a tool for prototyping and experimentation. In addition, it has also become a great tool for exploring my production database similar to how Mark Erickson describes in his blog post.
It’s amazing to see how the same tool can cover such a wide array of use cases ranging from education to business intelligence. I think this is largely in part to the amazing developer experience (or DX for short) that you get when you use Elixir and its ecosystem. Let’s unpack the topic of DX in Elixir before discussing how Livebook fits into the larger picture.
While I may be a little biased given I have been working closely with Elixir for the last 6 years, I believe that Elixir has one of the best developer experiences out there (the 2022 Stack Overflow Most loved, dreaded, and wanted also backs up this claim 😉).
Everything in the language and ecosystem is so beautifully connected that it makes development nothing short of a pleasure. For example, the same tooling that generates the documentation for the language itself, is also the same tooling that generates the documentation for Elixir libraries available on Hex.pm. This means that any time you are exploring a new library or framework, everything feels familiar and accessible. This consistency and ease-of-use extends even to the Elixir interactive shell where you can explore the documentation of your project libraries, the Elixir language and even the Erlang standard library right from your IEx session.
The fact that so much tooling is accessible to you right out of the box enables you to really focus on completing your task at hand. When your programming language, runtime and tooling support you in your endeavours, you feel like you have superpowers. So how does Livebook fit into this theme of empowering the developer? I am glad you asked 😄.
According to the tag line on the Livebook homepage, Livebook allows you to “write interactive & collaborative code notebooks in Elixir“. We’ll put aside the “collaborative” portion of that for a moment and focus on the “interactive” bit. By “interactive”, what Livebook effectively gives you is a fully fledged Elixir development environment, right in the browser. You can access the same documentation that you can from Hex or IEx right in the browser, you have code completion, you can install libraries from Hex on the fly, and you can create robust documents using markdown, Mermaid.js, and graphics with VegaLite (using Kino and Kino VegaLite).
You may be wondering how hard all of this is to set up and run on your machine? In true Elixir
fashion, setting up Livebook could not be simpler. If you are already using Elixir and have it set
up on your machine, all you need to do is run mix escript.install hex livebook
and then start the
Livebook server with livebook server
from your CLI. If you are new to Elixir and do not have the
runtime set up on your machine, the Livebook team has just announced Livebook Desktop.
Just download the Livebook app on your machine and you are off to the races.
One example of how we use Livebook in Elixir Patterns is when we
talk about implementing an HTTP stress tester using Task.async_stream/3
. By leveraging Kino,
we were able to create an interactive HTTP stress tester where you can configure the parameters
of the stress test and plot out the results. This can help visualize the effects of your code
changes like in the example below where test run 1
was run with a concurrency of 1
and test
run 2
was run with a concurrency of 10
with a total number of requests being 100
across
both tests. It is very easy to see how with the increased :max_concurrency
value passed to
Task.async_stream/3
, the test was able to execute in less time overall:
In addition, Livebook and the libraries in the livebook-dev GitHub organization are under active development and there are great features being released regularly to enhance your development experience. A few such features that I am particularly excited about (partly because I worked on them 😉) are the ability to visualize application/supervision trees, and trace process messages.
In the spirit of enabling the user, these visualization tools are useful for when you need to understand how your application (or perhaps a library that you are using) is organizing its processes. In the example below, I have several layers of supervisors each with a couple processes and links between some of the supervisors and processes:
Another useful tool that I added to Kino (thanks to help from José Valim and Jonatan Kłosko) was
the ability to trace messages that are sent between processes. In the example below, a TaskSupervisor
(#PID<0.460.0>
) spawns two task processes (#PID<0.461.0>
and #PID<0.462.0>
) which then proceed
to read from a named Agent process called SecretAgent
.
I believe that tools such as these will help future developers get better acquainted with the Elixir programming language and the amazing runtime that is the Erlang Virtual Machine. Whether you are a seasoned Elixir veteran, or just starting out, having tools like these are a great way to raise the DX bar. With that being said, let’s take Livebook for a test drive and see how you can create visuals such as these!
Under the hood, Kino uses Mermaid.js in order to render
diagrams and visualizations. You can create your own Mermaid.js diagrams by creating markdown
code blocks that are annotated with mermaid
. Let’s see how we can use this in order to render
a graph constructed with the Erlang :digraph
module.
We’ll start off by creating a new graph and also defining the vertices of the graph:
# Create new graph instance
graph = :digraph.new([:acyclic])
# Add vertices
:digraph.add_vertex(graph, :a, "Start")
:digraph.add_vertex(graph, :b, "Choice 1")
:digraph.add_vertex(graph, :c, "Choice 2")
:digraph.add_vertex(graph, :d, "End")
After you have defined the vertices for your graph, you can then add edges connecting the vertices in the graph:
:digraph.add_edge(graph, :a, :b)
:digraph.add_edge(graph, :a, :c)
:digraph.add_edge(graph, :b, :d)
:digraph.add_edge(graph, :c, :d)
After adding the edges to your graph, you can fetch all of the edges in the graph data structure and combine the edges in a format that Mermaid.js can understand in order to render the graph:
mermaid_edges =
graph
|> :digraph.edges() # Get all of the edges in the graph
|> Enum.map_join("\n", fn edge ->
{_, vertex_1, vertex_2, _} = :digraph.edge(graph, edge) # Get the edge vertices
{_, vertex_1_name} = :digraph.vertex(graph, vertex_1) # Get the label for the first vertex
{_, vertex_2_name} = :digraph.vertex(graph, vertex_2) # Get the label for the second vertex
# Mermaid.js format for graph edges: VERTEX_1_ID[VERTEX_1_label] --> VERTEX_2_ID[VERTEX_2_label]
"#{vertex_1}[#{vertex_1_name}] --> #{vertex_2}[#{vertex_2_name}];"
end)
# Delete the graph instance so you don't leak ETS tables :)
:digraph.delete(graph)
Finally, once you have the Mermaid.js edge definitions, all you have to do is wrap them in a
simple markdown block and pass the markdown to Kino.Markdown.new/1
:
Kino.Markdown.new("""
```mermaid
graph TD;
#{mermaid_edges}
```
""")
And with that, you can now run your Livebook code block and you’ll have a beautiful diagram like the one below:
All in all, I think Livebook is an excellent tool and a huge value-add to the Elixir ecosystem.
Whether you need it for proof-of-concept work, learning, or business intelligence, Livebook is
more than up to the task. Be sure to checkout our Elixir Patterns
book if you are interested in learning about recipes and patterns specific to Elixir/OTP. You can download the PDF with the first two chapters as well as the accompanying Livebooks for free! Those chapters cover the Erlang standard library and learn about useful tools like the :crypto
, :digraph
, :ets
and :persistent_term
modules to name a few.
Lastly, I’d like to say a huge THANK YOU to all of the maintainers of Livebook and the supporting libraries! A lot of work went into all these tools and your efforts are much appreciated!
]]>Rustler was created a few years ago by Hans Elias J., and it’s a project that aims to be a bridge between Rust and Elixir/Erlang. It makes really easy to develop packages - there are around 90 of them using Rustler on Hex.pm while I’m writting this - but there are some challenges with actually using them. First of all, Rustler-based packages require Rust toolchain to be installed to compile native code. Secondly, we need to actually compile the native code which for some projects can be really time and resources consuming.
This is where Rustler Precompiled comes in.
Rustler Precompiled is a project that enables the usage of precompiled NIFs. Precompiled NIFs are then downloaded from the internet and validated using checksums. This way we can precompile our Rustler projects in the CI and download them in the user machine securely. This can bring a huge benefit in compilation time to several projects. Since no Rust code is compiled, the only requirement is an internet connection for downloading and compiling your dependencies. And if you’d rather always build from scratch, due to security concerns, you can always bypass RustlerPrecompiled and force a local build.
For example, the html5ever
package takes 22 seconds to compile,
but only 2 seconds to download if precompiled.
The difference is bigger for larger projects like the Explorer:
it takes 2 min and 29 seconds to compile the project from scratch and only 3.3 seconds when using a precompiled
version.
The tests were made using my Dell XPS with an Intel® Core™ i7-1065G7 CPU (4 cores and 8 threads)
and the time
command with dependencies already compiled (mix deps.compile
before).
Almost the entire work happens in the CI server, where the NIF project in your library will be compiled to several targets. A “target” is combination of NIF version, operating system, CPU architecture, the vendor or manufacturer, and sometimes the ABI - usually describing the tool used to compile that software.
To build your NIF you will need a special tool named cross
.
This is a great tool that reduces the setup needed for “cross-compiling” to different targets. In
the background cross
will try to use the default cross-compilation abilities from Rust, and when
that is not possible, it will run a Docker container compiling for that given target.
In the end the build matrix of your project will look like this:
matrix:
job:
# NIF version 2.16
- { target: arm-unknown-linux-gnueabihf , os: ubuntu-20.04 , nif: "2.16", use-cross: true }
- { target: aarch64-unknown-linux-gnu , os: ubuntu-20.04 , nif: "2.16", use-cross: true }
- { target: aarch64-apple-darwin , os: macos-10.15 , nif: "2.16" }
- { target: x86_64-apple-darwin , os: macos-10.15 , nif: "2.16" }
- { target: x86_64-unknown-linux-gnu , os: ubuntu-20.04 , nif: "2.16" }
- { target: x86_64-unknown-linux-musl , os: ubuntu-20.04 , nif: "2.16", use-cross: true }
- { target: x86_64-pc-windows-gnu , os: windows-2019 , nif: "2.16" }
- { target: x86_64-pc-windows-msvc , os: windows-2019 , nif: "2.16" }
# NIF version 2.15
- { target: arm-unknown-linux-gnueabihf , os: ubuntu-20.04 , nif: "2.15", use-cross: true }
- { target: aarch64-unknown-linux-gnu , os: ubuntu-20.04 , nif: "2.15", use-cross: true }
- { target: aarch64-apple-darwin , os: macos-10.15 , nif: "2.15" }
- { target: x86_64-apple-darwin , os: macos-10.15 , nif: "2.15" }
- { target: x86_64-unknown-linux-gnu , os: ubuntu-20.04 , nif: "2.15" }
- { target: x86_64-unknown-linux-musl , os: ubuntu-20.04 , nif: "2.15", use-cross: true }
- { target: x86_64-pc-windows-gnu , os: windows-2019 , nif: "2.15" }
- { target: x86_64-pc-windows-msvc , os: windows-2019 , nif: "2.15" }
In the example, I’m assuming you are using GitHub Actions. Notice that we have 8 targets for each NIF version, which will produce 16 lib binaries.
“When this is going to build”, you may be asking. It is going to build on each tag pushed, just right before the publishing of your package to Hex.pm. This is really important, since we need to have the files ready to generate the checksum file. This file is meant to guarantee that no one replaces a published NIF with a malicious version.
In order to check for the integrity of the NIF, the checksum file will be published with your package. It is not necessary to do the versioning of this file, though.
Rustler Precompiled has a specific audience: package developers. So I wrote a detailed guide for publishing packages in the Rustler Precompiled docs.
Like with Rustler, the NIF module is usually simple. Taking our example app, it looks like this:
defmodule RustlerPrecompilationExample.Native do
version = Mix.Project.config()[:version]
use RustlerPrecompiled,
otp_app: :rustler_precompilation_example,
crate: "example",
base_url:
"https://github.com/philss/rustler_precompilation_example/releases/download/v#{version}",
force_build: System.get_env("RUSTLER_PRECOMPILATION_EXAMPLE_BUILD") in ["1", "true"],
version: version
# When your NIF is loaded, it will replace this function.
def add(_a, _b), do: :erlang.nif_error(:nif_not_loaded)
end
This is similar to Rustler
API, but with addition of three important options:
:base_url
- the place where the NIF will be downloaded from. In this example it uses the GitHub
releases schema. If using the version 0.3.0
it is going to download the files from the
release list.
:force_build
- a way to force the build by falling back to Rustler
. In this case we are
reading the environment variable RUSTLER_PRECOMPILATION_EXAMPLE_BUILD
. There is also an
application environment that can be set, so you don’t need to configure in the module:
config :rustler_precompiled, :force_build, your_otp_app: true
Another important thing to mention is that development pre release versions are always forced to compile.
If you have a 0.1.0-dev
version the project will always fallback to Rustler
.
:version
- finally we need to specify the version of the package in use. This version is needed
both for the file name resolution and to define if it’s a pre-release.
Now we can safely use precompiled NIFs written with Rustler in our packages. This can increase the adoption of tools like the Explorer that uses Polars underneath.
It makes the publishing of packages harder, but the usage of those packages is much easier since it won’t require the dependencies needed for Rust code compilation.
There is also a bonus: Rustler Precompiled is prepared for Nerves projects! It was tested in Raspberry Pi machines thanks to Frank Hunleth of the Nerves core team.
Finally, I want to thank Hans Elias J., Magnus and Benedikt Reinartz of the Rustler core team for the support and code reviews. And also, thank José Valim for the guidance and code reviews.
Happy coding!
]]>We are glad to announce Nx (Numerical Elixir) v0.1 has been released!
For those unfamiliar, Elixir is a dynamic, functional language for building scalable and maintainable applications. Elixir leverages the Erlang VM, known for running low-latency, distributed, and fault-tolerant systems.
Numerical Elixir is an effort, publicly unveiled almost a year ago, to bring Elixir to the world of numerical computing and machine learning. The foundation of this effort is a library called Nx, that brings multi-dimensional arrays (tensors) and just-in-time compilation of numerical Elixir to both CPU and GPU. As we will see, the mixture of functional programming and tensor compilers provide an elegant and powerful abstraction for emitting highly specialized code.
In this blog post, we will discuss the current state of Nx, some of its upcoming features, and take a look at its growing ecosystem.
Nx’s mascot is the Numbat, a marsupial native to southern Australia. Unfortunately the Numbat are endangered and it is estimated to be fewer than 1000 left. If you are excited about Nx, consider donating to Numbat conservation efforts, such as Project Numbat and Australian Wildlife Conservancy.
Let’s start with a very quick introduction to Nx. Let’s create a two-dimensional tensor:
iex> t = Nx.tensor([[1, 2], [3, 4]])
#Nx.Tensor<
s64[2][2]
[
[1, 2],
[3, 4]
]
>
Tensors can be unsigned integers (u8
, u16
, u32
, u64
), signed integers (s8
, s16
, s32
, s64
), floats (f16
, f32
, f64
), and brain floats (bf16
). Each dimension of a tensor can be optionally named.
To implement a numerically stable version of the Softmax function using Nx:
iex> t = Nx.tensor([[1, 2], [3, 4]])
iex> normalized = Nx.subtract(t, Nx.reduce_max(t))
iex> Nx.divide(Nx.exp(normalized), Nx.sum(Nx.exp(normalized)))
#Nx.Tensor<
f32[2][2]
[
[0.032058604061603546, 0.08714432269334793],
[0.23688282072544098, 0.6439142227172852]
]
>
The computations above are happening in pure Elixir. However, you can plug a custom backend, such as Torchx, and have the computation be performed by state-of-the-art libraries such as LibTorch, on both CPU and GPU:
iex> Nx.default_backend(Torchx.Backend)
iex> t = Nx.tensor([[1, 2], [3, 4]])
iex> normalized = Nx.subtract(t, Nx.reduce_max(t))
iex> Nx.divide(Nx.exp(t), Nx.sum(Nx.exp(t)))
#Nx.Tensor<
Torchx.Backend
f32[2][2]
[
[0.032058604061603546, 0.08714432269334793],
[0.23688282072544098, 0.6439142227172852]
]
>
The full power of Nx comes from defn
, which stands for numerical definitions. Numerical definitions are a subset of Elixir tailored for numerical computing:
defmodule MyModule do
import Nx.Defn
defn softmax(t) do
normalized = t - Nx.reduce_max(t)
Nx.exp(normalized) / Nx.sum(Nx.exp(normalized))
end
end
Inside defn
we can use Elixir regular operators and they are all translated to their equivalent tensor operations. You have access to many of the language features and data types, such as macros, the beloved pipe operator, pattern-matching, maps, and more.
When invoked, the code above takes the types and shapes of the arguments and compiles them to highly optimized code to run on the CPU, the GPU, or even Cloud TPUs. For example, we can use Google’s XLA compiler via EXLA:
iex> Nx.Defn.default_options(compiler: EXLA, client: :cuda)
iex> MyModule.softmax(Nx.tensor([[1, 2], [3, 4]]))
#Nx.Tensor<
f32[2][2]
EXLA.DeviceBackend(cpu)
[
[0.032058604061603546, 0.08714432269334793],
[0.23688282072544098, 0.6439142227172852]
]
>
For reference, here are some benchmarks of the function above when called with a tensor of one million random float values:
Name ips average deviation median 99th %
xla gpu f32 keep 15308.14 0.0653 ms ±29.01% 0.0638 ms 0.0758 ms
xla gpu f64 keep 4550.59 0.22 ms ±7.54% 0.22 ms 0.33 ms
xla cpu f32 434.21 2.30 ms ±7.04% 2.26 ms 2.69 ms
xla gpu f32 398.45 2.51 ms ±2.28% 2.50 ms 2.69 ms
xla gpu f64 190.27 5.26 ms ±2.16% 5.23 ms 5.56 ms
xla cpu f64 168.25 5.94 ms ±5.64% 5.88 ms 7.35 ms
elixir f32 3.22 311.01 ms ±1.88% 309.69 ms 340.27 ms
elixir f64 3.11 321.70 ms ±1.44% 322.10 ms 328.98 ms
Comparison:
xla gpu f32 keep 15308.14
xla gpu f64 keep 4550.59 - 3.36x slower +0.154 ms
xla cpu f32 434.21 - 35.26x slower +2.24 ms
xla gpu f32 398.45 - 38.42x slower +2.44 ms
xla gpu f64 190.27 - 80.46x slower +5.19 ms
xla cpu f64 168.25 - 90.98x slower +5.88 ms
elixir f32 3.22 - 4760.93x slower +310.94 ms
elixir f64 3.11 - 4924.56x slower +321.63 ms
We have spent the last months maturing Nx towards Machine Learning and production use cases. Sean Moriarity has developed Axon, which we used to battle-test Nx and its automatic differentiation engine against several traditional and non-traditional neural networks.
For example, here is a Convolutional Neural Network model to train and classify the CIFAR-10 dataset implemented with Axon:
Axon.input(input_shape)
|> Axon.conv(32, kernel_size: {3, 3}, activation: :relu)
|> Axon.batch_norm()
|> Axon.max_pool(kernel_size: {2, 2})
|> Axon.conv(64, kernel_size: {3, 3}, activation: :relu)
|> Axon.batch_norm()
|> Axon.max_pool(kernel_size: {2, 2})
|> Axon.flatten()
|> Axon.dense(64, activation: :relu)
|> Axon.dropout(rate: 0.5)
|> Axon.dense(10, activation: :softmax)
You can find the whole example, including downloading, training, and inference of the dataset here. You can also find examples for generative, structured, and other vision-related neural networks.
To power the existing and upcoming functionality, we have brought many features to Nx. In particular:
We implemented streaming capabilities, which allows a program to be loaded into GPUs/TPUs, while we stream batches of inputs to it. This can be useful for distributed learning and also running inference efficiently in production.
We started working on a series of functions related to Linear Algebra under the Nx.LinAlg
module, which are relevant for models that rely on matrix factorization.
We introduced while
loops into numerical definitions, to support both static and dynamic unrolling of loops, which are handy in recurrent models (speech recognition, semantic parsing, sign language translation, etc).
We added hooks to numerical definitions, which allow developers to stream data out of GPUs/TPUs as computation happens. With this, you can debug system, monitoring the performance of models during training (think TensorBoard integration) and inference, and more.
There is still a lot of work ahead of us and you can follow the issues tracker for both Nx and Axon projects for more information.
Over the last 10 months we have put a huge amount of work on making Nx the building block for numerical computing and machine learning in Elixir. The path we chose was not the only option available to us. For example, we could have:
interfaced directly with Python and its ecosystem
implemented bindings for high-level libraries, such as torchvision and torchtext, instead of libtorch
The options above are extremely useful, especially if you want to quickly put a system in production. However, our goals are also to:
make Elixir a suitable platform for new Machine Learning developments
fully leverage the power provided by the platform Elixir runs on, the Erlang VM
provide consistency and stability, especially when working on a domain that is still actively evolving
For those reasons, we chose to invest on Nx as its own foundation, agnostic to any particular framework. The road is definitely longer but we also believe the pay-off will be higher too!
Plus, we are not alone! Many folks have joined the Machine Learning Working Group from the Erlang Ecosystem Foundation to bring other important projects to life, such as:
Axon - Nx-powered Neural Networks for Elixir, shown in the previous section
Explorer - dataframes (series and tabular data) for Elixir. It runs on Rust’s Polars for amazing performance
Livebook - interactive and collaborative code notebooks for Elixir. Once you install Livebook, there are several example notebooks available. We are also planning to port many of Axon examples to notebooks, you can track them in the notebooks directory
Scidata - download and normalize datasets related to science
There are also exciting projects being developed outside of the working group, such as OpenCV bindings via evision and others.
Here is a peek at what we expect to see in the near future, within Elixir’s Machine Learning ecosystem:
Integration between ONNX and Axon, allowing developers to bring trained models from other platforms into Elixir and vice-versa
Precompiled Explorer bindings, so developers can get started with Dataframes in Elixir without a need to have the Rust toolchain installed on their machines
Desktop app versions of Livebook, making it easier than ever for any developer to get Elixir code up and running on their machines
Support for checkpointing in Nx’ automatic differentiation system. Checkpoints reduce the memory usage at the cost of increased computation when calculating gradients, which is helpful when training large models
This is barely scratching the surface of what is possible. Here are some ideas to explore in the long term:
Support for other compilers and backends. Our bindings for Google XLA are quite complete and there is work in progress on LibTorch (contributions are welcome). We are also interested in exploring other options, such as Apache TVM.
Distributed training: in Machine Learning, “distributed” often stands for training across multiple GPUs. With Nx, we can mix the “distributed” meaning of Machine Learning with the “distributed” meaning of the Erlang VM, which is across multiple nodes.
Federated learning is a technique for training an algorithm across multiple edge devices. Federated training comes in different shapes, such as centralized - when there is a central server responsible for aggregating and coordinating devices - and decentralized. Elixir and the Erlang VM can shine under several scenarios, thanks to its orchestrating capabilities born from telecommunication and thanks to projects like Nerves.
And there are definitely other possibilities we haven’t even considered yet. I hope this shares some of our vision, ideas, and goals. If you are excited about these new possibilities, we welcome you to use, enjoy, and contribute to many of the projects above, or perhaps even start your own!
Happy coding!
]]>Until recently you could only install LiveDashboard within Phoenix apps. Now that changes: let me introduce you to PLDS - Phoenix LiveDashboard Standalone.
PLDS is a command line tool that brings LiveDashboard to a broader public. It can be used to access
remote systems if they can be reached from localhost.
PLDS usage is similar to using :observer
, and only requires a browser and Elixir installed on your localhost.
Suppose that you have a node running on a remote machine and you want to inspect it, but that system doesn’t have Phoenix nor LiveDashboard installed. You can connect to it using PLDS like this:
$ plds --connect name@host --cookie mycookie --open
This command will attempt to connect to the node and open the browser in PLDS.
Fantastic, right?! With PLDS you can inspect the supervision tree, the VM information, machine resources, Ecto repositories, Broadway pipelines and more.
Here is a quick video demonstrating the inspection of a node that is running our Broadway RabbitMQ example app:
It’s fairly easy to connect when both machines are in the same network with no firewall rules preventing communication between then. But this can be trickier when you are accessing a system that sits in a remote network because they will not be accessible from the internet for security reasons.
Having SSH access to the machine running your remote node you also have the possibility to access it by doing a port forwarding of at least two ports: the EPMD - the Erlang port manager daemon - and the node you want to connect to.
The easiest way to discover which ports you need to forward is by SSH into the remote machine and running epmd -names
. If you are running a release that has the Erlang Runtime System (ERTS) included then you can find epmd
at your_release/erts-VSN/bin/epmd
.
This command is going to return the EPMD and the node port:
$ epmd -names
epmd: up and running on port 4369 with data:
name myapp at port 45193
In our case, epmd is running in its default port, 4369
, and myapp
is running at 45193
.
To make this work first you need to stop the epmd
instance running on your localhost if any. Running $ killall epmd
is almost guarantee to work, but you may need to run $ systemctl stop epmd.socket
depending on your OS.
After that you can forward the two ports from the previous section. In my case I need to forward 4369
and 45193
:
$ ssh user@remote-server -L4369:localhost:4369 -L45193:localhost:45193
Done! Now you can connect to your remote machine like it was in your local network with PLDS. Remember to get the name and the cookie of your remote node.
PLDS can be helpful for debugging and observing systems running in production - systems with limited machines like those running Nerves can spare resources if we opt for not installing LiveDashboard and run PLDS.
We hope you enjoy the tool! For details, see https://hexdocs.pm/plds/.
]]>Broadway is around since 2019 and is helping teams ingest and process data from a variety of sources like RabbitMQ, Amazon SQS, Apache Kafka, and Google Cloud PubSub. It initially launched with the following features:
Throughout the last several months it gained some cool new features:
Broadway.DummyProducer
and new test helpers :via
Broadway.stop/1
for gracefully stopping a pipeline manually Broadway.topology/1
to describe the current topology of a pipeline Broadway.all_running/0
returns all running Broadway names in the current node Broadway now has its own logo:
As well as a brand new website, designed by Aakash Raj Dahal and developed by Jonatan Kłosko.
With the release of Broadway 1.0 we also want to announce the release of a brand new dashboard page for Phoenix LiveDashboard that can show all your Broadway pipelines.
The idea of Broadway Dashboard is to be a tool for inspection and experimentation, where developers can play and fine tune the configuration of their pipeline aiming for a higher throughput.
You can see each of the pipeline’s stages represented by a circle, and they turn red when they are busy. The percentage label represents the busy time vs the idle time. This helps team spot bottlenecks in their pipeline.
Marlus Saraiva did an awesome presentation of Broadway in ElixirConf 2019, where you can see the first version of the dashboard working in depth.
This project was born from Marlus’ code and presentation, and couldn’t be done without his amazing work!
Broadway Dashboard also works well in a distributed environment. This means that you can inspect a running pipeline in another node of your system. The only requirement is that they are connected, and Broadway is up-to-date on both nodes. We are also working on a command line version of the Broadway Dashboard, to make it more convenient to inspect your pipelines even if you don’t have Broadway pre-installed.
Broadway API is stable now, which means that the community can focus on bringing more producers to the fold.
Finally we want to say thank you to all the contributors of both projects, as well as of all existing and future producer libraries! You rock!
Stay tuned for more news. Happy hacking!
]]>Before we start digging deeper into the details, I’ll try to provide some minimum context on why I decided to create Surface in the first place.
The idea of components in software development is not new and its practical use has been around for at least 3 decades. And although many new concepts have been added to the original idea, they’re usually variations of the same basic principles, presented with different clothes and updated vocabulary.
Since live components were introduced a couple of years ago, LiveView users have been able to build stateful components based on
the Phoenix.LiveComponent
abstraction. However, although this abstraction provided the foundation to define components that can handle
their own state, there were still many aspects that were missing when it comes to a full-featured component model.
My first attempt to use LiveView was in 2019 when I was preparing a talk on “Building Efficient Data Pipelines with Broadway” for ElixirConf. I wanted to present a live representation of the pipeline so people could visualize the workload of each stage (process) along with global and individual metrics. Basically, a dashboard for Broadway.
LiveView sounded like a perfect match for that use case and as you can see in this short video, it proved to be the right choice for the job. I was amazed that I was able to do all that stuff with absolutely no custom JS.
This first contact with LiveView led me to the following conclusion:
Phoenix Liveview is fantastic! I want it to play an important role in my dev stack. However, it needs to evolve into
a “real” component-based approach. Something similar to what React
or Vue
is but taking into account the server-side nature
of Phoenix LiveView. This component model should focus not only on composability but also on improving ergonomics and
dev experience in general.
In order to address this, I started to work on a prototype of what would later become the first draft of Surface. And the dashboard became the first opportunity to explore some of the ideas behind it.
The main pain points I had when designing the Broadway Dashboard were mostly related to the following three gaps:
I’ll try to elaborate a bit on each of those gaps, presenting their direct impacts on the development experience.
When Phoenix introduced live components, they could be either stateless and stateful. However, even though stateless components are not specific to LiveView - they are stateless after all - those components could not be used outside a LiveView, so it’s not possible to reuse them in any controller-based view nor in layouts.
In order to overcome this problem, many users have tried a more functional approach by designing those stateless pieces of code as functions instead of live components. That works perfectly until you try to reuse those functions in different scenarios. However, the issue is that those individual functions and the components themselves would often not compose. If you attempted to pass a component to a custom function, you would often see the following runtime error:
** (exit) an exception was raised:
** (ArgumentError) cannot convert component X with id nil to HTML.
A component must always be returned directly as part of a LiveView template.
If you ever tried to use a live component inside form_for
, you’ve certainly seen a similar message as most of Phoenix’s built-in form/inputs
helpers rely on the contant_tag
function.
EEx
is a great template engine. It’s not only fast but also extremely flexible. The main issue with it when used as a solution
for a component-based model, is the fact that it makes no distinction between plain text and a structured format like HTML.
That’s one of the main reasons it can be so fast and flexible.
However, by not recognizing the structure of the underlying HTML template, it misses a wonderful opportunity to gather relevant information about the semantics of that structure. Information that could be used later to do amazing things that can boost productivity, like static validation, improved ergonomics and better tooling.
The whole point of designing components is to provide reusable building blocks that can be easily composed into other larger reusable building blocks. In order to achieve that, we need a way to document the component’s shape, identifying its public interface from any other internal detail that should better be kept hidden from the user.
Without a standard API to declare that interface, it’s up to the component’s author to find a way to document it properly. If that does not happen, it leads to a poor experience for developers trying to use those components. Whenever you need to use a component and there’s no well-defined interface for it, you’ll have to answer the following questions by yourself:
live_component/4
? However, if we structure this information, we not only improve communication by giving precise answers to those questions, but we can also provide compile-time checking, automatic generation of docs and better tooling overall.
On the tooling front, I’d mention the ability to provide auto-complete for editors and to build tools like the Surface Catalogue, which is our attempt to bring something like Storybook to the Phoenix/LV realm. In case you haven’t seen it yet, here’s a short video of its first prototype in action.
The two PR’s mentioned at the beginning of this post addresses two of the three gaps listed above.
The new component/3
addresses the first one by bringing a compatible stateless component API that allows users to define real
stateless components based on pure functions. These new “Function Components” can:
The second PR introduces a new templating language called HEEx
, which is an extension of EEx
. This language is HTML-aware and
component-friendly, providing syntactic sugar for handling attributes as well as validating the structure of the template.
Have you ever forgot to close a <div>
and saw LiveView go crazy, updating parts of the view you didn’t expect? If the markup is invalid,
the browser will attempt to complete it, and it may do so incorrectly. If for any reason the structure of the HTML is broken, LiveView
will misbehave.
With the new HTMLEngine
engine, users will be able to use the ~H
sigil to write HEEx
code directly in their
components/LiveViews or create .heex
template files for them, just like it was previously done with ~L
and .leex
, respectively.
The engine will also validate the code, raising errors on common mistakes like those unclosed/unmatched tags.
The new syntax also allows users to inject “Function Components” directly in the template using an HTML-like notation:
<Component.func attr="value">
<div>
...
</div>
</Component.func>
An HTMLTokenizer
which is used by the new engine is also available and can be used to easily implement additional
tools, like a formatter, for example. ;)
As you can see, we’re filling two of the three gaps we had. Conversations regarding the third one (No declarative interface) are already advancing.
One question that has been raised in the community is if Surface will eventually get merged into LiveView. The answer is:
Not exactly. :)
Surface is still way ahead of LiveView on its component model. There are many other features and dozens of compile-time checks. We’re starting carefully to bring some of its features to Phoenix Liveview but instead of doing this indiscriminately, we’re identifying the core concepts and evaluating the best way to implement them as core features.
In the long-term, we hope we can move enough of those concepts to Phoenix, allowing Surface to evolve much faster, focusing on higher-level features, ergonomics, better tooling and high-quality components, while the Phoenix core team can keep improving the foundation of its component model.
A good example of how this is beneficial for both projects is the already mentioned component/3
macro. It would be impossible
to implement that in Surface alone as it requires changes to LiveView itself.
In this post, I tried to present the current efforts to push Phoenix towards a more component-friendly direction.
The end goal is to establish Phoenix as a great foundation for writing reusable components, regardless of the template engine.
If you like EEx
, you’ll be able to use HEEx
. If you don’t, you can use Surface
or any other template language you prefer.
As long as the component model is part of the LiveView’s core, users will be able to use and share whole suites of components built
with any of those different solutions!
We still have a long way to go to achieve that but the first steps have already been taken and I hope you’re as excited as I am about the wide range of possibilities this brings to provide a modern and robust solution for web development.
]]>We are glad to announce Livebook, an open source web application for writing interactive and collaborative code notebooks in Elixir and implemented with Phoenix LiveView. Livebook is an important step in our journey to enable the Erlang VM and its ecosystem to be suitable for numerical and scientific computing.
I have recorded a screencast that highlights some Livebook features, which you can watch below. It also showcases the Axon library, for building Neural Networks in Elixir, as well as some improvements coming in Elixir v1.12:
Livebook is a Dashbit project developed by Jonatan Kłosko, with contributions from myself, Jon Klein, Chris McCord, and designed by Aakash Raj Dahal. We are glad to have an open source example of a complex LiveView application out in the wild and we hope you enjoy using it!
If you can’t yet watch the video, here is a summary of Livebook features:
A deployable web app built with Phoenix LiveView where users can create, fork, and run multiple notebooks.
Each notebook is made of multiple sections: each section is made of Markdown and Elixir cells. Code in Elixir cells can be evaluated on demand. Mathematical formulas are also supported via KaTeX.
Persistence: notebooks can be persisted to disk through the .livemd
format, which is a
subset of Markdown. This means your notebooks can be saved for later, easily shared, and
they also play well with version control.
Sequential evaluation: code cells run in a specific order, guaranteeing future users of the same Livebook see the same output. If you re-execute a previous cell, following cells are marked as stale to make it clear they depend on outdated notebook state.
Custom runtimes: when executing Elixir code, you can either start a fresh Elixir process, connect to an existing node, or run it inside an existing Elixir project, with access to all of its modules and dependencies. This means Livebook can be a great tool to provide live documentation for existing projects.
Explicit dependencies: if your notebook has dependencies, they are explicitly listed and
installed with the help of the Mix.install/2
command in Elixir v1.12+.
Collaborative features allow multiple users to work on the same notebook at once. Collaboration works either in single-node or multi-node deployments - without a need for additional tooling.
Here is a peek at the “Welcome to Livebook” introductory notebook:
This announcement provides only the initial step of our Livebook vision. Our plan is to continue focusing on visual, collaborative, and interactive features in the upcoming releases.
Happy coding!
]]>:persistent_term
but we’ve
replaced it with an ETS table that is more suitable for data that periodically changes. Thanks to
readers for pointing this out.
While working on Bytepack last year, we needed to authenticate our HTTP requests to the Google Cloud Storage and we chose the popular Goth library to generate the OAuth2 tokens. The library worked great out of the box, however we noticed a few potential areas of improvements that we were glad to contribute back to the library.
First, a quick introduction to Goth. This is how we used to use it:
Add it to your dependencies:
def deps do
[{:goth, "~> 1.2.0"}]
end
Configure it:
# config/config.exs
config :goth,
json: File.read!("path/to/google/json/creds.json")
And use it:
iex> Goth.Token.for_scope("https://www.googleapis.com/auth/cloud-platform.read-only")
{:ok, %Goth.Token{expires: 1614245694, token: "ya29.cAL...", ...}}
A given token is valid for one hour which led to two important features of the library:
While the user of the library could save the token off somewhere to be re-used later, the library conveniently provides a built-in cache so it’s not necessary. Only the first time you request a token it would actually be generated, subsequent calls would read from the cache.
The token is automatically refreshed before it goes stale.
For our project, we identified a few missing pieces in the library though, we needed some more customization. We wanted to use a different HTTP client as well as request token refresh earlier so that if we run into any network issues, there’s enough time to try again a few times before the token gets stale.
We also noticed that fetching from built-in cache was done through a single GenServer which means that process could easily become a bottleneck under heavy traffic. This wasn’t a big concern for us as we only needed a token for writes and our application was read-heavy. However, one of our Elixir Development Subscription customers was also using Goth and they were very performance cautious so removing the bottleneck was an important improvement for them.
Finally, for libraries we prefer explicit configuration over the application environment, so we
worked on that too. Despite the improvements on Elixir v1.9 with config/releases.exs
and Elixir v1.11 with config/runtime.exs
, it is still a best practice to avoid global
configuration, as there are better alternatives that we’ll show in this
article.
We wanted to eventually contribute back all of these changes, however at that point we needed to change how the library works in a pretty fundamental way so instead we ended up writing a new library from scratch and trying that out in our project first. We also contacted Phil Burrows, the original author and maintainer of Goth, and came up with a plan how to backport our changes. We have deprecated the existing API, so the existing users can upgrade at their own pace, and came up with a new API.
To use it, the first step is to add it your dependencies:
def deps do
[{:goth, "~> 1.3-rc"}]
end
Then, add the Goth
child spec to your supervision tree:
defmodule MyApp.Application do
use Application
def start(_type, _args) do
credentials =
"GOOGLE_APPLICATION_CREDENTIALS_JSON"
|> System.fetch_env!()
|> Jason.decode!()
source = {:service_account, credentials, []}
children = [
{Goth, name: MyApp.Goth, source: source}
]
Supervisor.start_link(children, strategy: :one_for_one)
end
end
You can now finally use it:
iex> Goth.fetch(MyApp.Goth)
{:ok, %Goth.Token{expires: 1614245694, token: "ya29.cAL...", ...}}
As you can see, we no longer rely on the :goth
application starting it’s own supervision tree,
but instead we explicitly add it to our own tree. This gives us more control when exactly it
starts as well as we can trivially start multiple instances, each with different credentials and
scopes. This is not something we needed ourselves, but it was a long-requested feature by the
community.
Let’s dive a little bit deeper into two particular improvements we’ve made: switching HTTP clients and avoiding single-process bottleneck.
Goth depended on the HTTPoison HTTP client but we already picked Finch as our HTTP client of choice and it would be wasteful and potentially error-prone to use different clients for different parts of the system so we definitely wanted to standardise on just one. We need a way to tell Goth which HTTP client to use and we did that by introducing a Goth.HTTPClient
contract, a default implementation for backwards-compatibility as well as nice out-of-the-box experience, and an option to switch.
Our Finch-based adapter roughly looked like this:
defmodule Bytepack.Extensions.Goth.FinchClient do
@moduledoc """
Finch-based HTTP client for Goth.
## Options
* `:name` - the name of the `Finch` pool to use.
* `:default_opts` - default options that will be used on each request,
defaults to `[]`. See `Finch.request/3` for a list of supported options.
"""
@behaviour Goth.HTTPClient
defstruct [:name, default_opts: []]
@impl true
def init(opts) do
struct!(__MODULE__, opts)
end
@impl true
def request(method, url, headers, body, opts, initial_state) do
opts = Keyword.merge(initial_state.default_opts, opts)
Finch.build(method, url, headers, body)
|> Finch.request(initial_state.name, opts)
end
end
and this is how we’d use it in our supervision tree:
children = [
{Finch, name: Bytepack.Finch, pools: pools},
{Goth,
name: Bytepack.Goth,
source: source,
http_client: {Bytepack.Extensions.Goth.FinchClient, name: Bytepack.Finch}}
]
The init/1
callback is an important extension point of the HTTP contract. While in the snippet above, it doesn’t do much, it just converts options keywords list into a struct (to make sure we didn’t make a typo in the key names so it’s pretty useful!), in the future the built-in Hackney-based adapter could be changed like this:
defmodule Goth.HTTPClient.Hackney do
@behaviour Goth.HTTPClient
@impl true
def init(opts) do
if Code.ensure_loaded?(:hackney) do
# ...
else
raise "please add :hackney to your dependencies"
end
end
end
and then Goth could mark its dependency on Hackney as optional:
{:hackney, "~> 1.7", optional: true}
This means that if users intended to use Goth with a different HTTP client, they wouldn’t even download and compile hackney in the first place. A small but important win!
Taking a step back from Goth for a moment, in general we believe that libraries should have as least dependencies as possible, and the dependencies they have should be easily customisable. Customisation via explicit contract is one option, another one is adding extension points via being able to pass anonymous functions or a {module, function, args}
tuple. As an example for the latter, here’s an excerpt from the docs of our Broadway connector for the Google Cloud Pub/Sub service:
* `:token_generator` - Optional. An MFArgs tuple that will be called before
each request to fetch an authentication token. It should return
`{:ok, String.t()} | {:error, any()}`.
Default generator uses `Goth.Token.for_scope/1` with
`"https://www.googleapis.com/auth/pubsub"`.
This way, when users of broadway_cloud_pub_sub
update to latest version of Goth, they’ll be able to easily use the new API:
token_generator: {Goth, :fetch, [MyApp.Goth]}
Last but not least, worth mentioning the extension points are not only useful for library users but for the library authors themselves. Being able to easily swap some implementation details is really useful for tests!
A given process can only handle one message at a time. This is typically fine, but if you send a lot of messages to that single process, it’s message queue will built-up and that can become a bottleneck. The common and preferred strategy to improve performance is to use ETS.
This is how our new Goth cache implementation looks like:
defmodule Goth do
defdelegate fetch(server), to: Goth.Server
end
defmodule Goth.Server do
@moduledoc false
use GenServer
def fetch(server) do
%{config: config, token: token} = get(server)
if token do
{:ok, token}
else
Token.fetch(config)
end
end
@impl true
def init(opts) when is_list(opts) do
opts =
Keyword.update!(opts, :http_client, fn {module, opts} ->
{module, module.init(opts)}
end)
state = struct!(__MODULE__, opts)
:ets.new(state.name, [:named_table, read_concurrency: true])
# given calculating JWT for each request is expensive, we do it once
# on system boot to hopefully fill in the cache.
case Token.fetch(state) do
{:ok, token} ->
store_and_schedule_refresh(state, token)
{:error, _} ->
put(state, nil)
send(self(), :refresh)
end
{:ok, state}
end
@impl true
def handle_info(:refresh, state) do
case Token.fetch(state) do
{:ok, token} ->
store_and_schedule_refresh(state, token)
{:noreply, state}
{:error, exception} ->
...
end
end
defp store_and_schedule_refresh(state, token) do
put(state, token)
time_in_seconds = ...
Process.send_after(self(), :refresh, time_in_seconds * 1000)
end
defp get(name) do
:ets.lookup_element(name, :data, 2)
end
defp put(state, token) do
config = Map.take(state, [:source, :http_client])
:ets.insert(state.name, {:data, %{config: config, token: token}})
end
end
We still built it as a GenServer because we want to periodically refresh the token, but notice fetching the token isn’t done via message passing but by fetching it from the ETS table using the name of our GenServer!
In this article we discussed our efforts to redesign the Goth library to be more flexible and performant. In particular, we introduced a HTTP client contract to easily swap clients out and we’ve removed a single-process bottleneck. We are very glad to have contributed these changes upstream and we hope library authors and users would perfom similar changes wherever they make sense!
For reference, here’s our Goth redesign proposal and please give Goth v1.3.0-rc a go!
Special thanks to Phil Burrows for writing Goth in the first place, helping with the transition, and reviewing the draft of this post. Thanks to Michael Crumm for helping with backporting some of the functionality into the new design too!
]]>Sean Moriarity and I are glad to announce that the project we have been working on for the last 3 months, Nx, is finally publicly available on GitHub. Our goal with Nx is to provide the foundation for Numerical Elixir.
In this blog post, I am going to outline the work we have done so far, some of the design decisions, and what we are planning to explore next. If you are looking for other resources to learn about Nx, you can hear me unveiling Nx on the ThinkingElixir podcast.
Nx is a multi-dimensional tensors library for Elixir with multi-staged compilation to the CPU/GPU. Let’s see an example:
iex> t = Nx.tensor([[1, 2], [3, 4]])
#Nx.Tensor<
s64[2][2]
[
[1, 2],
[3, 4]
]
>
As you see, tensors have a type (s64) and a shape (2x2). Tensor operations are also done with the Nx
module. To implement the Softmax function:
iex> t = Nx.tensor([[1, 2], [3, 4]])
iex> Nx.divide(Nx.exp(t), Nx.sum(Nx.exp(t)))
#Nx.Tensor<
f64[2][2]
[
[0.03205860328008499, 0.08714431874203257],
[0.23688281808991013, 0.6439142598879722]
]
>
The high-level features in Nx are:
Typed multi-dimensional tensors, where the tensors can be unsigned integers (u8
, u16
, u32
, u64
), signed integers (s8
, s16
, s32
, s64
), floats (f32
, f64
) and brain floats (bf16
);
Named tensors, allowing developers to give names to each dimension, leading to more readable and less error prone codebases;
Automatic differentiation, also known as autograd. The grad
function provides reverse-mode differentiation, useful for simulations, training probabilistic models, etc;
Tensors backends, which enables the main Nx
API to be used to manipulate binary tensors, GPU-backed tensors, sparse matrices, and more;
Numerical definitions, known as defn
, provide multi-stage compilation of tensor operations to multiple targets, such as highly specialized CPU code or the GPU. The compilation can happen either ahead-of-time (AOT) or just-in-time (JIT) with a compiler of your choice;
For Python developers, Nx
currently takes its main inspirations from Numpy
and JAX
but packaged into a single unified library.
Our initial efforts have focused on the underlying abstractions. For example, while Nx implements dense tensors out-of-the-box, we also want the same high-level API to be valid for sparse tensors. You should also be able to use all functions in the Nx
module with tensors that are backed by Elixir binaries and with tensors that are stored directly in the GPU.
By ensuring the underlying tensor backend is ultimately replaceable, we can build an ecosystem of libraries on top of Nx, and allow end-users to experiment with different backends, hardware, and approaches to run their software on.
Nx’s mascot is the Numbat, a marsupial native to southern Australia. Unfortunately the Numbat are endangered and it is estimated to be fewer than 1000 left. If you are excited about Nx, consider donating to Numbat conservation efforts, such as Project Numbat and Australian Wildlife Conservancy.
One of the most important features in Nx
is the numerical definition, called defn
. Numerical definitions are a subset of Elixir tailored for numerical computing. Here is the softmax
formula above, now written with defn
:
defmodule Formula do
import Nx.Defn
defn softmax(t) do
Nx.exp(t) / Nx.sum(Nx.exp(t))
end
end
The first difference we see with defn
is that Elixir’s built-in operators have been augmented to also work with tensors. Effectively, defn
replaces Elixir’s Kernel
with Nx.Defn.Kernel
.
However, defn
goes even further. When using defn
, Nx
builds a computation with all of your tensor operations. Let’s inspect it:
defn softmax(t) do
inspect_expr(Nx.exp(t) / Nx.sum(Nx.exp(t)))
end
Now when invoked, you will see this printed:
iex(3)> Formula.softmax(Nx.tensor([[1, 2], [3, 4]]))
#Nx.Tensor<
f64[2][2]
Nx.Defn.Expr
parameter a s64[2][2]
b = exp [ a ] f64[2][2]
c = exp [ a ] f64[2][2]
d = sum [ c, axes: nil, keep_axes: false ] f64
e = divide [ b, d ] f64[2][2]
>
#Nx.Tensor<
f64[2][2]
[
[0.03205860328008499, 0.08714431874203257],
[0.23688281808991013, 0.6439142598879722]
]
>
This computation graph can also be transformed programatically. The transformation is precisely how we implement automatic differentiation, also known as autograd
, by traversing each node and computing their derivative:
defn grad_softmax(t) do
grad(t, Nx.exp(t) / Nx.sum(Nx.exp(t)))
end
Finally, this computation graph can also be handed out to different compilers. As an example, we have implemented bindings for Google’s XLA compiler, called EXLA. We can ask the softmax
function to use this new compiler with a module attribute:
@defn_compiler {EXLA, client: :host}
defn softmax(t) do
Nx.exp(t) / Nx.sum(Nx.exp(t))
end
Once softmax
is called, Nx.Defn
will invoke EXLA
to emit a just-in-time and highly-specialized compiled version of the code, tailored to the tensor type and shape. By passing client: :cuda
or client: :rocm
, the code can be compiled for the GPU. For reference, here are some benchmarks of the function above when called with a tensor of one million random float values on different clients:
Name ips average deviation median 99th %
xla gpu f32 keep 15308.14 0.0653 ms ±29.01% 0.0638 ms 0.0758 ms
xla gpu f64 keep 4550.59 0.22 ms ±7.54% 0.22 ms 0.33 ms
xla cpu f32 434.21 2.30 ms ±7.04% 2.26 ms 2.69 ms
xla gpu f32 398.45 2.51 ms ±2.28% 2.50 ms 2.69 ms
xla gpu f64 190.27 5.26 ms ±2.16% 5.23 ms 5.56 ms
xla cpu f64 168.25 5.94 ms ±5.64% 5.88 ms 7.35 ms
elixir f32 3.22 311.01 ms ±1.88% 309.69 ms 340.27 ms
elixir f64 3.11 321.70 ms ±1.44% 322.10 ms 328.98 ms
Comparison:
xla gpu f32 keep 15308.14
xla gpu f64 keep 4550.59 - 3.36x slower +0.154 ms
xla cpu f32 434.21 - 35.26x slower +2.24 ms
xla gpu f32 398.45 - 38.42x slower +2.44 ms
xla gpu f64 190.27 - 80.46x slower +5.19 ms
xla cpu f64 168.25 - 90.98x slower +5.88 ms
elixir f32 3.22 - 4760.93x slower +310.94 ms
elixir f64 3.11 - 4924.56x slower +321.63 ms
Where keep
indicates the tensor was kept on the device instead of being transferred back to Elixir. You can see the benchmark in the bench
directory and find some examples in the examples
directory of the EXLA project.
Before moving forward, it is important for us to take a look at how numerical definitions are compiled. For example, take the softmax
function:
defn softmax(t) do
Nx.exp(t) / Nx.sum(Nx.exp(t))
end
One might think that Elixir takes the AST of the softmax function above and compiles it directly to the GPU. However, that’s not the case! Numerical definitions are first compiled to Elixir code that will emit the computation graph and this computation graph is then compiled to the GPU. The multiple stages go like this:
Elixir AST
-> compiles to .beam (Erlang VM bytecode)
-> executes into defn AST
-> compiles to GPU
This multi-stage programming is made possible thanks to Elixir macros. For example, when you see a conditional inside defn
, that conditional looks exactly like Elixir conditionals, but it will be compiled to an accelerator:
defn softmax(t) do
if Nx.any?(t) do
-1
else
1
end
end
In a nutshell, defn
provides us with a subset of Elixir for numerical computations that can be compiled to specific hardware, such as CPU, GPU, and other accelerators. All of this was possible without making changes or forking the language.
And while defn
is a subset of the language, it is a considerable one. You will find support for:
|>
), module attributes, the access syntax (i.e. tensor[1][1..-1]
), etc if
and cond
), loops (coming soon), etc defn
(which enables constructs such as grad
) And more coming down the road.
At this point, you may be wondering: is functional programming a good fit for numerical computing? One of the main concerns is that immutability can be expensive when working with large blobs of memory. And that’s a valid concern! In fact, when using the default tensor backend, tensors will be backed by Elixir binaries which are copied on every operation. That’s why it was critical for us to design Nx
with pluggable backends from day one.
As we move to higher-level abstractions, such as numerical definitions, we will start to reap the benefits of functional programming.
For example, in order to build computation graphs, immutability becomes an indispensable tool both in terms of implementation and reasoning. The JAX library for Python, which has been one of the guiding lights for Nx design, also promotes functional and immutable principles:
JAX is intended to be used with a functional style of programming
— JAX Docs
Unlike NumPy arrays, JAX arrays are always immutable
— JAX Docs
Similarly, existing frameworks like Thinc.ai argue that functional programming can provide better abstractions and more composable building blocks for deep learning libraries.
We hope that, by exploring these concepts in a language that is functional by design, Elixir can bring new ideas and insights at the higher-level.
There is a lot of work ahead of us and we definitely cannot tackle all of it alone. Generally speaking, here are some broad areas the numerical computing community in Elixir should investigate in the long term:
Visual tools: such as plotting libraries and integration with notebooks for interactive programming
Machine learning tools: while Sean is already exploring some designs for neural networks, we will likely also see interest on tools for supervised learning (classification/regression), dimensionality reduction, clustering, etc. My hope is that those libraries can be implemented with defn
, allowing them to benefit from custom backends and custom compilers
Nx: there is a lot to explore inside Nx itself, such as better support for linear algebra operations and perhaps even FFT. I am also looking forward to see how folks will experiment with backends that are optimized to work with tensors that exhibit certain properties, such as sparse tensors and hermetian matrices
defn: while defn
already supports grad
, that’s just one of many transformations we can automatically perform. We could also support auto-batching (also known as vmap
), inverses, Jacobian/Hessian matrices, etc
Integration: there are two ways we can speed up Nx tensors, either by using custom backends (eager) or by using custom compilers (lazy). There are many options we can consider here, such as libtorch
and eigen
as backends, and a growing list of tensor compilers. Since we aim to put Nx
as the building block of the ecosystem, we hope that by integrating new compilers and backends, developers and researchers will have the option to experiment with many different performance and usage profiles
For now, we have created an Nx-related mailing list where we can coordinate those ideas and use for general discussion.
For the short-term, Sean and I are working on features like tensor streaming, communication across devices, as well as AOT compilation. The latter might be particularly useful for Nerves. We are also investigating how to integrate dataframes directly into Nx
, including defn
support. By supporting dataframes, we hope to have a single library to tackle different steps of a machine learning pipeline, where everything can be inlined and compiled into a single GPU executable. For this, we are looking into xarray’s datasets and TensorFlow feature columns.
Given there is a lot of explore, we are also interested in feedback and experiences, especially missing features we should prioritize. You can find a list of other planned features in our issues tracker.
Happy computing!
]]>Think of Broadway as a facilitator to build data processing pipelines.
It is a tool that will connect to your queue system or to a stream of events and will emit those events to consumers according to the demand from those consumers. This feature is called “back-pressure”. There is a nice article by José Valim about how Change.org is using Broadway to process millions of messages without compromise the stability of the system.
Broadway will fit better in an environment that needs to process a lot of data, but it is also recommended for simpler cases that aim to scale with time. If you have a stream of data coming from Kafka, RabbitMQ, Amazon SQS or Google Cloud Pub/Sub, then Broadway already has an adapter ready for you. Otherwise you may need to write your own, so let’s see an example!
I choose to write a producer based on Twitter stream because it is a HTTP stream, which is simple and can emit a lot of events per second.
I first tried to write a cURL command to fetch data from that stream.
curl --location --request GET 'https://api.twitter.com/2/tweets/sample/stream' -H
'Authorization: Bearer your-token-here'
You can setup a new application and grab your token following the Twitter V2 API page.
On the Elixir side we can use Mint
to retrieve the data and
have more control of our stream.
Mint is different from most Erlang and Elixir HTTP clients because it does not have a built-in
connection pool and has a process-less architecture. This is a perfect fit for Broadway because
its producers form a pool of their own. Instead of maintaining a pool of producers and a separate
pool of HTTP connections we just have the former and so we avoid overhead of any unnecessary
processes and message passing to achieve maximum performance.
Here is an example of how we can consume the tweet stream:
defmodule TwitterStream do
alias Mint.HTTP2
@twitter_stream_url_v2 "https://api.twitter.com/2/tweets/sample/stream"
def start(token) do
uri = URI.parse(@twitter_stream_url_v2)
{:ok, conn} = HTTP2.connect(:https, uri.host, uri.port)
{:ok, conn, request_ref} =
HTTP2.request(
conn,
"GET",
uri.path,
[{"Authorization", "Bearer #{token}"}],
nil
)
listen(conn, request_ref, token)
end
defp listen(conn, ref, token) do
# Mint sends the last message to `self()`, so we receive here.
last_message =
receive do
msg -> msg
end
case HTTP2.stream(conn, last_message) do
{:ok, conn, responses} ->
# We process "responses" and loop again.
listen(conn, ref, token)
{:error, conn, %Mint.HTTPError{}, _} ->
IO.puts("starting again")
start(token)
end
end
end
We can execute this code by running TwitterStream.start(token)
in our IEx terminal. This stream
is always pushing and will never end unless you kill this process.
There is another type of producers which requires the polling of events, and they usually do that from time to time. An example of this is Amazon SQS Broadway. For this article we are going to use a push stream of events from Twitter to our application.
This is the piece that will gather data from our Twitter stream and deliver tweets as event messages to consumers.
Broadway has an important concept: producers only deliver events when consumers ask for them (the so called back-pressure). We are going to slightly ignore this because our producer is going to deliver events imediately as they arrive, and Broadway will take care of matching the number of events with the demand. But be aware that, whenever possible, it is better to have a more fine-grained control of the demand and stop producing events when no one is demanding them.
Note: Our example does not make usage of back-pressure, because Twitter itself will always emit events, and we can’t tell Twitter to stop it. We will emit the events right away and rely on Broadway’s internal buffer to discard events that are above the capacity of our consumers.
Our producer has to define two main functions: init/1
and handle_demand/2
. Those callbacks
are described in the GenStage
documentation
because our producer is primarely a GenStage producer. Broadway provides two other
callbacks that can be used to initialize
or stop things in the life-cycle of a Broadway topology.
Let´s go to our init/1
function:
defmodule OffBroadwayTwitter.Producer do
use GenStage
@behaviour Broadway.Producer
@twitter_stream_url_v2 "https://api.twitter.com/2/tweets/sample/stream"
@impl true
def init(opts) do
uri = URI.parse(@twitter_stream_url_v2)
token = Keyword.fetch!(opts, :twitter_bearer_token)
state =
connect_to_stream(%{
token: token,
uri: uri
})
{:producer, state}
end
# ...
end
The most important line of this function is the return:
{:producer, state}
It says to Broadway that this is a producer
and defines the state of this producer as the
second element.
We also start the connection and first request to our stream with the function
connect_to_stream/1
that
can be viewed next:
defmodule OffBroadwayTwitter.Producer do
# ...
defp connect_to_stream(state) do
{:ok, conn} = HTTP2.connect(:https, state.uri.host, state.uri.port)
{:ok, conn, request_ref} =
HTTP2.request(
conn,
"GET",
state.uri.path,
[{"Authorization", "Bearer #{state.token}"}],
nil
)
%{state | request_ref: request_ref, conn: conn, connection_timer: nil}
end
# ...
end
The request_ref
is a reference to assert that we are reading data from this particular
request. It is going to be used when we start the loop for reading messages. Speaking of loops,
we are going to enter in one: Mint works by sending messages to “self”, which means that every
interaction will generate a message to the process that called it. This way we can continuously
read the stream inside a loop.
We are going to use the handle_info/2
callback that is slightly different from a typical
GenServer
: it will return a tuple with 3 elements representing what to do, what messages to
produce and the new state respectively.
After the connection and first request we are going to perform our stream requests inside that
handle_info/2
callback.
defmodule OffBroadwayTwitter.Producer do
# ...
@impl true
def handle_info({tag, _socket, _data} = message, state) when tag in [:tcp, :ssl] do
conn = state.conn
case HTTP2.stream(conn, message) do
{:ok, conn, resp} ->
process_responses(resp, %{state | conn: conn})
{:error, conn, %error{}, _} when error in [Mint.HTTPError, Mint.TransportError] ->
timer = schedule_connection(@reconnect_in_ms)
{:noreply, [], %{state | conn: conn, connection_timer: timer}}
:unknown ->
{:stop, :stream_stopped_due_unknown_error, state}
end
end
@impl true
def handle_info(:connect_to_stream, state) do
{:noreply, [], connect_to_stream(state)}
end
defp schedule_connection(interval) do
Process.send_after(self(), :connect_to_stream, interval)
end
# ...
end
It’s important that we always update the connection value in our state. This is because the stream
expects that we pass the last conn
for the next interaction. Another caveat is the need
to restart the connection after the server closes it or after some kind of error. We do that
here by sending another message to self that will reconnect after a few seconds.
Let’s go to the process_responses/1
definition:
defmodule OffBroadwayTwitter.Producer do
use GenStage
# ...
defp process_responses(responses, state) do
ref = state.request_ref
tweets =
Enum.flat_map(responses, fn response ->
case response do
{:data, ^ref, tweet} ->
decode_tweet(tweet)
{:done, ^ref} ->
[]
{_, _ref, _other} ->
[]
end
end)
{:noreply, tweets, state}
end
defp decode_tweet(tweet) do
case Jason.decode(tweet) do
{:ok, %{"data" => data}} ->
meta = Map.delete(data, "text")
text = Map.fetch!(data, "text")
[
%Message{
data: text,
metadata: meta,
acknowledger: {Broadway.NoopAcknowledger, nil, nil}
}
]
{:error, _} ->
IO.puts("error decoding")
[]
end
end
# ...
end
Since Mint is returning a HTTP2 message
containing many possible frames, we are iterating through them and updating the state to retain
that tweet. We are using a special struct for the message
called Broadway.Message
,
and that struct has a attribute called acknowledger
. This struct has all attributes
Broadway expects for processing the event properly, and the acknowledger
attribute is
important because it says which module is responsible for acknowledging the messages after
finishing the pipeline.
Acknowledging is critical in a queue system to mark a given event message as processed or to clean up that message from the system after processing it. In our example we don’t need this because Twitter stream is a firehouse of events.
So far we dealt with the incoming flow of messages. Now we need to implement the handle_demand/2
function. Here is how it looks like:
defmodule OffBroadwayTwitter.Producer do
use GenStage
# ...
@impl true
def handle_demand(_demand, state) do
{:noreply, [], state}
end
# ...
end
For this example, we are relying on Broadway’s internal buffer which is going to store messages until a new consumer asks for them. But, as I said before, in 99% of the implementations we do need to have a better control of how many events we reply to our consumers and really implement a back-pressure mechanism.
Now that we have our producer we can setup a Broadway topology to consume events. The topology is
a module with three main functions: start_link
which configures this consumer, handle_message
which processes each message and do most of the work, and handle_batch
which manipulates a
group of messages. For instance, if you want to process tweets and store them in the database or
in S3, you could submit them in batches using these callbacks. You can define multiple batchers,
each taking a maximum size and a maximum interval for batching. In this example, we will have
a single batcher.
The shape of this module looks like this:
defmodule OffBroadwayTwitter do
use Broadway
alias Broadway.Message
def start_link(opts) do
Broadway.start_link(
# Here you define your consumer's configuration
)
end
@impl true
def handle_message(_, %Message{data: data} = message, _) do
# Here you can work with your message. In our case, a tweet.
# After this, you can choose to route your message to a named
# batch handler using `put_batcher/2`, or just return the message.
message
end
@impl true
def handle_batch(_batch_name, messages, _, _) do
# Here your messages will be processed in groups after being processed by handle_message.
messages
end
end
The OffBroadwayTwitter
module will dictate how this pipeline is going to process the events because
it controls many aspects like concurrency and batch size. After processing a batch of messages it
will ask for more events to the producer.
In my example the only task is to print all the Tweets after “upcasing” it:
defmodule OffBroadwayTwitter do
use Broadway
alias Broadway.Message
def start_link(opts) do
Broadway.start_link(__MODULE__,
name: __MODULE__,
# Here is where our producer is configured.
# It is important that our producer is only one because
# our Twitter token can only open one connection at time.
producer: [
module: {OffBroadwayTwitter.Producer, opts},
concurrency: 1
],
processors: [
default: [concurrency: 50]
],
batchers: [
default: [batch_size: 20, batch_timeout: 2000]
]
)
end
@impl true
def handle_message(_, %Message{data: data} = message, _) do
# You can simulate a job by using `Process.sleep(500)` here.
message
|> Message.update_data(fn data -> String.upcase(data) end)
end
@impl true
def handle_batch(_, messages, _, _) do
list = Enum.map(messages, fn e -> e.data end)
IO.inspect(list, label: "Got batch")
messages
end
end
Finally we want to test those things together. To facilitate, I added the topology module to my
supervision tree in the OffBroadwayTwitter.Application
module:
defmodule OffBroadwayTwitter.Application do
@moduledoc false
use Application
@impl true
def start(_type, _args) do
children = [
{OffBroadwayTwitter,
twitter_bearer_token: System.fetch_env!("TWITTER_BEARER_TOKEN")}
]
opts = [strategy: :one_for_one, name: OffBroadwayTwitter.Supervisor]
Supervisor.start_link(children, opts)
end
end
We have our consumer that requires a bearer token from the system environment in order to properly work.
To start the app, you can run it with IEx
:
TWITTER_BEARER_TOKEN=your-token-here iex -S mix
You should see a lot of tweets in upcase :)
Broadway provides a solid model to solve problems of data ingestion. There are producers for the most important queue systems out there, like Amazon SQS, RabbitMQ, Google Cloud Pub/Sub or Kafka so you don’t need to implement a new one. But if you, like me, don’t find the Broadway producer implementation of your choice, you can rollout your own. I hope you have fun in the process! :D
The application from this article can be found at https://github.com/philss/off_broadway_twitter.
]]>
As of Hex v0.21, we can create a local registry with mix hex.registry build
, let’s see how we can use it.
A quick aside: we’ve used the words “repository” and “registry”, what do we mean by them? In a nutshell, a Hex registry is a collection of resources that describe the packages and their relationships and allows for efficient dependency resolution. A Hex repository is basically a Hex registry + actual package tarballs hosting.
The mix hex.registry build
task requires three things:
Let’s create an “acme” directory for our repository, generate a random private key, a public directory, and finally let’s build the registry resources:
$ mkdir acme
$ cd acme
$ openssl genrsa -out private_key.pem
$ mkdir public
$ mix hex.registry build public --name=acme --private-key=private_key.pem
* creating public/public_key
* creating public/tarballs
* creating public/names
* creating public/versions
and that’s it! Now, all we need to do is start a HTTP server that exposes the public
directory and we can point Hex clients to it. However, let’s add a package to our repository first.
To publish a package you need to copy the tarball to public/tarballs
and re-build the registry. You can build your own package (using mix hex.build
) or simply use an existing one. Let’s do the latter, we can easily fetch a package with the mix hex.package fetch
task:
$ mix hex.package fetch decimal 2.0.0
decimal v2.0.0 downloaded to decimal-2.0.0.tar
$ cp decimal-2.0.0.tar public/tarballs/
$ mix hex.registry build public --name=acme --private-key=private_key.pem
* creating public/packages/decimal
* updating public/names
* updating public/versions
Now let’s test our repository, all we need to do is expose our public/
directory via http:
$ python3 -m http.server 8000 --directory=public/
Serving HTTP on :: port 8000 (http://[::]:8000/) ...
And let’s now add the repository and try fetching the package that we just published:
$ mix hex.repo add acme http://localhost:8000 --public-key=public/public_key
$ mix hex.package fetch decimal 2.0.0 --repo=acme
decimal v2.0.0 downloaded to decimal-2.0.0.tar
it worked!
Here’s how you’d use the package from your custom repository in your project, add this to mix.exs
:
defp deps() do
{:decimal, "~> 2.0", repo: "acme"}
end
and run mix deps.get
.
Let’s briefly talk about deploying your custom repository solution to production.
Deploying to Amazon S3 (or similar cloud services) is probably the easiest way to have a reliable Hex repository.
If you already have an S3 bucket, you can use AWS CLI to sync the contents of the public/ directory like this:
$ aws s3 sync public s3://my-bucket
Warning: Remember to sync only the public directory and not private_key.pem! And if you do want to sync your private key, remember to set appropriate bucket policy so it isn’t accidentally exposed.
Your repository should now be available under an URL like: https://<bucket>.s3.<region>.amazonaws.com
or however you configured your bucket.
See “Deploying to S3” on the new Hex.pm self-hosting guide for more information.
If you need any customizations to your Hex server, you may consider creating a proper Elixir project. Since we’re basically just hosting static files, Plug
& Plug.Cowboy
is more than enough:
Step 1: Create a new project with $ mix new my_app --sup
Step 2: Add dependencies
defp deps do
[
{:plug, "~> 1.11"},
{:plug_cowboy, "~> 2.4"}
]
end
Step 3: Update your supervision tree to start Cowboy
# lib/my_app/application.ex
def start(_type, _args) do
port = 4000
children = [
{Plug.Cowboy, scheme: :http, plug: MyApp.Plug, options: [port: port]}
]
opts = [strategy: :one_for_one, name: MyApp.Supervisor]
Supervisor.start_link(children, opts)
end
Step 4: Add MyApp.Plug
# lib/my_app/plug.ex
defmodule MyApp.Plug do
use Plug.Builder
plug Plug.Logger
plug Plug.Static, at: "/", from: "/path/to/repo/public"
plug :not_found
defp not_found(conn, _opts) do
send_resp(conn, 404, "not found")
end
end
And that should be it!
See “Deploying with Plug.Cowboy & Docker” on the new Hex.pm self-hosting guide for more information. In particular, you’ll learn how to add HTTP Basic authentication, use Elixir releases, configure your application with environment variables, and prepare for Docker deployment.
In this article we’ve introduced the mix hex.registry build
task that allows you quickly building a local registry. We’ve also touched on deploying your custom solution to Amazon S3 or rolling your own with Plug. Definitely check out Hex.pm self-hosting guide for a more comprehensive reference.
Happy hacking!
]]>This past weekend, on January 9th, we celebrated 10 years since the first commit to the Elixir repository. While I personally don’t consider Elixir to be 10 years old yet - the language that became what Elixir is today surfaced only 14 months later - a decade is a mark to celebrate!
The goal of this post is to focus on the current state of some projects in the ecosystem and then briefly highlight a few of the exciting efforts coming over the next months.
When I started working on Elixir, I personally had the ambition of using it for building scalable and robust web applications. However, I didn’t want Elixir to be tied to the web. My goal was to design an extensible language with a diverse ecosystem. Elixir aims to be a general purpose language and allows developers to extend it to new domains.
Given Elixir is built on top of Erlang and Erlang is used for networking and distributed systems, Elixir would naturally be a good fit in those domains too, as long as I didn’t screw things up. The Erlang VM is essential to everything we do in Elixir, which is why compatibility has become a language goal too.
I also wanted the language to be productive, especially by focusing on the tooling. Learning a functional programming language is a new endeavor for most developers. Consequently their first experiences getting started with the language, setting up a new project, searching for documentation, and debugging should go as smoothly as possible.
Extensibility, compatibility, and productivity are the goals we built the language upon.
Last year we started a series of articles on companies using Elixir in production on the official website. As of today, we have 7 production cases listed with more coming this year! Overall it is very exciting to see many different companies using a variety of business models and industries running Elixir in production.
Companies like BlockFi, Discord (case), Divvy, Podium, Remote, SalesLoft, and Stord have reached “unicorn status” and rely heavily on Elixir. Startups like Boulevard (podcast), Community (case), Duffel (case), Ockam, Mux (podcast), Ramp, and V7 (case) also use Elixir and have received funding in the last year or two. Elixir is also used within known brands and enterprises such as Bleacher Report, Change.org (case), Heroku (case), Mozilla (case), PagerDuty, PepsiCo (case), StoneCo, and TheRealReal.
There is also a special category of startups that run Elixir alonside an open source model, such as Plausible Analytics, Supabase, Logflare (podcast), and Hex.pm (podcast) itself. Still on the open source front, you will find projects like Mozilla’s Hubs, Pleroma, and Changelog (podcast). There also many small scale and hobby projects that use Elixir for a productive and joyful development experience.
Today, Elixir has a diverse ecosystem that works on a wide range of domains and industries. Let’s take a look at some examples.
Most developers are familiar with using Elixir for web development thanks to the Phoenix web framework. Phoenix gained traction in the ecosystem because it was the first to fully leverage the language and the platform for building real-time applications besides the usual MVC (Model-View-Controller) offering.
It all started with Phoenix Channels, as a bi-directional communication between clients and servers, and Phoenix PubSub, which uses Erlang’s distributed compatibilities to broadcast messages across nodes. As far as I know, Phoenix was the first major web framework to provide a multi-node web real-time solution completely out-of-the-box. Regardless if you are using one node or ten nodes, everything just works, with minimal configuration and dependencies.
Phoenix has matured a lot since its first stable release. Phoenix v1.2 included Phoenix Presence, that allows developers to track which users, IoT devices, etc are connected to your cluster right now. No databases or external dependencies required! This is one of the problems that look deceptively simple at first, but once you outline all scalability, performance, and fault-tolerance requirements, it becomes quite complex. Luckily, Phoenix is running on a platform that excels at these problems, and I am not aware of any other framework that provides such a lean and elegant solution as part of its default stack.
Most recently, Phoenix LiveView was released and brought new ways to build rich, real-time user experiences with server-rendered HTML, inspiring developers to attempt similar solutions for other languages and frameworks. You can read the original announcement or learn how to build a real-time Twitter clone in 15 minutes. As part of the Live family, we have also announced Phoenix LiveDashboard, making monitoring and instrumentation a first-class citizen for Phoenix applications.
While I always expected Elixir to shine for building web applications, I was taken by surprise when I heard about the Nerves platform for creating high-end embedded applications. However, once I learned their premise, it all made sense: writing embedded systems is complicated. Reasoning about failures is hard. So what if we could leverage the decades of lessons learnt by Erlang/OTP to design embedded applications? What if a fault on the Wi-Fi driver could be fixed by having a supervisor simply restart it? After all, the first major use of Erlang/OTP was in an embedded system, the Ericsson AXD301 ATM switch.
Nerves brings the Elixir ecosystem and the battle-tested Erlang VM to edge computing, providing a rich developer experience using proven technology. Nerves started as a one step process for turning an Elixir project into a complete software image for common hardware devices. Today, Nerves is being used in production in industrial automation, machine learning, consumer electronics and more, with Farmbot (case) and Rose Point Navigation being two notable examples.
The Nerves team also created NervesHub, a fully open-source device management system. Combining all these technologies makes Elixir a comprehensive language for building end-to-end IoT platforms.
Shortly after Elixir v1.0 was released, the Elixir Core Team and I started looking into abstractions for tackling data ingestions and data pipelines in Elixir. We ran through a couple designs until we eventually landed on GenStage: a behaviour for exchanging data with back-pressure between Elixir processes and external systems. For an introduction, make sure to check out my keynote introducing both GenStage and Flow.
Today, almost 5 years later, GenStage has been used by many industries and has become one of the factors driving Elixir adoption. For example, you can read how both Discord and Change.org have built systems on Elixir and GenStage that handle spikes and run at massive scale.
However, GenStage was just the beginning. In 2019, we announced Broadway, which is a higher-level abstraction on top of GenStage that makes building data ingestion pipelines a breeze. We originally released with Amazon SQS support. Nowadays, RabbitMQ, Google Cloud PubSub, Apache Kafka, and other sources (known as producers in Broadway terms) are also available.
Since the Erlang VM was designed for scalable network processing, one can expect to also be an excellent platform for audio and video streaming. However, if you also wanted to process and transform those streams on the fly, the situation becomes much more complicated as you likely have to integrate with native code.
Luckily, the tables have turned when Erlang/OTP 20 was released a couple years ago with the so-called Dirty NIFs. The Erlang VM always had the ability to invoke native code, but this native code could not run for long, as to not interfere with the preemptive features of the Erlang runtime. Dirty NIFs allow developers to tag native code either as IO or CPU bound, which runs on specific threads. Between ports (I/O based), NIFs, Dirty NIFs, and remote nodes, developers now have many options to interface with native code with different performance and reliability guarantees. That’s exactly the foundation the Membrane Framework builds on top of.
Membrane was extracted from RadioKit, a startup aiming at disrupting the radio broadcasting industry. Originally it focused on processing and mixing audio. Later, Software Mansion acquired the framework and provided stable funding and a solid team to help it grow into a full-scale framework. Currently, it allows developers to process, transmit, broadcast, and transform audio and videos streams on the fly. Whether you are building a Twitch clone, a VOD application or a video conferencing system, Membrane provides a growing set of high-level abstractions and pre-made modules so you don’t have to dive into idiosyncrasies of particular codecs, protocols, and formats.
The year of 2021 looks very exciting for the Erlang Ecosystem and the Elixir community. In this section, we are going to mention some of the things we expect to see in 2021.
In September 2020, Lukas Larsson and the Erlang/OTP team announced a JIT compiler for the Erlang VM called BeamAsm. How faster the JIT will be in practice depends on your application but the results posted in the announcement are promising. To quote Lukas:
If we run the JSON benchmarks found in the Poison or Jason, BeamAsm achieves anything from 30% to 130% increase (average at about 70%) in the number of iterations per second for all Erlang/Elixir implementations. For some benchmarks, BeamAsm is even faster than the pure C implementation jiffy.
More complex applications tend to see a more moderate performance increase, for instance, RabbitMQ is able to handle 30% to 50% more messages per second depending on the scenario.
I have been running Erlang/OTP master since the JIT pull request has been merged. I am also interested in the benefits the JIT brings to the developer experience and I must say the improvements are clear: code compilation and test suites run distinctively faster (around 30% to 50% in my case) and that’s quite promising!
My understanding is that there is more to explore when it comes to JIT but the benefits so far are already substantial beyond micro-benchmarks, bringing measurable benefits to end-users.
On the web front, we should soon see the release of Phoenix v1.6, where one of the major features is the addition of the mix phx.gen.auth
code generator that sketches out an authentication solution with registration, confirmation, password recovery, and more. These improvements to the getting started workflow alongside the metrics and dashboards added in v1.5 put Phoenix in a unique position to provide a great and complete developer experience from development to production, with a scalable runtime to back it up.
We will most likely see Phoenix LiveView get the 1.0 stamp this year too, with a refined template syntax and exciting component features. While many teams and companies have adopted and leveraged LiveView to build great user experiences, it is understandable that some are waiting for a stable release to jump in with both feet. Stability also means more learning resources, books, courses, etc. All of those will lead to more growth.
Phoenix LiveView will also lead the ecosystem to more visual tools. We have already talked about the Phoenix LiveDashboard but I expect to see more tools in this area soon, such as Surface, Oban Pro, and the soon to be released Broadway dashboard showcased by our own Marlus Saraiva at ElixirConf.
One of the major features the Membrane team is working on is WebRTC support. Until now the framework was capable of processing streams delivered to it over numerous protocols but not from the web browser. The combination of Membrane and Phoenix can become a powerful addition to the ecosystem, allowing developers to add a multimedia component to their real-time applications, all directly from Elixir.
The Dashbit team also hopes to release Broadway v1.0 this year. The biggest feature we are working on is support for network based producers, allowing developers to create HTTP endpoints or implement custom TCP/UDP protocols, such as Fluentd or Logstash formats, which feed directly into their Broadway pipeline.
If you want to participate, you should definitely consider getting involved with the many projects and efforts happening in the community. Note the list above is not comprehensive and there is more exciting work happening in different areas.
If you are just learning or want to learn Elixir, the website is a good starting point, check out the guides for a fast-paced introduction or our learning resources page with many resources for different levels of your learning curve.
Finally, we at Dashbit continue exploring new domains and areas to bring Elixir into. Last month we announced a research Master of Science project sponsored by Dashbit into eBPF by the Compilers Lab in the Federal University of Minas Gerais, Brazil.
We have also been really hard at work over the last 2 months or so on a project called Nx and a set of auxiliary tools that have the potential to bring Elixir to a whole new domain and open up the language to areas that were not explored in depth before! I have shared some early benchmarks and I will be officially presenting these projects this February on Lambda Days 2021. Come join us and stay tuned! Edit: Nx is now publicly available.
]]>
For those not familar, the Gettext project converts .po
files like this:
# pt
msgid "Hello world"
msgstr "Olá mundo"
# pl
msgid "Hello world"
msgstr "Witaj świecie"
Into a module with functions:
def translate("pt", "Hello world"), do: "Olá mundo"
def translate("pl", "Hello world"), do: "Witaj świecie"
While we start with an Elixir application, we end-up doing most of the work with the Erlang compiler and tools, so most of the lessons here are applicable to the wider ecosystem. Be sure to read until the end for a welcome surprise.
When project compilation is slow, the first step is to identify which files are slow. In Elixir v1.11, this can be done like this:
$ mix compile --force --profile time
The command above will print:
...
[profile] lib/ecto/query/planner.ex compiled in 1376ms (plus 596ms waiting)
[profile] lib/ecto/association.ex compiled in 904ms (plus 1168ms waiting)
[profile] lib/ecto/changeset.ex compiled in 869ms (plus 1301ms waiting)
[profile] Finished compilation cycle of 95 modules in 2579ms
[profile] Finished group pass check of 95 modules in 104ms
Compilation of each file in your project is done in parallel. The overall message is:
[profile] FILE compiled in COMPILE_TIME (plus WAITING_TIME waiting)
COMPILE_TIME
is the time we were effectively compiling code. However, since a file may depend on a module defined in another file, WAITING_TIME
is the time we wait until the file we depend on becomes available. High waiting times are not usually a concern, so we focus on the files with high compilation times.
At the end, we print two summaries:
[profile] Finished compilation cycle of 95 modules in 2579ms
[profile] Finished group pass check of 95 modules in 104ms
The first includes the time to compile all files in parallel and includes how many modules have been defined. The second is the time to execute a group pass which looks at all modules at once, in order to find undefined functions, emit deprecations, etc.
Unless the “group pass check” is the slow one - which would be a bug in the Elixir compiler - we are often looking at a single file being the root cause of slow compilation. With this file in hand, it is time to dig deeper.
Once we have identified the slow file, we need to understand why it is slow. When Elixir compiles a file, it executes code at three distinct stages. For example, let’s assume the slow down was in lib/problematic_file.ex
that looks like this:
# FILE LEVEL
defmodule ProblematicModule do
# MODULE LEVEL
def function do
# FUNCTION LEVEL
end
end
When compiling the file above, Elixir will execute each level in order. If that file has multiple modules, then compilation will happen for each module in the file, first at MODULE LEVEL and then FUNCTION LEVEL.
TIP: If a file with multiple modules is slow, I suggest breaking those modules into separate files and repeating the steps in the previous section.
With this knowledge in hand, we want to compile the file once again, but now passing the ERL_COMPILER_OPTIONS=time
flag to the underlying Erlang compiler, which will print time reports. One option is to do this:
$ mix compile
$ touch lib/problematic_file.ex
$ ERL_COMPILER_OPTIONS=time mix compile
Then, for each module being compiled (which includes the one in your mix.exs
), you will see a report like this:
core : 0.653 s 72136.4 kB
sys_core_fold : 0.482 s 69055.3 kB
sys_core_alias : 0.146 s 69055.3 kB
core_transforms : 0.000 s 69055.3 kB
sys_core_bsm : 0.098 s 69055.3 kB
v3_kernel : 2.250 s 169439.0 kB
Most compilers work by doing multiple passes on your code. Above we can see how much time was spent on each pass and how much memory the code representation, also known as Abstract Syntax Tree (AST), takes after each pass.
The ERL_COMPILER_OPTIONS=time mix compile
command above has one issue though. If other files depend on the problematic file, they may be recompiled too, and that will add noise to your output. If that’s the case, you can also do this:
$ ERL_COMPILER_OPTIONS=time mix run lib/problematic_file.ex
This is a rather neat trick: we are re-running a file that we have just compiled. You will get warnings about modules being redefined but they are safe to ignore.
With the time reports in hand, there are two possible scenarios here:
One (or several) of the passes in the report are slow. This means the slow down happens when compiling at the FUNCTION LEVEL and it will be associated with the generation of the .beam
file for ProblematicModule
All passes are fast and the slow down happens before the reports emitted by ERL_COMPILER_OPTIONS=time
are printed. If this is the case, the slowdown is actually happening at the MODULE LEVEL, before the generation of the .beam
file
Most times, the slowdown is actually at the FUNCTION LEVEL, including the one reported as a Gettext issue, so that’s the one we will explore. Performance issues at the MODULE LEVEL may still happen though, especially in large module bodies as seen in Phoenix’s Router - but don’t worry, those have often already been optimized throughout the years!
At this point, we have found a module that is slow to compile. Given the original Gettext issue pointed to a difference of performance between Erlang versions, my next step is to remove Elixir from the equation.
Luckily, this is very easy to do with the decompile project:
$ mix archive.install github michalmuskala/decompile
$ mix decompile ProblematicModule --to erl
This command will emit a Elixir.ProblematicModule.erl
file, which is literally the compiled Elixir code, represented in Erlang. Now, let’s compile it again, but without involving Elixir at all:
$ erlc +time Elixir.ProblematicModule.erl
TIP: the command above may not work out of the box. That’s because the
.erl
file generated bydecompile
may have invalid syntax. In those cases, you can manually fix those errors. They are often small nits.
If you want to try it yourself, you can find the .erl
file for the Gettext report here:
$ erlc +time Elixir.GettextCompile.Gettext.erl
Here are the relevant snippets of the report I got on my machine:
...
expand_records : 0.065 s 19988.0 kB
core : 3.295 s 373293.3 kB
...
beam_ssa_bool : 1.125 s 39252.7 kB
...
beam_ssa_bsm : 2.432 s 39263.1 kB
...
beam_ssa_funs : 0.119 s 39263.1 kB
beam_ssa_opt : 6.242 s 39298.0 kB
...
...
beam_ssa_pre_codegen : 3.426 s 48897.5 kB
...
...
Looking at the report you can start building an intuition about which passes are slow. Given we were also told the code compiled fast on Erlang/OTP 22.3, I compiled the same file with that Erlang version and compared the reports side by side. Here are my notes:
The core
pass got considerably slower between Erlang/OTP versions (from 1.8s to 3.2s)
Going from the expand_records
pass to core
increases the memory usage by almost 20 times (although this behaviour was also there on Erlang/OTP 22)
The beam_ssa_bool
did not exist on Erlang/OTP 22
In Erlang/OTP 22.3, the module takes 22 seconds to compile. On version 23.1, it takes 32 seconds. We have some notes and a reasonable target of 22 seconds to optimize towards. Let’s get to work.
Note: it is worth saying that it is very natural for new passes to be added and others to be removed between Erlang/OTP versions, precisely because the compiler is getting smarter all the time! As part of this process, some passes get faster and others get slower. Such is life. :)
The Erlang compiler also has a neat feature that alows us to profile any compiler pass. Since we have detected the slow down in the core
file, let’s profile it:
$ erlc +'{eprof, core}' Elixir.ProblematicModule.erl
It will print a report like this:
core: Running eprof
****** Process <0.111.0> -- 100.00 % of profiled time ***
FUNCTION CALLS % TIME [uS / CALLS]
-------- ----- ------- ---- [----------]
gen:do_for_proc/2 1 0.00 0 [ 0.00]
gen:'-call/4-fun-0-'/4 1 0.00 0 [ 0.00]
v3_core:unforce/2 2 0.00 0 [ 0.00]
v3_core:make_bool_switch/5 2 0.00 0 [ 0.00]
v3_core:expr_map/4 1 0.00 0 [ 0.00]
v3_core:safe_map/2 1 0.00 0 [ 0.00]
With the slowest entries coming at the bottom. In this Gettext module, the slowest entry was:
cerl_trees:mapfold/4 3220377 19.14 2447684 [ 0.76]
Jackpot! 20% of the compilation time was spent on a single function. This is a great opportunity for optimization.
I usually like to say there are two types of performance improvements. You have semantic improvements, which you can only pull off by having a grasp of the domain. The more you understand, the more likely you are to be able to come up with an improved algorithm (or the more you will be certain you are already implementing the state of the art). There are also mechanical improvements, which are more about how the runtime and the data structures in the language work. Often you work with a mixture of both.
In this case, the function cerl_trees:mapfold/4
is a function that traverses all AST nodes recursively. You can also see it was called more than 3 million times. The caller of this function in the core
pass has the following goal:
Lower a
receive
to more primitive operations. Rewrite patterns that use and bind the same variable as nested cases.
To be honest, I don’t quite understand the work being done by the linked code but I checked the module being compiled and I learned that:
receive
In other words, the pass is looking for a construct that does not happen anywhere in the compiled code. Therefore, can we avoid doing the work if we know we don’t have to do it?
That’s when I realized that, there are many constructs that never have a case
or a receive
in them! For example, a list with integer elements, such as [1, 2, 3]
, will never have a case
/receive
inside. More importantly, a string, such as “123”, won’t either. Those are known as literals. As we have seen, the Gettext module is full of literals, such as strings, and perhaps traversing them looking for these constructs is part of the issue. What if we tell cerl_trees:mapfoldl/4
to stop traversing whenever it finds a literal?
This is exactly what my first pull request does. By skipping literals and profiling again, I got these results:
cerl_trees:mapfold/4 2002931 11.14 1647204 [ 0.72]
This brought this particular pass from 3.2s to 2.4s! Skipping literals indeed yields a solid improvement but still not quite as fast as Erlang/OTP 22.3, which took only 1.8s.
Luckily, we can go even deeper! We know we can’t have case
/receive
s inside a literal. But are there any other constructs that can’t have case
/receive
s in them? The answer is yes! The core
pass performs variable hoisting out of expressions, which means that, code like this:
[
x,
case y do
true -> foo()
false -> bar()
end
]
is rewritten to:
_compilervar =
case y do
true -> foo()
false -> bar()
end
[x, _compilervar]
This expands the number of constructs we no longer have to traverse, as it is guaranteed they won’t have a receive
nor case
in them. I have updated the pull request accordingly and overall I was able to improve two distinct passes by 25% and 33%. They are not much but I will take them!
The first patch took most of a day. While debugging and working on it, I jumped around the source code and learned a lot. At some point, my brain starting nagging me about the second note: the AST becomes considerably larger at the end of the core
pass. That’s when I realized: what if cerl_trees:mapfold/4
is running millions of times because the AST is too large? And more importantly, why is the AST so large?
While investigating the core
pass, I noticed that strings such as "Hello"
in patterns, would come in roughly as:
{bin, Metadata0, [
{bitstr, Metadata1, {string, Metadata2, 'Hello'}, Size, Type}
]}
and come out as:
{bin, Metadata0, [
{bitstr, Metadata1, {char, Metadata2, $H}, Size, Type},
{bitstr, Metadata1, {char, Metadata2, $e}, Size, Type}
{bitstr, Metadata1, {char, Metadata2, $l}, Size, Type}
{bitstr, Metadata1, {char, Metadata2, $o}, Size, Type}
]}
Strings are a higher level representation and we want to convert them to lower level ones in order to run compiler optimizations later on. However, the new representation consumes much more memory. Given the Gettext module is matching on a bunch of strings, this explains such a huge growth in memory usage.
Luckily, the core
pass already had an optimization for this scenario, which converts strings to large integers, so that the “Hello” string actually comes out as:
{bin, Metadata0, [
{bitstr, Metadata1, {integer, Metadata2, 310939249775}, 40, integer}
]}
However, this optimization was only applied to strings outside of patterns. We could try to apply this optimization in more cases but we need to be careful with not making compiled pattern matching slower at runtime. Fortunately, about a year ago, I sent a pull request to the compiler that made it apply string matching optimizations more consistently. This means we can collapse strings into large integers now without affecting the result of later compiler passes!
This lead to the second pull request. Before the patch:
expand_records : 0.077 s 19988.7 kB
core : 3.295 s 373293.3 kB
sys_core_fold : 0.868 s 370212.9 kB
sys_core_alias : 0.237 s 370212.9 kB
core_transforms : 0.000 s 370212.9 kB
sys_core_bsm : 0.677 s 370212.9 kB
v3_kernel : 2.662 s 169439.0 kB
After this patch:
expand_records : 0.077 s 19988.7 kB
core : 0.653 s 72136.4 kB
sys_core_fold : 0.482 s 69055.3 kB
sys_core_alias : 0.146 s 69055.3 kB
core_transforms : 0.000 s 69055.3 kB
sys_core_bsm : 0.098 s 69055.3 kB
v3_kernel : 2.250 s 169439.0 kB
Not only it made the core
pass 75% faster, it made all other passes faster too. This goes until the v3_kernel
pass, which changes the AST representation. Also notice the size of the AST is the same after v3_kernel
, which supports our theory we are not ultimately changing the end result. Overall, the memory usage was reduced by 75% on the core passes.
Ironically, if I had started with this patch, I probably wouldn’t have worked in the first pull request, because cerl_trees:mapfold/4
most likely wouldn’t show up as a bottleneck.
These results were very exciting but there is still one last note to explore.
To finish the day, I have also profiled beam_ssa_bool
, beam_ssa_pre_codegen
, and friends. Curiously, in almost all of them, the slowest call was related to a recursive function named beam_ssa:rpo/1
, that would be invoked hundreds of thousands of times:
beam_ssa:rpo_1/4 802391 10.72 375843 [ 0.47]
While exploring the code, I learned that many times we could skip these calls by precomputing the rpo
value and explicitly passing it in as an argument. Take this code:
if
map_size(DefVars) > 1 ->
Dom = beam_ssa:dominators(Blocks1),
Uses = beam_ssa:uses(Blocks1),
St0 = #st{defs=DefVars,count=Count1,dom=Dom,uses=Uses},
{Blocks2,St} = bool_opt(Blocks1, St0),
Each of beam_ssa:dominators/1
, beam_ssa:uses/1
, and bool_opt/2
call beam_ssa:rpo/1
with the same argument. Therefore, if I rewrite the code and change the supporting APIs to this:
if
map_size(DefVars) > 1 ->
RPO = beam_ssa:rpo(Blocks1),
Dom = beam_ssa:dominators(RPO, Blocks1),
Uses = beam_ssa:uses(RPO, Blocks1),
St0 = #st{defs=DefVars,count=Count1,dom=Dom,uses=Uses},
{Blocks2,St} = bool_opt(RPO, Blocks1, St0),
The profiler now gives better numbers on the beam_ssa:rpo/1
calls, reducing it almost in half:
beam_ssa:rpo_1/4 481526 6.35 203949 [ 0.42]
To me, this is a mechanical change because I literally had no idea what rpo
meant while writing the patch - and I still don’t! It assume it is something that is generally cheap to compute, but given our problematic module is almost 100k lines of code, it exercises code paths that 99% of the code out there doesn’t.
The other interesting aspect is that this type of mechanism refactoring is extremely easy to perform in functional languages exactly because they are immutable and tend to isolate side-effects. I can move function calls around because I know they are not changing something else below my feet.
I asked the Erlang Compiler Team if they were interested in making the calls to beam_ssa:rpo/1
upfront, as in the code snippet above, which they kindly agreed. This lead to the third and last pull request.
At this point, you may be wondering: did I reach my target? Did I make it faster? To our general excitement, the target was reached before I even started! It happens that Erlang/OTP has landed JIT support on master and the JIT support (and most likely other optimizations) already made it so Erlang master compiled faster than Erlang 22.3, beating it by 1 second, down to 21s.
Putting the JIT and all of the pull requests above together, the problematic module compiles in 18s, shaving an extra 3 seconds and reducing the memory usage spike by more than half! The performance benefits yielded by JIT are generally applicable while the changes in these pull requests will mostly benefit modules with many strings inside patterns (such as the Phoenix Router, Gettext, Elixir’s Unicode module, etc).
In case you are a Gettext user and you don’t want to wait until the next Erlang version comes out to benefit from faster compilation times, I have also pushed improvements to the Gettext library that breaks these problematic modules into a bunch of small ones, by partitioning them by locale and domain. Those improvements are in master and we would welcome if you gave them a try and provided feedback as we prepare for a Hex release.
I am a person who absolutely loves doing optimization work and I have to say the 36 hours that emcompassed debugging these issues up to writing this article, have been extremely fun! I hope you have learned a couple things too.
]]># lib/foo.ex
defmodule Foo do
def foo() do
a = 42
end
end
when we compile it, we’ll see this helpful warning:
$ mix compile
Compiling 1 file (.ex)
warning: variable "a" is unused (if the variable is not meant to be used, prefix it with an underscore)
lib/foo.ex:3: Foo.foo/0
$ echo $?
0
where $?
in a Unix shell contains the exit status of the last executed command in the shell, 0
is success, non-zero code is a failure.
To make sure we don’t accidentally commit code that has warnings, we can pass the --warnings-as-errors
option:
$ mix compile --warnings-as-errors
Compiling 1 file (.ex)
warning: variable "a" is unused (if the variable is not meant to be used, prefix it with an underscore)
lib/foo.ex:3: Foo.foo/0
Compilation failed due to warnings while using the --warnings-as-errors option
$ echo $?
1
Notice our shell reports the failure, exit status 1
. This is very helpful because many CI systems will automatically fail the build when encountering non-zero exit code from a command.
Let’s see how to enable warnings as errors on CIs. Here’s a typical GitHub Actions setup for an Elixir project:
# .github/workflows/ci.yml
jobs:
test:
runs-on: ubuntu-latest
steps:
- uses: actions/checkout@v2
- name: Install OTP and Elixir
uses: actions/setup-elixir@v1
with:
otp-version: 23.1.1
elixir-version: 1.11.1
- run: mix deps.get
- run: mix test
mix test
will compile the code by calling mix compile
and then run tests. To enable warnings as errors, all we need to do is to call mix compile --warnings-as-errors
explicitly: (remember to use the right MIX_ENV
!)
# (...)
- run: mix deps.get
- run: MIX_ENV=test mix compile --warnings-as-errors
- run: mix test
we could even combine it using mix do
task:
# (...)
- run: mix deps.get
- run: MIX_ENV=test mix do compile --warnings-as-errors, test
We have enabled warnings as errors for compiled code but suppose we have warnings in our tests:
defmodule FooTest do
use ExUnit.Case
test "foo" do
a = 42
end
end
We run our CI command again:
$ MIX_ENV=test mix do compile --warnings-as-errors, test
Compiling 1 file (.ex)
Generated foo app
warning: variable "a" is unused (if the variable is not meant to be used, prefix it with an underscore)
test/foo_test.exs:5: FooTest."test foo"/1
.
Finished in 0.01 seconds
1 test, 0 failures
Randomized with seed 834982
$ echo $?
0
However, our command was successful, why?
In short, mix compile
by default wouldn’t see files in test/
. While the test files are of course compiled too, the compilation happens inside mix test
and starts with the default compilation options.
We can alleviate it by setting compiler options in test/test_helper.exs
, the first file that is loaded before we load any tests:
# test/test_helper.exs
Code.put_compiler_option(:warnings_as_errors, true)
ExUnit.start()
See Code.put_compiler_option/2
for the list of all available options.
Now, if we re-run the command it will fail:
$ MIX_ENV=test mix do compile --warnings-as-errors, test
warning: variable "a" is unused (if the variable is not meant to be used, prefix it with an underscore)
test/foo_test.exs:5: FooTest."test foo"/1
Compilation failed due to warnings while using the --warnings-as-errors option
$ echo $?
1
Finally, on Elixir v1.12+ instead of changing test_helper.exs
, we can simply do mix test --warnings-as-errors
. Note we still need to pass --warnings-as-errors
to mix compile
, see docs!
We are big fans of keeping projects free of warnings and we usually configure our CIs to ensure that. Here’s an excerpt from GitHub Actions configuration:
# .github/workflows/ci.yml
jobs:
test:
runs-on: ubuntu-latest
steps:
- uses: actions/checkout@v2
- name: Install OTP and Elixir
uses: actions/setup-elixir@v1
with:
otp-version: 23.1.1
elixir-version: 1.11.1
- run: mix deps.get
- run: MIX_ENV=test mix do compile --warnings-as-errors, test
And from Elixir v1.12+, you can do:
- run: MIX_ENV=test mix do compile --warnings-as-errors, test --warnings-as-errors
On large projects there’s usually a lot of compilation output in which case breaking it up might be helpful to be able to inspect each step’s output separately:
- run: MIX_ENV=test mix deps.compile
- run: MIX_ENV=test mix compile --warnings-as-errors
- run: mix test --warnings-as-errors
Finally, we also like to add mix format --check-formatted
and mix deps.unlock --check-unused
to our CI pipeline to catch even more things before code gets committed.
Happy hacking!
]]>Before we start, I want to emphasize we find Redis a fantastic piece of technology. This is not a critique of Redis but rather a discussion of the different options Elixir developers may have available.
The first scenario where you may not need Redis with Elixir is Distributed PubSub. Throughout this section, we will consider PubSub systems to provide at-most-once delivery: they broadcast events to the currently available subscribers. If a subscriber is not around, they won’t receive the message later.
For this reason, PubSub systems are often paired with databases to offer persistence. For example, every time someone sends a message in a chat application, the system can save the contents to the database and then broadcast it to all users. This means everyone connected at a given moment sees the update immediately, but disconnected users can catch up later.
Imagine that you have multiple nodes, and you want to exchange messages between said nodes. In Elixir, thanks to the Erlang VM, which ships with distribution support, this can be as simple as:
for node <- Node.list() do
send({:known_name, node}, :hello_world)
end
In 200LOC or less, you can implement a PubSub system that broadcasts to all subscribers within the same node or anywhere else in a cluster, without bringing any third-party tools. At best, you will need libcluster - an Elixir library - to establish the connection between the nodes based on some strategy (K8s, AWS, DNS, etc.).
In other words, PubSub pretty much ships out of the box with Elixir. Technologies without distribution would need to rely on Redis PubSub, PostgreSQL Notifications, or similar to achieve the same.
Of course, the above assumes your infrastructure allows you to directly establish connections between nodes, which is trivial in plataforms such as Fly.io or Gigalixir.
Presence is the ability to track who is connected in a cluster right now — the “who” may be users, phones, IoT devices, etc. For example, if Alice is connected to node A, she wants to see that Bob is also available, even if he has joined node B.
Presence is one of the problems that are more complicated to implement than it sounds. For example, let’s consider implementing Presence by storing the connected entities in a database. However, what happens if a node crashes or leaves the cluster? Because the node crashed, all the users connected to it must be removed, but the node itself cannot do so. Therefore the other nodes need to detect those failure scenarios and act accordingly. But observing failures in a distributed system is also complicated: how do you differentiate between a temporarily unresponsive node from one that permanently failed?
Another common approach to solve this problem is to frequently write to a database while users are connected. If you have seen no writes within a timeframe, you consider those users to be disconnected. However, such solutions have to choose between being write-intensive or inaccurate. For instance, let’s say that users become disconnected after 1 minute. This means that you need to write to the database every 1 minute for every user. If you have 10k users, that’s 167 writes per second, only to track that the users are connected. Meanwhile, the gap between a user leaving and having their status reflected in the UI is, in the worst-case scenario, also 1 minute. Any attempt at reducing the number of writes implies an increased gap.
Given Elixir’s clustering support, we can once more implement Presence without a need for third-party dependencies! We use a PubSub system to implement Presence, as we need to notify as users join and leave. Instead of relying on centralized storage, the nodes directly communicate and exchange information about who is around. This removes the need for frequent writes. When a user leaves, this is also reflected immediately.
So while you can use Redis or another storage to provide Presence, Elixir can deliver a solution that is efficient and doesn’t require third-party tools.
The solutions to previous cases were built on top of Erlang’s unique distribution capabilities. In the following sections, the distinguishing factor between needing Redis or not will be multi-core concurrency, so this discussion is more generally applicable. Therefore, when we say Elixir in this section, it will also apply to JVM, Go, and other environments. They will contrast to Ruby, Python, and Node.js, in which their primary runtimes do not provide adequate multi-core concurrency within a single Operating System process.
Let’s start with the non-concurrent scenario. Consider you are building a web application in Ruby, Python, etc. To deploy it, you get two eight-core machines. In languages that do not provide satisfactory multi-core concurrency, a common option for deployment is to start 8 instances of your web application, one per core, on each node. Overall, you will have CxN instances, where C is the number of cores, and N is the number of nodes.
Now consider a particular operation in this application that is expensive, and you want to cache its results. The easiest solution, regardless of your programming environment, is to cache it in memory. However, given we have 16 instances of this application, caching it in memory is suboptimal: we will have to perform this expensive operation at least 16 times, one for each instance. For this reason, it is widespread to use Redis, Memcached, or similar for caching in environments like Ruby, Python, etc. With Redis, you would cache it only once, and it will be shared across all instances. The trade-off is that we are replacing memory access by a network round-trip, and the latter is orders of magnitude more expensive.
Now let’s consider environments with multi-core concurrency. In languages like Elixir, you start one instance per node, regardless of the number of cores, since the runtime will share memory and efficiently spread the work across all cores. When it comes to caching, keeping the cache in-memory is a much more affordable scenario, as you will only have to compute once per node. Therefore, you have the option to skip Redis or Memcached altogether and avoid network round-trip.
Of course, this depends on how many nodes you are effectively running in production. Luckily, many companies report being able to run Elixir with an order of magnitude less nodes than technologies they have migrated from.
You can also choose a mixed approach and store the cache both in-memory and in Redis. First, you look up in memory and, if missing, you fallback to Redis. If unavailable in both, then you execute the operation and cache it in each. The critical part to highlight here is that multi-core environments give you more flexibility to tackle these problems while reducing resource utilization. In Elixir/Erlang, you can also keep the cache in memory and use PubSub to distribute it across nodes. You can see this last approach in action in the excellent FunWithFlags library.
Another trade-off to consider is that all in-memory cache will be gone once you deploy new nodes. Therefore, if you need data to persist across deployments, you will want to use Redis as a cache layer, as detailed above, or dump the cache in a storage, such as database, S3, or Redis, before each deployment.
Another scenario you may not need Redis in Elixir is to perform asynchronous processing. Let’s continue the discussion from the previous case.
In environments without or with limited multi-core concurrency, given each instance is assigned to one core, they are limited in their ability to handle requests concurrently. This has led to a common saying that “you should avoid blocking the main thread”. For example, imagine that your application has to deliver emails on sign up or generate some computationally expensive reports. While one of your 16 web instances is doing this, it cannot handle other incoming requests efficiently. For this reason, a common choice here is to move the work elsewhere, typically a background-job processing queue. First, you store the work to be done on Redis or similar. Then one of the 16 web instances (or more commonly a completely different set of workers) grabs it from the queue.
In multi-core concurrent environments, requests can be handled concurrently regardless if they are doing CPU or IO work. Sending the email from the request itself won’t block other requests. Generating the report is not a problem, as requests can be served by other CPUs. These platforms typically get assigned as many requests as they can handle and they distribute the work over the machine resources. Even if you prefer to deliver emails outside of the request, in order to send an earlier response to users, you can spawn an asynchronous worker without a need to move the delivery to an external queue or to another machine. Once again, concurrency gives us a more straightforward option to tackle these scenarios.
Note the Erlang VM takes care of multiplexing CPU and IO work without a need for developers to tag functions as async or similar. Workers in Erlang/Elixir are also preemptive, so it is not possible for a group of workers to starve all of the machine resources and block other workers from progressing their tasks. Quite similar to how Operating Systems manage their own processes, albeit much more lightweight.
There is one big caveat here: background-job processing queues often come with multiple features, such as retries, job visibility, etc. If you need any of these features, then I strongly suggest using a tool that relies on storage and provides all bells and whistles. Note that a background-job tool may use Redis, such as Elixir’s exq, but it doesn’t need to. They can use a database, as seen in Oban, or conventional messaging systems, such as RabbitMQ or Amazon SQS. In any case, for something as trivial as sending an email in Elixir, I would send the e-mail within the request, especially if the user needs to open up the e-mail before proceeding.
This caveat has led to some confusion, where some would claim that “you don’t need background jobs in Elixir”, which can be misleading. In Elixir, it is a choice you make when your requirements demand so, but it is not a necessity from day one.
I want to finish this section with a tale of one of my last consulting gigs as a Ruby developer as it was an insightful example of when background jobs are not an answer and can be even harmful.
The gig was with a company having scalability issues with Ruby. In particular, their problems were related to payment processing. They had to integrate with a specific payment processor, which would often take north of 3 seconds to handle a request. As per the above, while their Ruby servers were waiting for the payment processor, they could not do any other work, which slowed down their service. Their first course of action was to ramp up the number of servers. However, as the application gained users, latency was still unpredictable, operations became more complicated, often putting strains on other parts of their architecture, leading to a lot of sunk development time.
They tried using threaded web servers but it did not address the problem satisfactorily. They also explored moving to JRuby, which would have solved the problem at the runtime level, but they had little experience operating Java VMs, which blocked them from migrating.
The quick workaround (and common practice) was to move the payment processing to a background job. However, if the processing failed, they could not merely retry the job. Due to payment processing requirements, the user input was necessary on every attempt. So when it failed, they chose to send an email to users with a link to try again, which ultimately affected their conversion rates.
When we were brought in to work on the system, we developed a separate application to communicate with the payment processor, so we could scale it in isolation and try different deployment options with minimal impact. Then we added client-side polling to see the payment state while it was processed. The problem was addressed, but it cost hundreds of hours of development time and lost revenue until they arrived at the solution. A difficulty that would not exist in platforms with rich and robust tools for async processing and concurrency.
In this article, we discussed cases where you can reduce your operational complexity by using the features that ship as part of Elixir. The goal is to provide an in-depth reference that developers can link to when someone says that “you may not need Redis in Elixir”.
If I had to summarize what all of the cases have in common, the answer is ephemeral state. PubSub, caching, etc. are all temporary. PubSub delivers messages to who is available right now. Presence keeps who is connected right now. Whatever is cached can be lost and be recomputed. Therefore, if you have ephemeral data in Elixir, the odds are that you may not need Redis. However, if you need to persist or backup this state, then Redis or any other database will be handy.
It is also worth saying that, if you would rather just use Redis, for whatever reason, then go ahead and use Redis! You certainly won’t be alone as you join other companies using libraries like Redix to run Elixir and Redis together in production.
]]>We added this layer of security to our webhooks in one of our projects following Stripe’s specification, and it works well! The idea is to sign the entire body of the request using a secret shared by the emitter (the server) and the client of the webhook. The signature contains the timestamp and the hash of the body. This hash is generated with a HMAC using the SHA256 algorithm to ensure a balance between performance and security.
UPDATE #1: Thanks to the feedback from Pawel Szafran we fixed the order of “secret” and “payload” arguments when using
:crypto.mac/4
in this blog post.
The signature is a header sent on each request and it looks like this:
t=1492774577,
v1=6ffbb59b2300aae63f272406069a9788598b792a944a07aba816edb039989a39
Where t
is the timestamp, which is the time in seconds that the event was signed, and the v1
is the version of this signature. Note that multiple versions may be present.
The value of v1
is the calculated hash of the body, along with the timestamp and a shared secret between the server and the client. The timestamp is important to prevent replay attacks.
To calculate the HMAC of a string in Elixir, you can use the :crypto
module, normally available from Erlang:
:crypto.mac(:hmac, :sha256, "your-shared-secret", "your-entire-body")
We will be using the following body as an example:
{
"data": "hello world"
}
And the secret will be just secret
. Let’s freeze the time in 1603136520
, which is 2020-10-19 19:42:00
in UTC.
Following the Stripe’s specification, the signature will be the HMAC of:
.
(dot) character; This is something like:
signed_payload = "1603136520.{\n \"data\":\"hello world\"\n}"
hmac = :crypto.mac(:hmac, :sha256, "secret", signed_payload)
You may notice that this code will generate a binary, which is not what we want. Instead, we need to encode the signature as a base 16 string:
Base.encode16(hmac, case: :lower)
The result will be the string 47f795dce546e011e7da48824b1ccaccd3b667a455d6f8cee47499cadaf6427a
. Awesome! Now we need to put the hash and the timestamp in the request headers. For the request, you will need a HTTP client. For my example I will be using Finch, which is a new and robust HTTP client.
body = "{\n \"data\":\"hello world\"\n}"
now = System.system_time(:second)
sig = "t=#{now},v1=#{signature(body, now)}"
Finch.build(:post, "https://httpbin.org/post", [{"signature", sig}], body)
|> Finch.request(MyFinch)
The signature/2
function looks like this:
def signature(body, timestamp) do
signed_payload = "#{timestamp}.#{body}"
hmac = :crypto.mac(:hmac, :sha256, "secret", signed_payload)
Base.encode16(hmac, case: :lower)
end
For the server that is it. Now each client will receive the signature in a signature
header.
The clients that receives the webhook requests can now verify the integrity of the data. If you are receiving webhooks from Stripe, you can use this exact approach to validate them.
The algorithm is similar to what is needed to sign, but there are some details regarding reading the request body from Plug.Conn
, and the comparison between the two signatures.
In order to read the original request body from Plug.Conn
, you will need to write a custom body_reader
that caches the body from webhook requests. This is because Plug
will replace the body by the parsed version when you have something like a JSON request. Here is how this custom body reader looks like:
defmodule BodyReader do
def cache_raw_body(conn, opts) do
with {:ok, body, conn} <- Plug.Conn.read_body(conn, opts) do
conn = update_in(conn.assigns[:raw_body], &[body | &1 || []])
{:ok, body, conn}
end
end
end
We have two options to configure that with our Phoenix or Plug application:
body_reader: {BodyReader, :cache_raw_body, []}
to Plug.Parsers
and caches
all the requests; We went with the second option because our application also had uploads and we didn’t want to load the uploads into memory. In our application we changed the Phoenix Endpoint to look like this:
defmodule MyApp.Endpoint do
use Phoenix.Endpoint, otp_app: :my_app_web
# This line replaces the "plug Plug.parsers" setup.
plug :parse_body
opts = [
parsers: [:urlencoded, :multipart, :json],
pass: ["*/*"],
json_decoder: Phoenix.json_library()
]
@parser_without_cache Plug.Parsers.init(opts)
@parser_with_cache Plug.Parsers.init([body_reader: {BodyReader, :cache_raw_body, []}] ++ opts)
# All endpoints that start with "webhooks" have their body cached.
defp parse_body(%{path_info: ["webhooks" | _]} = conn, _),
do: Plug.Parsers.call(conn, @parser_with_cache)
defp parse_body(conn, _),
do: Plug.Parsers.call(conn, @parser_without_cache)
end
Now every request to enpoints that starts with /webhooks
will be cached at Plug.Conn
under assigns.raw_body
. We will be using this to check if the signature matches.
This is the last part in the steps to verify the webhook request. We now have the raw body cached into our Plug connection, and we need to read that and compare with what we have in the signature
header that the server sent to us.
First of all, we need to parse the signature
header. To do so, let’s write a new plug with a function called parse
:
defmodule HTTPSignature do
@behaviour Plug
@impl true
def init(opts), do: opts
@impl true
def call(conn, _) do
# TODO
end
defp parse(signature, schema) do
parsed =
for pair <- String.split(signature, ","),
destructure([key, value], String.split(pair, "=", parts: 2)),
do: {key, value},
into: %{}
with %{"t" => timestamp, ^schema => hash} <- parsed,
{timestamp, ""} <- Integer.parse(timestamp) do
{:ok, timestamp, hash}
else
_ -> {:error, "signature is in a wrong format or is missing #{schema} schema"}
end
end
end
This function will receive a signature like we described in the beginning: t=timestamp,v1=signature-hash
, and will transform into a tuple in case of success.
After that we need to actually fetch the raw_body
from the connection, and verify against the signature header. To do that, we will introduce another private function to our plug module:
defp raw_body(conn) do
case conn do
%Plug.Conn{assigns: %{raw_body: raw_body}} ->
# We cached as iodata, so we need to transform here.
{:ok, IO.iodata_to_binary(raw_body)}
_ ->
# If we forget to use the plug or there is no content-type on the request
raise "raw body is not present or request content-type is missing"
end
end
And finally to verify, we need to get the header, parse it and compare. For the comparison, we cannot simply do a basic equality check. This is to avoid timing attacks. Luckily we have a function for that from Plug: Plug.Crypto.secure_compare/2
. Here is how the verification looks like:
def verify(header, payload, secret, opts \\ []) do
with {:ok, timestamp, hash} <- parse(header, @schema) do
current_timestamp = System.system_time(:second)
cond do
timestamp + @valid_period_in_seconds < current_timestamp ->
{:error, "signature is too old"}
not Plug.Crypto.secure_compare(hash, hash(timestamp, payload, secret)) ->
{:error, "signature is incorrect"}
true ->
:ok
end
end
end
Summing up, the plug’s call/2
function looks like this:
@impl true
def call(conn, opts) do
with {:ok, header} <- signature_header(conn),
{:ok, body} <- raw_body(conn),
:ok <- verify(header, body, "secret", opts) do
conn
else
{:error, error} ->
conn
|> put_status(400)
|> json(%{
"error" => %{"status" => "400", "title" => "HTTP Signature is invalid: #{error}"}
})
|> halt()
end
end
Done! Now we can use this Plug in our webhook pipeline at Phoenix router. Every request that does not have a valid signature will return an error.
Signing webhook requests can increase a lot the level of security of communication between services! Elixir helps us to implement this in a safe and easy way with its tools. We saw how to implement HTTP signatures for our webhook endpoints, and we introduced a Plug at the client side to verify the body of those webhooks requests.
Happy coding!
]]>Ecto.Migrator
module. Migrations are most commonly used for database schema changes like creating tables, columns, etc. In fact, migrations are often so convenient to use that developers use them even in other circumstances, in particular instead of (or in conjuction with) migrating schema, they migrate data. Below we’ll discuss some of the challenges with either approach, especially around deployment and operations.
Let’s say you just built a v1 of your product, made the first deployment, and everything is working flawlessly. You then added some new features (and/or fixed some bugs!), deployed them, and the application started to throw errors, what happened? Better remember to run those migrations on new deployments! Since it’s so easy to forget manual steps like that, you go ahead and configure your deployment pipeline to automatically run migrations on new release and things work well again. (Ecto manages migrations via the schema_migrations
table and locks it so even if you deploy to multiple nodes and all of them automatically try to run migrations, only one node will actually do and the remaining ones will simply wait.)
If you have just one instance of your application and you make a new deployment, at some point you’ll have to restart your app to load the new code, which would mean downtime. Thus you should be running at least two instances of your application - the “new” application being updated and the “old” one that continues to serve traffic.
This approach, however, restricts which operations you can perform in your schema migrations. In a nutshell, as long as you add new tables, new columns, etc you should be fine, the “old” code doesn’t even know about them. But once you modify your schema, change the type of a column, drop a table, etc, the “old” code that was depending on it will no longer work. On those occasions, you should split your software deployment in two. The first only adds to your schema and changes the code to work on both the “old” and “new” versions. Then, after all of your instances are using the “new” code, you’ll do a second deployment to change your DB schema.
Another challenge are schema changes that take a really long time. For instance, you may add an index on a huge table, which holds up the deployment. While it’s really convenient to run migrations automatically, wouldn’t it be nice to be able to run that particular migration manually?
Data migrations are migrations that change the data stored in the database, rather than the database schema. For example, here is a migration that rewrites all users statuses from active to enabled:
defmodule MyApp.Repo.Migrations.UpdateUsersStatus do
use Ecto.Migration
def up do
execute "UPDATE users SET status = 'active' WHERE status = 'enabled'"
end
def down do
execute "UPDATE users SET status = 'enabled' WHERE status = 'active'"
end
end
We may choose to implement this as an Ecto migration for the following reasons:
On the flip side, slow data migrations will also slow down new deployments. We could forget about Ecto migrations for data changes and implement these as scripts (or just regular functions) and run them on demand but then we’d lose the locking and versioning mechanisms given by migrations.
In short, there’s a lot of value in using Ecto migrations but sometimes we want to run them automatically and sometimes on demand. How to do that?
Fortunately, Ecto has support for multiple migrations directories, all we need to do is to split up our migrations accordingly, e.g.:
priv/
repo/
migrations/ # run "automatically"
manual_migrations/
When we generate a new migration we can pass a --migrations-path
option:
$ mix ecto.gen.migration --migrations-path=priv/repo/manual_migrations update_users
* creating priv/repo/manual_migrations
* creating priv/repo/manual_migrations/20201001160835_update_users.exs
We can pass it to mix ecto.migrate
too:
$ mix ecto.migrate --migrations-path=priv/repo/manual_migrations
18:17:39.083 [info] == Running 20201001160835 MyApp.Repo.Migrations.UpdateUsers.change/0 forward
18:17:39.086 [info] == Migrated 20201001160835 in 0.0s
If we deploy with releases, we can define separate functions for each set of migrations:
defmodule MyApp.Release do
@app :my_app
def migrate do
load_app()
for repo <- repos() do
path = Ecto.Migrator.migrations_path(repo)
run_migrations(repo, path)
end
end
def migrate_manual do
load_app()
for repo <- repos() do
# requires Ecto v3.4+:
path = Ecto.Migrator.migrations_path(repo, "manual_migrations")
run_migrations(repo, path)
end
end
defp run_migrations(repo, path) do
{:ok, _, _} = Ecto.Migrator.with_repo(repo, &Ecto.Migrator.run(&1, path, :up, all: true))
end
defp repos do
Application.fetch_env!(@app, :ecto_repos)
end
defp load_app do
Application.load(@app)
end
end
Since Ecto v3.4 we can pass multiple migration paths at the same time:
$ mix ecto.migrate --migrations-path=priv/repo/migrations --migrations-path=priv/repo/manual_migrations
18:17:39.083 [info] == Running 20201001160800 MyApp.Repo.Migrations.CreateUsers.change/0 forward
18:17:39.083 [info] == Running 20201001160835 MyApp.Repo.Migrations.UpdateUsers.change/0 forward
(...)
You may want to make that the default behaviour in dev & test. If you’re using Phoenix, you may already have ecto.setup
and test
Mix aliases, so let’s modify them to run all migrations:
defp aliases() do
[
"ecto.migrate_all": ["ecto.migrate --migrations-path=priv/repo/migrations --migrations-path=priv/repo/manual_migrations"],
"ecto.setup": ["ecto.create", "ecto.migrate_all", "run priv/repo/seeds.exs"],
test: ["ecto.create --quiet", "ecto.migrate_all --quiet", "test"]
]
end
With Ecto multiple migration directories support we can easily split up our migrations into ones that are automatically running on deployments and ones that we manually trigger after the code was updated. This technique can be useful for both schema and data migrations.
We also mentioned a situation where schema changes require us to split the deployment in two. In fact, we could even combine that into one deployment with two steps: we make the code changes, define the “destructive” schema migration as a “manual” one and deploy. Then, after the deployment is complete on all nodes (along with any “safe” automatic migrations), we simply trigger the manual one!
Finally, in dev & test we may actually want to run all migrations at the same time and we can easily do that by passing both migration directories.
Happy hacking!
]]>
In Bytepack, authors can push new packages at any time. Publishing said packages is done with your usual package manager tool, such as mix hex.publish
in Elixir or npm publish
for Node.js. Once you call these commands, the request goes to specific endpoints that implement the Hex.pm and npm APIs.
The specific steps are shown in our “New package” page:
The /packages/new
route is a Phoenix LiveView that looks like this:
defmodule BytepackWeb.PackageLive.New do
use BytepackWeb, :live_view
def mount(params, session, socket) do
socket = authenticate(socket, session)
{:noreply, socket}
end
def render(assigns) do
~L"""
...HTML template...
"""
end
end
Nothing special so far. But here is where LiveView is a big deal.
To improve the user experience, we also wanted to automatically update the browser with the package information whenever the user publishes it. Implementing this functionality in LiveView requires three changes.
First we broadcast an event whenever a package is created to a “package:new” topic under the user:
Phoenix.PubSub.broadcast(
Bytepack.PubSub,
"user:#{user.id}:package:new",
{:published, package.id}
)
Back in PackageLive.New
, we change mount/3
to also subscribe to said topic:
def mount(params, session, socket) do
socket = authenticate(socket, session)
if connected?(socket) do
Phoenix.PubSub.subscribe(
Bytepack.PubSub,
"user:#{socket.assigns.current_user.id}:package:new"
)
end
{:noreply, authenticate(socket, session)}
end
and then write a clause to handle said events:
def handle_info({:published, package_id}, socket) do
{:noreply, live_redirect(socket, to: "/packages/#{package_id}")}
end
And that’s it! Now we redirect the browser to the newly created package page whenever the package is published.
We didn’t have to:
Compared to what others have built with LiveView, this is absolutely trivial. However, the fact we can set this up in less than 2 minutes is that excites me!
LiveView comes with its own integrated testing story too. We can test everything from the comfort of Elixir, without a need to bring heavy-hitters such as Selenium or any webdriver.
To run in development, we only need to start our Phoenix server. We don’t need external tooling in production either. We can deploy this to Fly.io or Gigalixir, configure clustering, and everything just works across multiple nodes.
While this is a very limited sample of what LiveView can do, it highlights the beauty of its model and, perhaps more importantly, it shows all of the things we don’t have to manage nor worry about. At the end of the day, the Bytepack team can focus more on the user experience than we would otherwise, thanks to LiveView’s accessibility.
]]>mix phx.gen.auth
.
This short post follows up on the topic by describing the general idea behind Two-factor
Authentication and how to use our recently released NimbleTOTP
library to generate and validate Time-based One Time Passwords (TOTP).
The concept of 2FA is quite simple. It’s an extra layer of security that demands a user to provide two pieces of evidence (factors) to the authentication system before access can be granted.
One way to implement 2FA is to generate a random secret for the user and whenever the system needs to perform a critical action it will ask the user to enter a verification code. This verification code is a Time-Based One-Time Password (TOTP) based on the user’s secret and can be provided by an authentication app like Google Authenticator or Authy, which should be previously installed and configured on a compatible device such as a smartphone.
Note: A critical action can mean different things depending on the application. For instance, while in a banking system the login itself is already considered a critical action, in other systems a user may be allowed to log in using just the password and only when trying to update critical data (e.g. its profile) 2FA will be required.
In order to allow developers to implement 2FA, NimbleTOTP provides functions to:
The first step to set up 2FA for a user is to generate (and later persist) its random
secret. You can achieve that using NimbleTOTP.secret/1
.
Example:
iex> secret = NimbleTOTP.secret()
<<63, 24, 42, 30, 95, 116, 80, 121, 106, 102>>
By default, a binary with 10 random bytes is generated. This is the secret you would store in the database once the user validates it.
Before persisting the secret, you need to make sure the user has already configured the authentication app in a compatible device. The most common way to do that is to generate a QR Code that can be read by the app.
You can use NimbleTOTP.otpauth_uri/3
along with eqrcode to generate the QR code as SVG.
Example:
iex> uri = NimbleTOTP.otpauth_uri("Acme:alice", secret, issuer: "Acme")
"otpauth://totp/Acme:alice?secret=MFRGGZA&issuer=Acme"
iex> uri |> EQRCode.encode() |> EQRCode.svg()
"<?xml version=\"1.0\" standalone=\"yes\"?>\n<svg version=\"1.1\"..."
You can also wrap the code that generates the SVG into a function so you can use it in any view/component. Something like:
def generate_qrcode(uri) do
uri
|> EQRCode.encode()
|> EQRCode.svg(width: 264)
|> Phoenix.HTML.raw()
end
The resulting SVG can then be injected directly into your Phoenix template using:
<%= generate_qrcode(uri) %>
Here’s how it looks on Bytepack’s website:
The generated QR Code on Bytepack's website
After successfully scanning the QR Code, your device will generate a
different 6 digit code every 30s
.
Verification code using Google Authenticator
You can compute the current verification code with:
iex> NimbleTOTP.verification_code(secret)
"859020"
Or validate it using the valid?/3
function:
iex> NimbleTOTP.valid?(secret, "859020")
true
iex> NimbleTOTP.valid?(secret, "012345")
false
After validating the code, you can finally persist the user’s secret in
the database. Whenever you need to authorize a critical action, you will
request an up-to-date verification code from the user and use the same
NimbleTOTP.valid?/2
function to validate the code against the secret
stored in the DB.
Note: Although you could validate the password directly against
NimbleTOTP.verification_code(secret)
using the standard==
operator, we strongly recommend to always useNimbleTOTP.valid?/3
instead. The latter uses a secure string comparison algorithm to prevent timing attacks.
For Bytepack, we enforce 2FA right after login:
Requesting the verification code
NimbleTOTP allows developers to easily add 2FA using Time-Based One-Time Password (TOTP) to their applications. TOTP is just one of many methods to provide 2FA, albeit the simplest one. The API is minimal and provides a complete solution for most of the cases you might need. We hope you enjoy it.
Happy coding!
]]>In this article, we will cover how we implemented the analytics system with Ecto upserts and how we have used the Elixir registry and Elixir processes to reduce the pressure on the database.
The idea is very simple: every time someone accesses a page, we will store this information in the database. However, we don’t need to track each access at the instant they happen. For us, tracking how many accesses a page had in a day is completely fine. Therefore, every time a page is accessed on a given date, we will attempt to insert an entry in the database. If an entry already exists, we update its counter instead.
Luckily, this can be done with an upsert in Ecto. Let’s first define the schema for the database resource:
defmodule MyApp.Metrics.Metric do
use Ecto.Schema
@primary_key false
schema "metrics" do
field :date, :date, primary_key: true
field :path, :string, primary_key: true
field :counter, :integer, default: 0
end
end
It has three fields: a date, the page path, and the counter (number of accesses). The date and path make a composite primary key. Our migration looks like this:
defmodule Dashbit.Repo.Migrations.CreateMetrics do
use Ecto.Migration
def change do
create table(:metrics, primary_key: false) do
add :date, :date, primary_key: true
add :path, :string, primary_key: true
add :counter, :integer, default: 0
end
end
end
Now we execute the following command whenever we want to count one page access:
defp upsert!(path, counter) do
import Ecto.Query
date = Date.utc_today()
query = from(m in Dashbit.Metrics.Metric, update: [inc: [counter: ^counter]])
Dashbit.Repo.insert!(
%Dashbit.Metrics.Metric{date: date, path: path, counter: counter},
on_conflict: query,
conflict_target: [:date, :path]
)
end
The code above performs an upsert, incrementing the number of accesses in a page by the value of counter
, which is typically 1. If an entry does not exist, one is immediately created.
This is the core of our analytics. It is a very straight-forward solution, but it does have a strong requirement on the database accepting all of our writes. While most applications heavily rely on a database, the analytics system is the only place in our website that uses a database, so we believe it is important to show an article, such as this blog post, even if there is an error when talking to the storage layer. To address this, we have decided to move the upserts to separate processes.
As laid out in the previous section, we want to move all the database writes done by our analytics code to a separate process. Another concern we have with our solution so far is how it will handle overloads. If there is a huge spike in traffic, could we end up putting too much pressure in the database? In this sense, would it be a good idea to batch our writes?
To be honest, our application will be just fine with spikes. Most of our page loads are within hundreds of microseconds, thanks to Phoenix, and our database usage is minimal. On the other hand, such a small project is a perfect opportunity to experiment, so we decided to explore how our analytics solution would look like if we performed writes asynchronously and in batches.
Here is what we came up with. Every time a user accesses a page, we will spawn an Elixir process that tracks all accesses to that page. If a process already exists for said page, we will message the existing process instead. The goal of this process is to collect all accesses within a time interval, writing to the database after X seconds.
We are going to call this the Worker
process and it starts like this:
defmodule Dashbit.Metrics.Worker do
use GenServer, restart: :temporary
We define a module for the process and declare it as a GenServer
. We also say that this process is :temporary
. I.e. if it dies, we don’t want the supervisor to restart it. That’s because we are assuming that, if the process dies, our logic that dynamically spawns processes for each page will eventually start a new one anyway.
Next we define the init
callback of the process:
@impl true
def init(path) do
Process.flag(:trap_exit, true)
{:ok, {path, _counter = 0}}
end
The init
callback traps exits and sets the process state to {path, 0}
. The first element is the page path, the second element is the number of page visits.
Our process should be able to receive a :bump
message. This message is sent whenever we need to bump the counter and is handled by the handle_info
callback:
@impl true
def handle_info(:bump, {path, 0}) do
schedule_upsert()
{:noreply, {path, 1}}
end
@impl true
def handle_info(:bump, {path, counter}) do
{:noreply, {path, counter + 1}}
end
If we receive the :bump
when the page had no access (i.e. counter is zero), we will bump the counter to 1 and we will also schedule an upsert event, so we eventually write those accesses to the database. If the counter is more than 0, we simply bump it and return an updated state.
The scheduling and upsert code will look like this:
defp schedule_upsert() do
Process.send_after(self(), :upsert, Enum.random(10..20) * 1_000)
end
@impl true
def handle_info(:upsert, {path, counter}) do
upsert!(path, counter)
{:noreply, {path, 0}}
end
defp upsert!(path, counter) do
# same function as the previous section
end
The schedule_upsert()
function schedules a message to the current process (self()
). The message will be named :upsert
and it will be delivered in a random value between 10s to 20s. The reason we picked a random value is to avoid a scenario where multiple processes for different pages are spawned at the same time and they all write to the database at the same time.
Next we define another handle_info
clause, this time to handle the scheduled :upsert
message. This clause simply invokes the upsert!
function, defined in the previous section, and resets the state back to {path, 0}
. This makes it so that, once there is a new bump, we will schedule a new upsert.
Finally, we implement the terminate
callback, which will be invoked whenever our application is shutting down:
@impl true
def terminate(_, {_path, 0}), do: :ok
def terminate(_, {path, counter}), do: upsert!(path, counter)
end
If our application is shutting down, we may have pending writes in our worker, so we want to send them to the database as part of our termination logic. One important thing to remember is that the terminate
callback is not called by default when shutting down, unless you are trapping exits. That’s why we called Process.flag(:trap_exit, true)
in the init
function.
The process we just implemented delivers all of the requirements we have so far: writes are now asynchronous, as they happen in a separate process, and they are also batched, using intervals between 10s and 20s. The last step we need to implement is to actually spawn those processes on the fly as users navigate through the website.
In order to spawn and find processes for each page, we are going to use Elixir’s Registry
. We also need a dynamic supervisor which is going to be the parent of all worker processes. Let’s implement this logic in the overaching Metrics
module, alongside our bump(page)
function.
Let’s get started with the basics:
defmodule Dashbit.Metrics do
use Supervisor
@worker Dashbit.Metrics.Worker
@registry Dashbit.Metrics.Registry
@supervisor Dashbit.Metrics.WorkerSupervisor
Our Dashbit.Metrics
module is a Supervisor
, which will have two children: the registry and the supervisor of all workers. Since the workers are started dynamically, as requests come, we will use a DynamicSupervisor
. We store the names of the worker, registry and dynamic supervisor processes in module attributes for convenience.
Next we will define how our supervisor is started and its init
callback:
def start_link(_opts) do
Supervisor.start_link(__MODULE__, :ok, name: __MODULE__)
end
@impl true
def init(:ok) do
children = [
{Registry, keys: :unique, name: @registry},
{DynamicSupervisor, name: @supervisor, strategy: :one_for_one}
]
Supervisor.init(children, strategy: :one_for_all)
end
With the registry and dynamic supervisor in place, we can write the bump function:
def bump(path) when is_binary(path) do
pid =
case Registry.lookup(@registry, path) do
[{pid, _}] ->
pid
[] ->
case DynamicSupervisor.start_child(@supervisor, {@worker, path}) do
{:ok, pid} -> pid
{:error, {:already_started, pid}} -> pid
end
end
send(pid, :bump)
end
end
The bump
function looks up in the registry if there is a process for the given path and returns its process identifier (pid
). If one does not exist, we ask the worker supervisor to start a worker dynamically. We expect two possible outcomes from start_child
:
{:ok, pid}
- the worker was started
{:error, {:already_started, pid}}
- a worker for the given path
already exists
We need the second branch to address a potential race condition where two users may access a page for the first time at the same time. In this scenario, the Registry.lookup/2
will fail for both them, and both will attempt to spawn the worker. One of them will succeed and the other will return the “already started” error. Once we find the pid
, we send it the :bump
message.
We are almost there. There are just two steps left. First, we need to configure the worker to register itself whenever it is started. This is done via the start_link
function. Let’s go back to the worker and add this:
@registry Dashbit.Metrics.Registry
def start_link(path) do
GenServer.start_link(__MODULE__, path, name: {:via, Registry, {@registry, path}})
end
Now we just need to start the Dashbit.Metrics
supervision tree. This is typically done in your application supervision tree, typically located in “lib/my_app/application.ex”:
children = [
Dashbit.Repo,
Dashbit.Metrics,
Dashbit.Endpoint
]
And that’s it. Now whenever a user accesses a page, we just need to call Dashbit.Metrics.bump(path)
where path
is the current page address. In our case, we store just the path, without host and without the query string). If you are using Plug, it can be built from the conn.path_info
field. We also only perform writes if the page was successfully rendered with 200 status. Overall, our bumping code looks like this:
plug :bump_metric
defp bump_metric(conn, _opts) do
register_before_send(conn, fn conn ->
if conn.status == 200 do
path = "/" <> Enum.join(conn.path_info, "/")
Dashbit.Metrics.bump(path)
end
conn
end)
end
In this article we have covered a minimal analytics system, using Ecto, GenServer and Elixir’s Registry, that performs writes asynchronously and in batches. The usage of the Registry to dynamically spawn processes that map to different resources, each with their own life-cycle, can be used in many different scenarios.
One important aspect in our solution is that, after a process for a page is created, it stays alive until there is a new deployment. This works for us because we have less than 100 pages, so we know the maximum number of processes is bound to a very low value.
Although Elixir process are lightweight thanks to the Erlang VM, if we had a large number of pages, such as millions of pages, we could potentially end-up with hundreds of thousands of unused processes. In this case, we would slightly change our solution to terminate the process after every upsert. Something along these lines:
@impl true
def handle_info(:upsert, {path, counter}) do
# We first unregister ourselves so we stop receiving new messages.
Registry.unregister(@registry, path)
# Schedule to stop in 2 seconds, this will give us time to process
# any late messages.
Process.send_after(self(), :stop, 2_000)
{:noreply, {path, counter}}
end
@impl true
def handle_info(:stop, {path, counter})
# Now we just stop. The terminate callback will write all pending writes.
{:stop, :shutdown, {path, counter}}
end
That’s it, we hope you have enjoyed the article and learned a thing or two that could be useful in your next project!
]]>While Bootstrap does ship with JavaScript components, Bootstrap also adds a dependency on jQuery and other libraries. However, since most of our app is powered by LiveView, we thought bringing jQuery as a whole would be an overkill. That’s why we were really glad to find the Bootstrap Native project, which implements the Bootstrap components in vanilla JavaScript.
UPDATE #1: this post was written for Bootstrap v4. Bootstrap v5 does away with the jQuery dependency. Hooray! Regardless of your chouce, you will still need the steps below (or similar) to make Bootstrap and LiveView work together.
We will have to install Bootstrap, Bootstrap Native, and, since we are using Webpack, the Bootstrap Native loader. Let’s do that:
$ cd assets
$ npm install --save bootstrap bootstrap.native
$ npm install --save-dev bootstrap.native-loader
Now open up assets/webpack.config.js
. Under the module.rules
key, we will add a new entry at the top to load bootstrap native:
{
test: /bootstrap\.native/,
use: {
loader: 'bootstrap.native-loader',
options: {
only: ['collapse', 'dropdown', 'tooltip']
}
}
},
We are passing the only
option to explicitly control which components we want to load. See the loader docs for more information. Remove the option if you would rather load everything and not worry about it.
Now open up assets/css/app.scss
and load Bootstrap’ CSS:
@import "~bootstrap/scss/bootstrap";
And open up assets/js/app.js
to load Bootstrap Native’s JavaScript:
import "bootstrap.native"
Note: this article assumes your app was generated with Phoenix v1.5, which has a SCSS/SASS loader already configured. Bootstrap requires it to work. If you don’t have it installed, you can find many tutorials online with the precise steps.
Since LiveView dynamically injects content on the page, we need to tell Bootstrap Native to reapply its JavaScript hooks whenever new content is added to the page. This is very important. If you don’t do this, any Bootstrap component dynamically added to the page won’t work as expected.
Back to your assets/js/app.js
, make sure you have this:
window.addEventListener("phx:page-loading-stop", info => {
BSN.initCallback(document.body)
NProgress.done()
})
And that’s it! Before we go, here are some useful tips that we have learned.
phx-update=ignore
For content that appears and disappears on the page based on mouse events, such as a dropdown, make sure to add the phx-update="ignore"
attribute to its root, like this:
<div class="collapse navbar-collapse" id="orgnav" phx-update="ignore">
<ul class="navbar-nav">
Without this attribute, if you are using the dropdown and LiveView updates the page, the dropdown will close - as the dropdown is only opened on the client and not the server. phx-update="ignore"
tells the LiveView client to not touch it.
phx-feedback-for
We use LiveView to provide dynamic input validation as users fill in the form. With Bootstrap, you can provide this feedback to users by annotating the input with the is-valid
or is-invalid
classes. If the input has is-valid
, it is contoured in green, and in red for is-invalid
. Your markup would typically look like this:
<div class="form-group">
<label for="user_email">E-mail</label>
<input type="text" class="form-control is-valid" id="user_email" placeholder="E-mail">
<div class="invalid-feedback">can't be blank</div>
</div>
Note it also has a div
with class invalid-feedback
for showing error messages.
However we only want to color a given input and show its error messages when the user effectively typed something in that particular input. LiveView controls this by using the phx-feedback-for
attribute. phx-feedback-for
must point to an input id
. If the input has not been focused yet, a phx-no-feedback
class is added to the element with the phx-feedback-for
annotation. This allows you to hide or undo any user feedback until the input is used. In our app, we added phx-feedback-for
to the wrapping div
:
<div class="form-group" phx-feedback-for="user_email">
Now we added the following rules to our CSS
.phx-no-feedback .invalid-feedback, .phx-no-feedback .valid-feedback {
display: none;
}
.phx-no-feedback input {
border-color: #dee2e6 !important;
padding-right: 0 !important;
background-image: none !important;
}
In a nutshell, we hide the feedback classes, and remove any color from the input. Once the input is used, LiveView removes the phx-no-feedback
class from the wrapping div
, showing errors messages and giving visual feedback to the user.
At this point, it is worth mentioning our whole input
generation is guided by a single input
function. For example, our organization creation form looks like this:
<%= f = form_for @changeset, "#",
id: "form-org",
phx_target: @myself,
phx_change: "validate",
phx_submit: "save" %>
<%= input f, :name %>
<%= input f, :slug %>
<%= input f, :address %>
<%= submit("Submit", phx_disable_with: "Submitting...") %>
</form>
We have written about how to implement such input
function in a previous article about Dynamic Forms in Phoenix.
When you scaffold your a live
resource with phx.gen.live
, Phoenix generates a ModalComponent
for you. However, you may now want your modals to be styled with Bootstrap. We have achieved this in our apps by introducing a live-modal
class, an alternative to Bootstrap’s modal
class, to be used at top of your modal. Our ModalComponent
now looks like this:
<div id="<%= @id %>" class="live-modal" tabindex="-1"
phx-capture-click="close"
phx-window-keydown="close"
phx-key="escape"
phx-target="<%= @myself %>"
phx-page-loading>
<div class="modal-dialog modal-lg" role="document">
<div class="modal-content">
<%= live_patch raw("×"), to: @return_to, class: "close" %>
<%= live_component @socket, @component, @opts %>
</div>
</div>
</div>
Inside the modal itself, we simply use the remaining Bootstrap classes for modals. Finally, we added this bit of CSS, based on Phoenix’ modal:
.live-modal {
opacity: 1 !important;
position: fixed;
z-index: 1;
left: 0;
top: 0;
width: 100%;
height: 100%;
overflow: auto;
background-color: rgb(0,0,0);
background-color: rgba(0,0,0,0.4);
}
.live-modal .modal-title {
margin-top: 0;
}
.live-modal .close {
position: absolute;
right: 1rem;
top: 1rem;
}
In this article, we followed the basic steps for using Bootstrap Native with LiveView. We have also shared some tips on how to fully integrate many Bootstrap components with your LiveView application, so everything just works™.
]]>import2alias
.
For example, to replace HexpmWeb.ViewHelpers
imported calls with ViewHelpers
,
we used the script like this:
cd /path/to/hexpm
mkdir -p lib/mix/tasks
curl https://gist.githubusercontent.com/wojtekmach/4e04cbda82ba88af3f84c44ec746b7ca/raw/import2alias.ex > lib/mix/tasks/import2alias.ex
curl https://gist.githubusercontent.com/wojtekmach/4e04cbda82ba88af3f84c44ec746b7ca/raw/lib_import2alias.ex > lib_import2alias.ex
elixir -r lib_import2alias.ex -S mix import2alias HexpmWeb.ViewHelpers ViewHelpers
As you can see, the script is actually quite tiny! In this blog post we’ll look under the hood and discuss some other improvements we’ve recently made. Let’s get started.
UPDATE #1: Thanks to feedback from @kleinernik, we’ve changed the script to a Mix task to avoid warnings on protocol consolidation.
UPDATE #2: Elixir v1.11+ will no longer consider imports as compile-time dependencies. Therefore converting imports to aliases is no longer strictly necessary for improving recompilation times. This article, however, can still be useful for those interested in converting imports to aliases for code readability reasons or for those willing to learn more about compilation tracers.
import2alias
is built on top of compilation tracers, a feature introduced in Elixir v1.10.
Per Elixir Code
documentation:
A tracer is a module that implements the
trace/2
function. The function receives the event name as first argument andMacro.Env
as second and it must return:ok
.
And here are some example events:
{:import, meta, module, opts}
- traced whenever module is imported. meta is the import AST
metadata and opts are the import options.
{:imported_function, meta, module, name, arity}
and {:imported_macro, meta, module, name, arity}
- traced whenever an imported function or macro is invoked. (…)
{:local_function, meta, name, arity}
and {:local_macro, meta, name, arity}
- traced whenever
a local function or macro is referenced. (…)
etc.
Here’s the tracer we wrote for our import2alias script:
defmodule Import2Alias.CallerTracer do
def trace({:imported_function, meta, module, name, arity}, env) do
Import2Alias.Server.record(env.file, meta[:line], meta[:column], module, name, arity)
:ok
end
def trace(_event, _env) do
:ok
end
end
We are only interested in :imported_function
events, we record file/line/column and
module/name/arity for further processing and ignore remaining events.
We could do the processing in the trace/2
function directly but the recommendation is to do
there as least work as possible because it slows down the compilation. Thus, we save the work for
further processing. Import2Alias.Server
is an Agent
that filters imported calls and groups them by source filenames. This way we’d rewrite any given
source file just once:
for {file, entries} <- entries do
lines = File.read!(file) |> String.split("\n")
lines =
Enum.reduce(entries, lines, fn entry, acc ->
{line, column, module, name, arity} = entry
List.update_at(acc, line - 1, fn string ->
# ...
end)
end)
File.write!(file, Enum.join(lines, "\n"))
end
If we have the column information, we rewrite the line becasue we know exactly where the imported call started and we rewrite it to be an aliased call.
if column do
pre = String.slice(string, 0, column - 1)
offset = column - 1 + String.length("#{name}")
post = String.slice(string, offset, String.length(string))
pre <> "#{inspect(alias)}.#{name}" <> post
else
# print warning
end
and this results in e.g.:
- <%= pretty_date(last_use.used_at) %> ...
+ <%= ViewHelpers.pretty_date(last_use.used_at) %> ...
and that’s it!
However, you may have noticed that we explicitly checked if the column information is available. Why wouldn’t we have the column information? This brings us to…
To get precise information where a function is called, not only at which line but also at which column, we’ve set this compile option:
Code.put_compile_option(:parser_options, [columns: true])
This worked fine in .ex
files but not in .eex
files, the EEx engine uses its own compiler.
We’ve changed EEx.Compiler
to properly track column
information and use that in error
messages.
EEx templates can also be directly embedded in Elixir modules, such as
using Phoenix ~E
or Phoenix LiveView ~L
sigils:
defmodule AppWeb.ThermostatLive do
use Phoenix.LiveView
def render(assigns) do
~L"""
Current temperature: <%= pretty_temperature @temperature %>
"""
end
end
To handle that, we’ve changed Elixir compiler to track indentation of heredoc
blocks and used that in
EEx,
Phoenix.HTML ~E
, and
Phoenix.LiveView ~L
.
To take advantage of these improvements you need to wait for Elixir v1.11 or
use a version manager, such as asdf install elixir master
,
to get the latest.
These compiler changes, besides making import2alias
more useful, should give more
capabilities to existing and future tooling and allow more accurate stacktraces, editor
integrations, and more. Perhaps that is the biggest win from all of this recent work after all!
In this article we’ve looked at the
import2alias
script,
how it was built on top of compilation tracers, and about some of our recent compiler changes that
made that more reliable. We are looking forward to hearing what you’ve built with compilation
tracers, happy hacking!
At some point I changed career paths and started to focus exclusively on developing Elixir and contributing to its ecosystem (Phoenix, Ecto, etc). Since I was involved in both Devise and Elixir, I was often asked: when will you launch Devise for Phoenix?
I guess the answer is now. Kind of.
I have thought about launching “Devise for Phoenix” probably hundreds of times. I had long conversations with Chris McCord (creator of Phoenix) and co-workers about this. Helping Phoenix users get past the burden of setting up authentication can be a great boost to adoption. At the same time, I never found a proper way to approach the problem.
Luckily, the Elixir/Phoenix community stepped in and tried different approaches: Coherence, Pow, Guardian, and many more.
Every time a new solution came out, I would study the source code. Often making security audits along the way and reporting bugs upstream. While working with different clients, I would talk to them and collect feedback on what worked and what didn’t. And more time passed, the more I realized that best authentication framework is no authentication framework at all. This is especially true for Phoenix applications.
Since Phoenix v1.3, Phoenix makes a big distinction of what is part of your web application and what is part of your business domain. Drawing these lines are important because, while I am perfectly ok with delegating a big chunk of my web application control to a third-party library, I am very unwilling to compromise when it comes to the business domain.
For example, in earlier Devise versions, we would generate a database migration file like this:
create_table(:users) do |t|
t.database_authenticatable null: false
t.recoverable
t.rememberable
t.trackable
end
When I look at this file, I can’t answer how my data will look like. It is hiding too much from me. Then a Devise model would look like this:
class User < ApplicationRecord
devise :database_authenticatable, :recoverable, :rememberable, :trackable
end
It is extremely unclear which functionalities my business domain object provides, how they relate to each other, etc. The issues with hiding most of the authentication complexity behind an authentication framework became more apparent when people wanted to customize how Devise worked. For this purpose, we allowed developers to copy Devise’s default controllers and views to their application. We added many callbacks and many configuration knobs. Looking at Devise’s API today, it has more than 35 different settings only at the root level. The devise
call above accepts its own options too.
While this made Devise more flexible and general purpose, it also made it more complex. A complex codebase is harder to be audited, which is important in authentication systems. Furthermore, the existence of too many options and customization hooks makes it extremely hard to guarantee that the authentication system will continue be secure under all possible customization combinations.
With time, I realized that what I want from an authentication system is for it to be as straight-forward as possible. When considering an authentication system for a server-side MVC application, I don’t want to hide my model/domain code under a framework/library. In particular, I don’t want to see my Ecto (Elixir’s database library) schema fields hidden behind a macro:
defmodule User do
use Ecto.Schema
schema "users" do
authentication_fields()
end
end
When it comes to controllers, views, and templates, they belong directly in my web application, as I may want to customize the user interface and the user experience.
Therefore, with all things considered, there is very little space for an authentication framework. So what does it mean? Everyone has to write their authentication system from scratch?
Not really. My proposed solution is to provide generators to inject all relevant authentication code into your application.
About 2 months ago I decided to handwrite a simple and secure authentication solution on top of a Phoenix application. I did a specification of how the system would work and e-mailed Griffin Byatt, the creator of Sobelow, a security-focused static analysis for Phoenix. After some back and forth and validation on the security aspects from Griffin, I was quite satisfied with the design document and I had a complete picture of how the authentication system would work. In particular:
For the password hashing, we can simply rely on the outstanding work done by David Whitlock on the comeonin libraries
For cryptography at the HTTP layer, the primitives available in Phoenix and Plug were too low-level. So we have worked on releasing Plug v1.10, which provides high-level API for signing, encrypting, as well as built-in support for signed and encrypted cookies
Then all that is left is to write plain and boring Phoenix application code :-)
I have written the authentication system as a pull request to a bare Phoenix application. Code reviews and security audits are greatly appreciated. The code is also licensed under Apache 2, so anyone can give it a try right now if they wish to.
Here are some interesting tidbits about the system:
It provides a registration page with session-based login/logout, account confirmation, password reset, and remember me cookies. You can also safely update your e-mail (it requires confirming the new address to become effective) and safely update your password - both operations require the current password.
The system uses only two database tables: one with the user information and another with all user tokens.
Currently there is no integration with an e-mail or SMS library. This will likely vary a lot per application, so we currently only log messages to the terminal. Developers will have to bring their favorite libraries for this. We have listed some options in the generated code.
The business domain code (the Phoenix context plus Ecto schemas) is only 340LOC which attests to the power of the platform. With docs, it jumps to roughly 600LOC. Note the code has been formatted by the Elixir formatter (so no code golfing).
The five controllers take only 230LOC. They are all relatively straight-forward and simply handle the return types from the business domain. The templates take 168LOC altogether - which you will most likely customize anyway.
The authentication system has 100% code coverage. The tests altogether take about 1100LOC. They are by far the biggest chunk of the code.
It took me roughly 7 working days to implement the complete system. This does not take into account the time spent designing the system. I expect it to take longer in greenfield projects, especially if they don’t have a lot of experience writing their own authentication systems. This highlights the importance of having such solutions readily available.
At the moment, Aaron Renner from DockYard is working on converting the pull request into an actual code generator called mix phx.gen.auth
. The generator will ship as a separate package that you can bring into your apps to generate the authentication system.
The generator is meant to be a simple and straight-forward starting point. If you have basic needs for authentication, it will most likely do the job. If you have complex needs, then I believe there is no library that will take you all the way, so a solid foundation trumps a complex solution. If your goal is third-party integration, then look at uberauth or assent.
I am also aware that generating the whole code into user applications comes with downsides. After all, the user can easily modify the code, making it unsafe. To help balance that, there are code comments whenever important decisions related to security were taken. The tests also help prevent unintentional regressions.
The other concern is about security vulnerabilities. If there is a vulnerability, you can’t simply update the code to get the latest. We plan to address this by retiring vulnerable package versions and relying on the Hex package manager to notify users. On the positive side, because the system is dead simple, we hope it will be mostly safe from vulnerabilities. Tools like phoenixdiff.org
and diff.hex.pm
can be used to track how the authentication system will evolve over time.
These trade-offs may not be everyone’s cup of tea. If that’s your case, then you can use the other tools available in the community. But if someone were to ask me which approach they should take for authentication today, I would personally go with the “no authentication framework” option.
If you prefer the generator approach but you’re not satisfied with the choices I made, David Whitlock (comeonin’s creator) also wrote his own authentication generator more than 2 years ago, which you can also give a try.
Stay safe and have fun!
]]>UPDATE #1: We have updated this article to mirror Elixir v1.11+’s best practices.
Recently, one of our Elixir Development Subscription clients noticed their development feedback cycle felt a bit sluggish, they sometimes had to wait seconds, or tens of seconds, for a code change to take effect. Today we will talk about how to understand and diagnose those issues.
Before we get started, it is worth making a distinction between initial compilation and re-compilation: the initial compilation is a one time cost that in the long-term doesn’t matter that much. On the other hand, everytime we make a change to our Elixir source code, part of our project needs to be recompiled and that may take time if Elixir believes it has to recompile a large part of our project. If the compilation is slow then it quickly can become a source of frustration. Let’s fix that!
Whenever you change one or more files in your project, Elixir will re-compile all “stale” files as well as everything the “stale” files depend on. Understanding how Elixir tracks dependencies between files is essential to understand how Elixir recompiles our projects.
Say you have a module A
in a.ex
and module B in b.ex
, when we change a.ex
the module A
is understandably re-compiled but B
might need to be re-compiled too - why?
From Elixir v1.11+, the Elixir compiler tracks 3 types of dependencies between modules:
runtime dependencies - if module A
calls some function from module B
and B
changes, A
does not have to be re-compiled, that’s good!
compile-time dependencies - if A
uses any functionality from B
in its module body (instead of inside its functions) and B
changes, A
needs to be re-compiled
export dependencies - If A
uses imports B
or uses a struct from B
, such as %B{}
,
A
needs to be re-compiled whenever B
adds or remove a function or changes its struct
definition
Additionally, if A
has compile-time dependency on B
, and B
has runtime dependency on C
, if
C
changes, B
doesn’t have to be re-compiled but A
has to! In our experience this is by far
the biggest source of re-compilations.
Generally speaking, we notice compilation problems when working on our own projects.
For example, you change a single file, then you run mix test
, and you suddenly see:
$ mix test
Compiling 27 files (.ex)
Now that we understand that this may be caused by compile-time dependencies, how can we identify and solve those dependencies?
The Elixir team has given us tools to do just that, namely mix xref graph
. For
example, if you changed lib/foo.ex
and that caused a large recompilation, you can run:
$ mix xref graph --sink lib/foo.ex --only-nodes
That will list all files that depend on lib/foo.ex
and which kind of dependency. If some
file has a compile time dependency on lib/foo.ex
, say lib/bar.ex
, then you can do the
same and see all dependencies on lib/bar.ex
:
$ mix xref graph --sink lib/bar.ex --only-nodes
Alternatively, you can remove the --only-nodes
flag and see a tree of dependencies on
lib/foo.ex
, albeit it is often quite deep for large projects:
$ mix xref graph --sink lib/foo.ex
From Elixir v1.11, you will be able to filter this tree to all transitive compile time dependencies:
$ mix xref graph --sink lib/foo.ex --label compile
Finally, if you are not sure where to get started, you can use mix xref graph --format stats
to get general information about the project. For Hex.pm, here is what it would look like:
$ mix xref graph --format stats
Tracked files: 165 (nodes)
Compile dependencies: 402 (edges)
Structs dependencies: 73 (edges)
Runtime dependencies: 429 (edges)
Top 10 files with most outgoing dependencies:
* lib/hexpm_web/router.ex (42)
* lib/hexpm/factory.ex (20)
* lib/hexpm_web/controllers/dashboard/organization_controller.ex (16)
* lib/hexpm/repository/releases.ex (14)
* lib/hexpm/repository/package.ex (14)
* lib/hexpm/accounts/user.ex (14)
* lib/hexpm/accounts/audit_log.ex (14)
* lib/hexpm_web/controllers/package_controller.ex (12)
* lib/hexpm/repository/release.ex (12)
* lib/hexpm/accounts/users.ex (12)
Top 10 files with most incoming dependencies:
* lib/hexpm/shared.ex (109)
* lib/hexpm_web/web.ex (75)
* lib/hexpm_web/router.ex (43)
* lib/hexpm_web/views/icons.ex (40)
* lib/hexpm_web/controllers/controller_helpers.ex (38)
* lib/hexpm_web/controllers/auth_helpers.ex (37)
* lib/hexpm_web/endpoint.ex (32)
* lib/hexpm/accounts/user.ex (31)
* lib/hexpm/repo.ex (25)
* lib/hexpm/schema.ex (24)
Once you learn from where the compile-time dependencies come from, the goal is to refactor the code in order to remove said dependencies. Let’s see some examples from the Phoenix team.
Luckily, the Phoenix team is also well aware of the issues behind over-relying on compile-time dependencies. For this reason, Phoenix v1.4 eliminated two common sources of re-compilations in new Phoenix apps: router helper imports and plugs. However, if you started your Phoenix application before v1.4, your code may not be up to date on the latest practices. So let’s take a look at them.
The first change done by the Phoenix team was to rewrite router imports to aliases, like this:
# web.ex
- import HexpmWeb.Router.Helpers
+ alias HexpmWeb.Router.Helpers, as: Routes
# lib/hexpm_web/controllers/dashboard_controller.ex
- redirect(conn, to: dashboard_path(conn, :profile))
+ redirect(conn, to: Routes.dashboard_path(conn, :profile))
In Elixir v1.10 and earlier, imports were considered compile-time dependencies, so this change yielded large improvements in recompilation times. Elixir v1.11 improved its compiler so imports are now tagged as export dependencies, therefore this change is no longer strictly required. Still, moving from imports to aliases converts them from an export to a runtime dependency. Furthermore, many developers prefer aliases over imports as it makes the code clearer.
The second change was related to plugs. First just a tiny bit of background. Here’s a sample plug:
defmodule MyPlug do
def init(opts), do: opts
def call(conn, opts) do
# ...
end
end
The init/1
function, as an optimization, is called at compile-time. This way, any heavy work is
only done once, as the project is being compiled, as opposed to on every HTTP request, as is the
case with the call/2
function. The consequence of this is that any module that invokes
plug MyPlug
now has a compile time dependency on MyPlug
and a transitive compile-time
dependency on any module invoked by MyPlug
, even at runtime. Fortunately, since Phoenix v1.4
we can configure Plug’s behaviour around init, setting:
# config/dev.exs
config :phoenix, :plug_init_mode, :runtime
will ensure init/1
is only called at runtime and so we’ll remove yet another source of possible
re-compilations. Remember this is only appropriate for development, don’t set it in production!
In this article we talked about common source of re-compilations and how we can fix them with simple refactorings, such as changing imports to aliases and by avoiding compile-time dependencies.
]]>To be clear, we are aware it is 2020 and implementing a blog is nothing fancy nowadays. However, we chose to not rely on a database, which is a different approach than most would take, and we want to talk about this process as it may be applicable in other scenarios.
UPDATE #1: We have recently encapsulated a good chunk of this article (with some changes) into a project we called NimblePublisher. Give it a try!
When implementing Dashbit’s website, our biggest question was: should we use something off-the-shelf, such as Wordpress or any CMS as a service, or should we roll our own? Dashbit’s website is mostly static content, so the main discussion point turned out to be the blog engine.
In the past, I have worked with both static page generators and publishing platforms. My favorite feature of static page generators is that we typically use pull requests to manage content and write new blog posts. In this scenario, blog posts are usually files in a Git repository. Given that everyone in our team is a developer, it perfectly fits our workflow. We know how to use Git to manage changes, track history, and review code via pull requests.
However, a static page generator has to build all pages upfront, which ultimately limits the range of features and usability that can be provided by the blog. This is not a concern on publishing platforms, which typically store all of the posts in the database, allowing them to dynamically render content in multiple different ways.
What if we could have the best of both worlds? What if we could keep the blog posts as simple files in our Git repository but still serve the posts with all dynamic features that you would expect from a blog, without having to rely on a database?
Dashbit’s website is a regular Phoenix application. In our codebase, to get a list of all blog posts, we simply call Dashbit.Blog.list_posts()
, which is not different from how most Phoenix applications interact with their business domains.
The difference, however, is that Dashbit.Blog.list_posts()
returns a list of blog posts that have been precompiled and already loaded into memory. There is no database involved. In a nutshell, when our project compiles, we read all blog posts from disk and convert them into in-memory data structures.
As we will see, there are many advantages to this approach. But let’s see some code first and then we will talk about why we like it.
What we know so far is that our application has a Dashbit.Blog
context module which exports a list_posts()
function. This function will return a list of Dashbit.Blog.Post
structs. Let’s see how they look like.
We define our posts as regular Elixir structs with the following fields:
defmodule Dashbit.Blog.Post do
@enforce_keys [:id, :author, :title, :body, :description, :tags, :date]
defstruct [:id, :author, :title, :body, :description, :tags, :date]
end
When compiling the Dashbit.Blog
module, we traverse a directory looking for all posts. It is roughly implemented like this:
defmodule Dashbit.Blog do
alias Dashbit.Blog.Post
posts_paths = "posts/**/*.md" |> Path.wildcard() |> Enum.sort()
posts =
for post_path <- posts_paths do
@external_resource Path.relative_to_cwd(post_path)
Post.parse!(post_path)
end
@posts Enum.sort_by(posts, & &1.date, {:desc, Date})
def list_posts do
@posts
end
end
First, we traverse all posts in the filesystem. Our posts are placed in the posts
directory at the root of our project. Each post follows this naming schema:
/posts/YEAR/MONTH-DAY-ID.md
For each post found, we declare the source file as an @external_resource
and then we call Post.parse!/1
. Using @external_resource
tells the Elixir compiler that, if the post changes in disk, it should recompile the Dashbit.Blog
module. As we will see later, this plays an important role in live reloading. Then Post.parse!/1
is responsible for reading the post from disk and returning a Post
struct. We will see how it is implemented soon.
Once all posts have been parsed, we sort the posts by descending date, using the new sorting feature in Elixir v1.10, and we store them in a module attribute. We read the module attribute inside the list_posts
function, which will effectively embed all blog posts into the function. In other words, calling list_posts
at runtime will simply return a list of all blog posts, which at that point have already been loaded into memory.
Those 15-ish lines are pretty much the core of our blog system. They allow us to read data from disk at compilation time and embedded them into our modules. Now it is time to talk about parsing.
Now that we traverse all blog posts, we need to convert the contents in disk to a Post
struct. This is done by the Post.parse!/1
function. However, we do have a challenge here. Besides its body, a post is made of many fields: title, author, tags, etc. So we need a simple syntax for writing a post that can include its body and all of its attributes. In our case, we choose a simple syntax like this:
==FIELD==
VALUE
For example, this blog post itself looks like this:
==title==
Welcome to our blog: how it was made!
==author==
José Valim
==description==
Today we announce...
==tags==
elixir, phoenix
==body==
Two weeks ago we officially unveiled Dashbit...
Furthermore, remember that our posts are placed in disk with the following filename format:
/posts/YEAR/MONTH-DAY-ID.md
This post in particular is placed at:
/posts/2020/02-03-welcome-to-our-blog-how-it-was-made.md
So besides the attributes inside the post contents, we also need to extract the Post :date
and :id
from its filesystem path.
Overall, our parse!/1
function looks like this:
def parse!(filename) do
# Get the last two path segments from the filename
[year, month_day_id] = filename |> Path.split() |> Enum.take(-2)
# Then extract the month, day and id from the filename itself
[month, day, id_with_md] = String.split(month_day_id, "-", parts: 3)
# Remove .md extension from id
id = Path.rootname(id_with_md)
# Build a Date struct from the path information
date = Date.from_iso8601!("#{year}-#{month}-#{day}")
# Get all attributes from the contents
contents = parse_contents(id, File.read!(filename))
# And finally build the post struct
struct!(__MODULE__, [id: id, date: date] ++ contents)
end
where parse_contents/2
is a private function implemented as follows:
defp parse_contents(id, contents) do
# Split contents into ["==title==\n", "this title", "==tags==\n", "this, tags", ...]
parts = Regex.split(~r/^==(\w+)==\n/m, contents, include_captures: true, trim: true)
# Now chunk each attr and value into pairs and parse them
for [attr_with_equals, value] <- Enum.chunk_every(parts, 2) do
[_, attr, _] = String.split(attr_with_equals, "==")
attr = String.to_atom(attr)
{attr, parse_attr(attr, value)}
end
end
and finally parse_attr/2
has the logic for parsing each individual attribute:
defp parse_attr(:title, value),
do: String.trim(value)
defp parse_attr(:author, value),
do: String.trim(value)
defp parse_attr(:description, value),
do: String.trim(value)
defp parse_attr(:body, value),
do: value
defp parse_attr(:tags, value),
do: value |> String.split(",") |> Enum.map(&String.trim/1) |> Enum.sort()
And that’s it! With the logic for parsing and handling each individual attribute, we can convert our files into structs and embedded them into Dashbit.Blog.list_posts()
. Now all we need to do is to call Dashbit.Blog.list_posts()
in our controllers and display the blog posts in the UI, as in any other Phoenix application.
There is one feature missing in our blog engine: markdown support. So far we are showing the blog posts bodies as they are written. Just recall the parse_attr(:body, value)
implementation above:
defp parse_attr(:body, value),
do: value
It would be nice if we could write our posts in Markdown and have them converted into HTML at compile time. And it would be even nicer if we could actually add syntax highlighting to all of the code snippets during compilation too. This would mean no need for extra .js
dependencies in the front-end!
Luckily, we can easily support Markdown and Syntax Highlighting in our blog by adding 2 dependencies, thanks to the amazing job done by the Elixir community: Earmark and Makeup Elixir.
Let’s add them to the deps
function in our mix.exs
:
{:earmark, "~> 1.3"},
{:makeup_elixir, "~> 0.14"},
Now, because we need to use them at compilation time, let’s make sure to start them before we parse the posts. Go back to Dashbit.Blog
and add this at the top:
for app <- [:earmark, :makeup_elixir] do
Application.ensure_all_started(app)
end
Finally, let’s change the parse_attr(:body, value)
clause to the following:
defp parse_attr(:body, value),
do: value |> Earmark.as_html!() |> Dashbit.Blog.Highlighter.highlight()
Earmark
will convert the post from Markdown to HTML and Dashbit.Blog.Highlighter
provides syntax highlighting. Dashbit.Blog.Highlighter.highlight/1
is a literal copy of the syntax highlighter code that ships with ExDoc. You could also depend on ExDoc for this functionality too, it is your call to have an extra dependency or not.
And that’s all. Now we got a complete blog engine, with both markdown support and syntax highlighting! In terms of syntax highlighting, Makeup supports both Elixir and Erlang. If you want to support other languages, we definitely encourage writing other makeup lexers and contribute them to the community!
We are quite happy with the results we got! We can write posts using our favorite editors and review new blog posts via pull requests. Git will also keep a history of all of the changes that we have done, so we got that for free too. Publishing a new blog post is simply a matter of doing a new deployment.
Because all of the blog posts are pre-compiled, with Markdown and Syntax Highlighting, serving blog posts is extremely fast and we avoid the need for syntax highlighting on the front-end. However, the blog itself is not static in nature. We still have a collection of posts in memory, which means we can sort, paginate, and filter them, using all of the functionality available in Elixir.
In fact, before we go, let’s take a look at two small features we can add to make our blog system even better.
Since all of the posts are a collection in memory, adding a feature that lists all tags or selects all posts with a given tag (as you can see in our sidebar) is very straight-forward.
Back in Dashbit.Blog
, just add this code:
defmodule NotFoundError do
defexception [:message, plug_status: 404]
end
@tags posts |> Enum.flat_map(& &1.tags) |> Enum.uniq() |> Enum.sort()
def list_tags do
@tags
end
def get_posts_by_tag!(tag) do
case Enum.filter(list_posts(), &(tag in &1.tags)) do
[] -> raise NotFoundError, "posts with tag=#{tag} not found"
posts -> posts
end
end
And we are done! We sort and build our collection of tags at compile-time, similar to how we did with our post collection, and expose them in list_tags
. Then to get all posts with a given tag, we filter the list of all posts looking for that given tag. In case we can’t find any post, we raise Dashbit.Blog.NotFoundError
, which has a status of 404, allowing us to show a “Not Found” page whenever someone attempts to look for a tag that doesn’t exist.
The second bonus feature is live reloading. Wouldn’t it be nice if, as we wrote our blog posts, we could see how they would appear on our site immediately? Given that:
@external_resource
Then we already have this feature almost working! All we need to do to get live reloading is a one line of code change in our config files, simply to tell Phoenix Live Reloading system to also watch the “posts” directory. Open up config/dev.exs
, search for live_reload:
and add this to the list of patterns:
live_reload: [
patterns: [
...,
~r"posts/*/.*(md)$"
]
]
and now you can enjoy live reloading as you write!
We hope you have enjoyed our introduction to our blog! We have many more interesting articles in the pipeline, so subscribe to our newsletter on top of our sidebar or follow us on Twitter for further news.
]]>This sharing often leads to confusion. Do they provide distinct behaviors? Do they overlap? For instance, is there any purpose to Elixir’s fault tolerance if Kubernetes also provides self-healing?
In this article, I will go over many of these topics and show how they are mostly complementary and discuss the rare case where they do overlap.
Kubernetes automatically restarts or replaces containers that fail. It can also kill containers that don’t respond to your user-defined health check. Similarly, in Erlang and Elixir, you structure your code with the help of supervisors, which automatically restart parts of your application in case of failures.
Kubernetes provides fault-tolerance within the cluster, Erlang/Elixir provide it within your application. To understand this better, let’s take an application that has to talk to a database (or any other external system). Most languages handle this by keeping a pool of database connections.
If your database goes offline, because of a bad configuration or a hardware failure, both the database and the Erlang/Elixir systems will respond negatively to health checks, which would cause Kubernetes to act and potentially relocate them. This is a node-wide failure and Kubernetes got your back.
However, what happens when part of your connections to the database are sporadically failing? For example, imagine your system is under load and you suddenly started running into connection limits, such as MySQL’s prepared statement limit. This failure likely won’t cause any health check to fail but your code will fail whenever one of its many connections reach said limit. Can you reason about this error today in your applications? Can you confidently say that the faulty connection will be dropped? Will another connection be started in place of the faulty one? Can you comfortably say this error won’t cascade in the application bringing the remaining of the connection pool down?
Erlang/Elixir’s abstractions for fault tolerance allow you to reason about those questions at the language level. It provides a mechanism for you to reason about connections, resources, in-memory state, background workers, etc. You can explicitly say how they are started, how they are shut down, and what should happen when things go wrong. These features can also be extremely helpful in face of partial failures. For example, imagine you have a news website and the live stock ticker is down. Should the website continue running, potentially serving stale data, or should everything crash down? The mental model provided by Erlang/Elixir allows us to reason about these scenarios. And of course, you can always let failures bubble up after a few retries, or even immediately, so it becomes a node-wide failure to be handled by K8s.
In a nutshell, Kubernetes and containers provide isolation and an ability to restart individual nodes when they fail, but it is not a replacement for isolation and fault handling within your own software, regardless of your language of choice. Using K8s and Erlang/Elixir allow you to apply similar self-healing and fault-tolerance principles in the large (cluster) and in the small (language/instance).
The Erlang VM also provides Distributed Erlang, which allows you to exchange messages between different instances running on the same or different machines. In Elixir, this is as easy as:
for node <- Node.list() do
# Send :hello_world message to named process "MyProcess" in each node
send {node, MyProcess}, :hello_world
end
When running in distributed mode (which is not a requirement in any way and you need to explicitly enable it), the Erlang VM will automatically serialize and deserialize the data as well as make sure the connection between nodes is alive, but it does not provide any node discovery. It is the programmer responsibility to say exactly where each node is located and connect the nodes together.
Luckily, Kubernetes provides service discovery out of the box. This means that, K8s allows us to fully automate the node discovery, which would otherwise be manual and error prone. Libraries like libcluster do exactly that (and rolling your own wouldn’t be complicated either). This is another great example of where Kubernetes and the Erlang VM complement each other!
However, you may still be wondering, is there a benefit to running Distributed Erlang when Kubernetes’ Service Discovery makes it relatively easy to have systems communicating with each other? Especially when considering RPC protocols such as Thrift, gRPC, and others?
When we are talking about different languages and different systems communicating with each other, picking one of the existing RPC mechanisms is likely the best choice, and they will also work fine with Erlang/Elixir. The scenario where the Erlang VM really shines, in my opinion, is for building homogeneous systems, i.e. when you have multiple deployments of the same container and they exchange information. For example, imagine you are building a real-time application when you want to track which users are in the same chat room, or in the same city block, or in the same mountain track. As users connect and disconnect and as nodes are brought up and down, you could somehow update the database or communicate via a complex RPC mechanism, while carefully watching the cluster for topology changes.
With the Erlang VM, you can just broadcast or exchange this information directly, without having to worry about serialization protocols, connection management, etc, as everything is provided by the VM. All without external dependencies. This is one of the many features that makes Phoenix a breeze to build distributed web-realtime systems.
When it comes to deployment, Kubernetes automatically rolls out changes to your application or its configuration, avoiding changing all instances at the same time. At the same time, the Erlang VM supports hot code swapping, which allows you to change the code that is running in production within a single instance without shutting said instance down.
Those two deployments techniques are obviously conflicting. In fact, hot code swapping does not go well in general with the whole idea of immutable containers. Does it mean that Kubernetes and the Erlang VM are a poor fit? Not really, because you don’t have to use hot code swapping. In fact, most people do not. Most Elixir applications are deployed using blue-green, canary, or similar techniques.
The truth about hot code swapping is that it is actually complicated to pull off in practice. Let’s use the database as an example once again. When you are deploying a new version of your software, whenever you update your database, you should never perform destructive changes. For example, if you want to rename a column, you have to add a new column, migrate the data over, and then remove the column. If you just rename the column, then you will have failures whenever doing rollouts, because you will have two versions of the software running at the same (one using the old column and the other using the new one). In hot code swapping, we have precisely the same issue, except it applies to all states inside your application. Companies that use hot code swapping often report they spend as much time developing the software as testing the upgrades themselves.
Of course, it doesn’t mean hot code swapping is useless. The Erlang VM development is mostly driven by business needs and there was a legitimate need for hot code swapping. In particular, when building telephone switches, there is never an appropriate moment to shut down an instance for updates, because at any given time a system is full of long running connections, perhaps days or even weeks. So being able to upgrade a live system is extremely helpful. If you have a similar need, then hot code swapping may be an option. Another option is to have smarter clients and migrate client connections between nodes when deploying.
Hot code swapping can also be used under other circumstances, such as during development to provide live code loading, without a need to restart your server, or to replace smaller components in production that don’t require replacing the whole instance.
Another feature provided by both Elixir and Kubernetes is configuration management. However, as seen before, they work at very distinct levels. While Elixir provides a unified API for configuring applications, it is relatively low-level. In a production system, you often want both configuration and secrets to be managed by higher level tools, such as the ones provided by Kubernetes. Luckily, you can incorporate said configuration tools into your deployment workflow with the help of Configuration Providers. This functionality is part of Elixir releases, which were officially made part of the Elixir language in version 1.9.
When provisioning Erlang and Elixir with Kubernetes, it is important to stay alert to one particular configuration: pod resources.
When using other technologies, it is common practice to break a large node into a bunch of small pods/containers. For example, if you have a node with 8 cores, you could allocate half of each CPU to a pod and split the memory equally between them, on a total of 16 pods.
This approach makes sense in many technologies that cannot exploit CPU and I/O concurrency simultaneously. However, the Erlang VM excels at managing system resources and your system will most likely be more efficient if you assign large pods to your Erlang and Elixir applications instead of breaking it apart into a bunch of small ones.
If the Erlang VM is sharing a machine with other applications you may want to consider reducing busy waiting. By doing so, the VM will optimize for lower CPU usage, making it a better neighbor, but with slightly higher latencies.
Kubernetes and the Erlang VM work at distinct levels. Kubernetes orchestrates within a cluster, the Erlang VM orchestrates at the language level within an instance. Fred Hebert summed up this distinction well in a tweet:
Still seeing bad comparisons between kubernetes and #Erlang/OTP. K8s is to OTP what region failover is to k8s. They operate on different layers of abstraction and impact distinct components.
OTP allows handling partial failures WITHIN an instance, something k8s can't help with.
— Fred Hebert (@mononcqc) April 29, 2019
If you are using Erlang/Elixir and you wonder how Kubernetes applies compared to other languages, you can use Kubernetes for the Erlang VM as you would with any other technology. Given that Erlang/Elixir software can typically scale both horizontally and vertically, it gives you many options on how you want to allocate your resources within K8s.
On other areas, Kubernetes and the Erlang VM can nicely complement each other, such as using K8s Service Discovery to connect Erlang VM instances. Of course, Distributed Erlang is not a requirement and Erlang/Elixir are great languages even for stateless apps, thanks to its scalability and reliability.
If you are one of the few who really need hot code swapping in production, then the Erlang VM may be one of the best platforms to do so, but keep in mind you will be straying away from the common path in both technologies.
Finally, if you appreciate Kubernetes and its concepts, you may enjoy working with Erlang and Elixir, as they will give you an opportunity to apply similar idioms on the small and on the large.
Thanks to Fernando Tapia Rico, Fred Hebert, George Guimarães, Tristan Sloughter, and Wojtek Mach for reviewing this article.
P.S.: This post was originally published on Plataformatec’s blog.
]]>To give some background information, Hexdocs.pm started out as basically just static file hosting for documentation. With the introduction of private Hexdocs it became a distinct Elixir application. Over time, we have also moved handling of documentation tarballs there to offload API servers. Instead of API servers doing all the work, they now just upload a tarball to S3 which automatically sends a SQS message which is then picked up by the Hexdocs app. The initial implementation of Hexdocs pipeline was done with a custom GenStage producer and a consumer.
Updating the pipeline to use Broadway was really straightforward. We’ve completely removed our custom producer and replaced it with BroadwaySQS.Producer. In terms of consuming messages, our code is pretty much unchanged, instead of implementing GenStage.handle_events/3
callback we now implement Broadway.handle_message/3
.
Previously, we needed to configure our supervision tree to start X producers and Y consumers, and set consumers to be subscribed to producers. With Broadway, we specify the desired topology and it starts all processes under a dedicated supervisor. Not only it’s a more declarative approach, Broadway automatically adds a “Terminator” process to the supervision tree that ensures proper application shutdown. While before the application could abort a job in the middle of processing, now Broadway ensures the job queue is drained before shutting down the app.
On the testing front, we didn’t start our GenStage pipeline at all during tests to avoid doing network requests, and we tested the logic through internal APIs. Now, we’re conditionally using Broadway.DummyProducer
, which doesn’t hit the network, and we’re triggering an event in the pipeline using Broadway.test_messages/2
making the test more realistic.
Perhaps the biggest win by moving over to Broadway was that it automatically batches and acknowledges messages. This, along with other existing and planned future features like rate-limiting and backoff, is what is most appealing about Broadway - that the community best practices will usually be the default behaviour or just a matter of configuration.
Overall, we were very happy with updating Hexdocs to use Broadway and we’ve been running it in production for last few months without issues. Not only we removed a lot of code, we got a couple nice features for free and we will continue to reap the benefits as Broadway gets updated.
See hexpm/hexdocs#11 to see all required code changes.
P.S.: This post was originally published on Plataformatec’s blog.
]]>Today we are happy to announce MiniRepo, a minimal Hex server that can be used for packages self-hosting.
MiniRepo ships with the following features:
See instructions for usage with Mix and Rebar3.
Finally, by making it easier to run self-hosted Hex registry we are achieving one of the goals of the Building and Packaging Working Group at Erlang Ecosystem Foundation, which we are glad to contribute to!
P.S.: This post was originally published on Plataformatec’s blog.
]]>(Update: This section is no longer relevant since v1.9 is already out!)
Since Elixir v1.9 is not out yet, we need to use the development version. Locally, my preferred approach is to use the Elixir plugin for the asdf-vm version manager.
Here’s a couple of ways we may use asdf to install recent development versions:
# install latest master
$ asdf install elixir master
$ asdf local elixir master
# or, install particular revision:
$ asdf install elixir ref:b8b7e5a
$ asdf local elixir ref:b8b7e5a
Per “Deployment” section of mix release
documentation:
A release is built on a host, a machine which contains Erlang, Elixir, and any other dependencies needed to compile your application. A release is then deployed to a target, potentially the same machine as the host, but usually separate, and often there are many targets (either multiple instances, or the release is deployed to heterogeneous environments).
We deploy Hex.pm using Docker containers and we needed to change our Dockerfile. If you’re deploying using buildpacks (e.g. to Heroku or Gigalixir), it should be as simple as setting elixir_version=master
in your elixir_buildpack.config
.
Elixir 1.9 ships with two new Mix tasks to work with releases:
mix release.init
- generates sample files for releases mix release
- builds the release
The sample files generated by mix release.init
are optional, if they are not present in your project then the release will be built with default options. On Hex.pm, previously we were building releases using Distillery and to work with Elixir releases we needed to make a few small tweaks. Here are the main ones:
:releases
section to mix.exs
- this is an optional step but since we don’t deploy on Windows, we only need to generate executable files for UNIX-like systems rel/vm.args
with rel/vm.args.eex
rel/hooks/pre_configure
with rel/env.sh.eex
config/releases.exs
for runtime configuration of the release mix deps.unlock
it!)
See the “Replace Distillery with Elixir releases” PR on Hex.pm repo for more details. We now have a few files that deal with configuring our app/release, let’s take a step back and see what they can do:
config/prod.exs
- provides build-time application configuration config/releases.exs
- provides runtime application configuration. We’re using the new Config
module and the System.fetch_env!/1
function, also introduced in Elixir v1.9.0, to conveniently return the environment variable if set, or raise an error. rel/vm.args.eex
- provides a static mechanism for configuring the Erlang Virtual Machine and other runtime flags. For now, we use the defaults but if down the line we’d tune the VM, we’d set the options here. rel/env.sh.eex
- provides a dynamic mechanism for setting up the VM, runtime flags, and environment variables.
RELEASE_NODE
and RELEASE_COOKIE
variables are used by the release script, see “Environment variables” section in the documentation for all recognized variables. The POD_A_RECORD
variable we have there is specific to our deployment environment on Hex.pm, we deploy it to Google Kubernetes Engine. See “Application configuration” and “vm.args and env.sh (env.bat)” sections for more information.
Finally, we use the mix release
task to actually assemble the release:
$ mix release
* assembling hexpm-0.0.1 on MIX_ENV=dev
* using config/releases.exs to configure the release at runtime
* creating _build/dev/rel/hexpm/releases/0.0.1/vm.args
* creating _build/dev/rel/hexpm/releases/0.0.1/env.sh
Release created at _build/dev/rel/hexpm!
# To start your system
_build/dev/rel/hexpm/bin/hexpm start
Once the release is running:
# To connect to it remotely
_build/dev/rel/hexpm/bin/hexpm remote
# To stop it gracefully (you may also send SIGINT/SIGTERM)
_build/dev/rel/hexpm/bin/hexpm stop
To list all commands:
_build/dev/rel/hexpm/bin/hexpm
The generated release script (bin/hexpm
) has many commands:
$ _build/dev/rel/hexpm/bin/hexpm
Usage: hexpm COMMAND [ARGS]
The known commands are:
start Starts the system
start_iex Starts the system with IEx attached
daemon Starts the system as a daemon
daemon_iex Starts the system as a daemon with IEx attached
eval "EXPR" Executes the given expression on a new, non-booted system
rpc "EXPR" Executes the given expression remotely on the running system
remote Connects to the running system via a remote shell
restart Restarts the running system via a remote command
stop Stops the running system via a remote command
pid Prints the OS PID of the running system via a remote command
version Prints the release name and version to be booted
In our Hex.pm deployment we have used two of these commands for now:
bin/hexpm start
- we use it as the start command to be run in our Docker container bin/hexpm eval
- we use it to run DB migrations and other maintenance scripts. For migrations, the command is: bin/hexpm eval 'Hexpm.ReleaseTasks.migrate()'
. In this blog post we’ve walked through using Elixir releases on an existing project, Hex.pm. We’ve installed the development version of Elixir, configured the release, and adjusted our deployment setup to use it. Hex.pm was previously using Distillery, and with minimal changes we were able to update it to use built-in releases support.
Overall, I’m very happy about this change. We’ve ended up with about the same amount of configuration code, but I think it’s a little bit better structured and more obvious.
I especially like new conventions around configuration. Where previously we used workarounds like config :app, {:system, "ENV_VAR"}
and "${ENV_VAR}"
(and REPLACE_OS_VARS=true
), we now have a clear distinction between build-time and runtime configuration. mix release
documentation does a really good job of explaining configuration aspects in particular but also the whole release process in general.
Building the release is now faster too, on my machine ~2.5s now vs ~5.5s before. Granted, it’s probably the least concern but it’s a nice cherry on top nonetheless.
As of this writing, Hex.pm is already deployed using Elixir releases. Now your turn - try out releases on your project! (And if something goes wrong, submit an issue!)
P.S.: This post was originally published on Plataformatec’s blog.
]]>Let’s take a look at some of the new capabilities. You can see them live at hexdocs.pm/elixir/master/ too!
You can now press <kbd>s</kbd> to focus the search bar, <kbd>c</kbd> to expand or collapse the sidebar, <kbd>n</kbd> to switch between light and dark mode. Last but not least, press <kbd>?</kbd> to see all available shortcuts.
Two of the most exciting new features are search autocompletion and full-text search. As you type in the search box, suggestions for existing modules, functions, callbacks, etc will show up. And if you want to search for a specific phrase across the whole documentation - that works too!
You may have seen on previous screencasts that there’s a little arrow near the project version and that’s finally the ability to switch between documentation versions:
This feature is still a bit rough around the edges and in particular if you go to documentation generated with previous ExDoc versions there’s no going back because there was no version switcher back then! :)
This release brings other improvements and bug fixes. For a full list of changes, see the CHANGELOG.
Special thanks to @SaneSquid, @peillis, @michal_lepicki and all the other contributors that made this such a great release.
P.S.: This post was originally published on Plataformatec’s blog.
]]>We have worked with many companies building data processing pipelines and we have noticed that they were often reimplementing the same features and also running into common pitfalls when assembling complex GenStage topologies. The goal of Broadway is to significantly cut down the development time to assemble those pipelines, while providing many features and avoiding common pitfalls.
Broadway comes with a handful of features that take the burden of defining concurrent GenStage topologies and provide a simple configuration API that automatically defines concurrent producers, concurrent processing, batch handling, and more, leading to both time and cost efficient ingestion and processing of data. Some of those features include:
Other features are already on the roadmap, such as:
Similarly to other process-based behaviours, we can create a Broadway-based data pipeline by defining a module like this:
defmodule MyBroadway do
use Broadway
alias Broadway.Message
def start_link(_opts) do
Broadway.start_link(__MODULE__,
name: __MODULE__,
producers: [
sqs: [
module: {BroadwaySQS.Producer, queue_name: "my_queue"}
]
],
processors: [
default: [stages: 50]
],
batchers: [
s3_odd: [stages: 2, batch_size: 10],
s3_even: [stages: 1, batch_size: 10]
]
)
end
...callbacks...
end
The configuration above defines a pipeline with:
:s3_odd
with 2 consumers :s3_even
with 1 consumer [producer_1]
/ \
/ \
/ \
/ \
[processor_1] [processor_2] ... [processor_50] <- process each message
/\ /\
/ \ / \
/ \ / \
/ x \
/ / \ \
/ / \ \
/ / \ \
[batcher_s3_odd] [batcher_s3_even]
/\ \
/ \ \
/ \ \
/ \ \
[consumer_s3_odd_1] [consumer_s3_odd_2] [consumer_s3_even_1] <- process each batch
In order to process the data provided by the SQS producer, we need to implement two Broadway callbacks: handle_message/3
, invoked by processors for each message, and handle_batch/4
, invoked by consumers with each batch:
defmodule MyBroadway do
use Broadway
alias Broadway.Message
...start_link...
@impl true
def handle_message(_, %Message{data: data} = message, _) when is_odd(data) do
message
|> Message.update_data(&process_data/1)
|> Message.put_batcher(:s3_odd)
end
def handle_message(_, %Message{data: data} = message, _) do
message
|> Message.update_data(&process_data/1)
|> Message.put_batcher(:s3_even)
end
@impl true
def handle_batch(:s3_odd, messages, _batch_info, _context) do
# Send batch of messages to S3 "odd" bucket
end
def handle_batch(:s3_even, messages, _batch_info, _context) do
# Send batch of messages to S3 "even" bucket
end
defp process_data(data) do
# Do some calculations, generate a JSON representation, etc.
end
end
At the end of the pipeline, messages are automatically acknowledged by the SQS producer.
Note: You can also use existing GenStage producers as the source of the pipeline. For more information see the Custom Producers Guide.
There’s a lot more about Broadway. We put a lot of effort in the documentation, including architectural aspects and a full guide on consuming events from Amazon SQS queues.
As with any first release, we expect to gather as much feedback as possible from the community so we can incorporate new use cases and improve the API appropriately. You can also contribute to this project in many ways, either by giving the project a try or building your own connector. The SQS connector presented in this post is already available. A RabbitMQ connector is also planned and should be available soon.
We plan to continue pushing the Elixir ecosystem forward! If you would like to build Elixir systems together with our team, reach out and we will be glad to discuss anything Elixir related, from data pipelines to web applications and distributed systems!
Happy coding!
P.S.: This post was originally published on Plataformatec’s blog.
]]>After DBConnection integration we have a driver that should be usable on its own. The next step is to integrate it with Ecto so that we can:
mix ecto.create
and mix ecto.migrate
, and finally using Ecto SQL Sandbox to manage clean slate between tests If you ever worked with Ecto, you’ve seen code like:
defmodule MyApp.Repo do
use Ecto.Repo,
adapter: Ecto.Adapters.MySQL,
otp_app: :my_app
end
The adapter
is a module that implements Ecto Adapter specifications:
Ecto.Adapter
- minimal API required from adapters Ecto.Adapter.Queryable
- plan, prepare, and execute queries leveraging query cache Ecto.Adapter.Schema
- insert, update, and delete structs as well as autogenerate IDs Ecto.Adapter.Storage
- storage API used by e.g. mix ecto.create
and mix ecto.drop
Ecto.Adapter.Transaction
- transactions API
Adapters are required to implement at least Ecto.Adapter
behaviour. The remaining behaviours are optional as some data stores don’t support transactions or creating/dropping the storage (e.g. some cloud services).
There’s also a separate Ecto SQL project which ships with its own set of adapter specifications on top of the ones from Ecto. Conveniently, it also includes a Ecto.Adapters.SQL
module that we can use, which implements most of the callbacks and lets us worry mostly about generating appropriate SQL.
Let’s try using the Ecto.Adapters.SQL
module:
defmodule MyXQL.EctoAdapter do
use Ecto.Adapters.SQL,
driver: :myxql,
migration_lock: "FOR UPDATE"
end
When we compile it, we’ll get a bunch of warnings as we haven’t implemented any of the callbacks yet.
warning: function supports_ddl_transaction?/0 required by behaviour Ecto.Adapter.Migration is not implemented (in module MyXQL.EctoAdapter)
lib/a.ex:1
warning: function MyXQL.EctoAdapter.Connection.all/1 is undefined (module MyXQL.EctoAdapter.Connection is not available)
lib/a.ex:2
warning: function MyXQL.EctoAdapter.Connection.delete/4 is undefined (module MyXQL.EctoAdapter.Connection is not available)
lib/a.ex:2
(...)
Notably, we get a module MyXQL.EctoAdapter.Connection is not available
warning. The SQL adapter specification requires us to implement a separate connection module (see Ecto.Adapters.SQL.Connection
behaviour) which will leverage, you guessed it, DBConnection. Let’s try that now and implement a couple of callbacks:
defmodule MyXQL.EctoAdapter.Connection do
@moduledoc false
@behaviour Ecto.Adapters.SQL.Connection
@impl true
def child_spec(opts) do
MyXQL.child_spec(opts)
end
@impl true
def prepare_execute(conn, name, sql, params, opts) do
MyXQL.prepare_execute(conn, name, sql, params, opts)
end
end
Since we’ve leveraged DBConnection in the MyXQL driver, these functions are simply delegating to driver. Let’s implement something a little bit more interesting.
Did you ever wonder how Ecto.Changeset.unique_constraint/3
is able to transform a SQL constraint violation failure into a changeset error? Turns out that unique_constriant/3
keeps a mapping between unique key constraint name and fields these errors should be reported on. The code that makes it work is executed in the repo and the adapter when the structs are persisted. In particular, the adapter should implement the Ecto.Adapters.SQL.Connection.to_constraints/1
callback. Let’s take a look:
iex> b Ecto.Adapters.SQL.Connection.to_constraints
@callback to_constraints(exception :: Exception.t()) :: Keyword.t()
Receives the exception returned by c:query/4.
The constraints are in the keyword list and must return the constraint type,
like :unique, and the constraint name as a string, for example:
[unique: "posts_title_index"]
Must return an empty list if the error does not come from any constraint.
Let’s see how the constraint violation error looks exactly:
$ mysql -u root myxql_test
mysql> CREATE TABLE uniques (x INTEGER UNIQUE);
Query OK, 0 rows affected (0.17 sec)
mysql> INSERT INTO uniques VALUES (1);
Query OK, 1 row affected (0.08 sec)
mysql> INSERT INTO uniques VALUES (1);
ERROR 1062 (23000): Duplicate entry '1' for key 'x'
MySQL responds with error code 1062
. We can further look into the error by using perror
command-line utility that ships with MySQL installation:
$ perror 1062
MySQL error code 1062 (ER_DUP_ENTRY): Duplicate entry '%-.192s' for key %d
Ok, let’s finally implement the callback:
defmodule MyXQL.EctoAdapter.Connection do
# ...
@impl true
def to_constraints(%MyXQL.Error{mysql: %{code: 1062}, message: message}) do
case :binary.split(message, " for key ") do
[_, quoted] -> [unique: strip_quotes(quoted)]
_ -> []
end
end
end
Let’s break this down. We expect that the driver raises an exception struct on constraint violation, we then match on the particular error code, extract the field name from the error message, and return that as keywords list.
(To make this more understandable, in the MyXQL project we’ve added error code/name mapping so we pattern match like this instead: mysql: %{code: :ER_DUP_ENTRY}
.)
To get a feeling of what other subtle changes we may have between data stores, let’s implement one more callback, back in the MyXQL.EctoAdapter
module.
While MySQL has a BOOLEAN
type, turns out it’s simply an alias to TINYINT
and its possible values are 1
and 0
. These sort of discrepancies are handled by the dumpers/2
and loaders/2
callbacks, let’s implement the latter:
defmodule MyXQL.EctoAdapter do
# ...
@impl true
def loaders(:boolean, type), do: [&bool_decode/1, type]
# ...
def loaders(_, type), do: [type]
defp bool_decode(<<0>>), do: {:ok, false}
defp bool_decode(<<1>>), do: {:ok, true}
defp bool_decode(0), do: {:ok, false}
defp bool_decode(1), do: {:ok, true}
defp bool_decode(other), do: {:ok, other}
end
As you can see there might be quite a bit of discrepancies between adapters and data stores. For this reason, besides providing adapter specifications, Ecto ships with integration tests that can be re-used by adapter libraries.
Here’s a set of basic integration test cases and support files in Ecto, see: ./integration_test/
directory.
And here’s an example how a separate package might leverage these. Turns out that ecto_sql
uses ecto
integration tests:
# ecto_sql/integration_test/mysql/all_test.exs
ecto = Mix.Project.deps_paths[:ecto]
Code.require_file "#{ecto}/integration_test/cases/assoc.exs", __DIR__
Code.require_file "#{ecto}/integration_test/cases/interval.exs", __DIR__
# ...
and has a few of its own.
When implementing a 3rd-party SQL adapter for Ecto we already have a lot of integration tests to run against!
In this article we have briefly looked at integrating our driver with Ecto and Ecto SQL.
Ecto helps with the integration by providing:
Ecto.Adapters.SQL
module that we can use to build adapters for relational databases even faster We’re also concluding our adapter series. Some of the overarching themes were:
Happy coding!
P.S.: This post was originally published on Plataformatec’s blog.
]]>In the first two articles of the series we have learned the basic building blocks for interacting with a MySQL server using its binary protocol over TCP. To have a production-quality driver, however, there’s more work to do. Namely, we need to think about:
DBConnection is a behaviour module for implementing efficient database connection client processes, pools and transactions. It has been created by Elixir and Ecto Core Team member James Fish and has been introduced in Ecto v2.0.
Per DBConnection documentation we can see how it addresses concerns mentioned above:
DBConnection handles callbacks differently to most behaviours. Some callbacks will be called in the calling process, with the state copied to and from the calling process. This is useful when the data for a request is large and means that a calling process can interact with a socket directly.
A side effect of this is that query handling can be written in a simple blocking fashion, while the connection process itself will remain responsive to OTP messages and can enqueue and cancel queued requests.
If a request or series of requests takes too long to handle in the client process a timeout will trigger and the socket can be cleanly disconnected by the connection process.
If a calling process waits too long to start its request it will timeout and its request will be cancelled. This prevents requests building up when the database cannot keep up.
If no requests are received for a period of time the connection will trigger an idle timeout and the database can be pinged to keep the connection alive.
Should the connection be lost, attempts will be made to reconnect with (configurable) exponential random backoff to reconnect. All state is lost when a connection disconnects but the process is reused.
The
DBConnection.Query
protocol provide utility functions so that queries can be prepared or encoded and results decoding without blocking the connection or pool.
Let’s see how we can use it!
We will first create a module responsible for implementing DBConnection callbacks:
defmodule MyXQL.Protocol do
use DBConnection
end
When we compile it, we’ll get a bunch of warnings about callbacks that we haven’t implemented yet.
Let’s start with the connect/1
callback and while at it, add some supporting code:
defmodule MyXQL.Error do
defexception [:message]
end
defmodule MyXQL.Protocol do
@moduledoc false
use DBConnection
import MyXQL.Messages
defstruct [:sock]
@impl true
def connect(opts) do
hostname = Keyword.get(opts, :hostname, "localhost")
port = Keyword.get(opts, :port, 3306)
timeout = Keyword.get(opts, :timeout, 5000)
username = Keyword.get(opts, :username, System.get_env("USER")) || raise "username is missing"
sock_opts = [:binary, active: false]
case :gen_tcp.connect(String.to_charlist(hostname), port, sock_opts) do
{:ok, sock} ->
handshake(username, timeout, %__MODULE__{sock: sock})
{:error, reason} ->
{:error, %MyXQL.Error{message: "error when connecting: #{inspect(reason)}"}}
err_packet(message: message) ->
{:error, %MyXQL.Error{message: "error when performing handshake: #{message}"}}
end
end
@impl true
def checkin(state) do
{:ok, state}
end
@impl true
def checkout(state) do
{:ok, state}
end
@impl true
def ping(state) do
{:ok, state}
end
defp handshake(username, timeout, state) do
with {:ok, data} <- :gen_tcp.recv(state.sock, 0, timeout),
initial_handshake_packet() = decode_initial_handshake_packet(data),
data = encode_handshake_response_packet(username),
:ok <- :gen_tcp.send(state.sock, data),
{:ok, data} <- :gen_tcp.recv(state.sock, 0, timeout),
ok_packet() <- decode_handshake_response_packet(data) do
{:ok, sock}
end
end
end
defmodule MyXQL do
@moduledoc "..."
@doc "..."
def start_link(opts) do
DBConnection.start_link(MyXQL.Protocol, opts)
end
end
That’s a lot to unpack so let’s break this down:
per documentation, connect/1
must return {:ok, state}
on success and {:error, exception}
on failure. Our connection state for now will be just the socket. (In a complete driver we’d use the state to manage prepared transaction references, status of transaction etc.) On error, we return an exception.
we extract configuration from keyword list opts
and provide sane defaults * we try to connect to the TCP server and if successful, perform the handshake.
as we’ve learned in part I, the handshake goes like this: after connecting to the socket, we receive the “Initial Handshake Packet”. Then, we send “Handshake Response” packet. At the end, we receive the response and decode the result which can be an “OK Pacet” or an “ERR Packet”. If we receive any socket errors, we ignore them for now. We’ll talk about handling them better later on.
finally, we introduce a public MyXQL.start_link/1
that is an entry point to the driver
we also provide minimal implementations for checkin/1
, checkout/1
and ping/1
callbacks
It’s worth taking a step back at looking at our overall design:
MyXQL
module exposes a small public API and calls into an internal module
MyXQL.Protocol
implements DBConnection
behaviour and is the place where all side-effects are being handled
MyXQL.Messages
implements pure functions for encoding and decoding packets This separation is really important. By keeping protocol data separate from protocol interactions code we have a codebase that’s much easier to understand and maintain.
Let’s take a look at handle_prepare/3
and handle_execute/4
callbacks that are used to
handle prepared statements:
iex> b DBConnection.handle_prepare
@callback handle_prepare(query(), opts :: Keyword.t(), state :: any()) ::
{:ok, query(), new_state :: any()}
| {:error | :disconnect, Exception.t(), new_state :: any()}
Prepare a query with the database. Return {:ok, query, state} where query is a
query to pass to execute/4 or close/3, {:error, exception, state} to return an
error and continue or {:disconnect, exception, state} to return an error and
disconnect.
This callback is intended for cases where the state of a connection is needed
to prepare a query and/or the query can be saved in the database to call later.
This callback is called in the client process.
iex> b DBConnection.handle_execute
@callback handle_execute(query(), params(), opts :: Keyword.t(), state :: any()) ::
{:ok, query(), result(), new_state :: any()}
| {:error | :disconnect, Exception.t(), new_state :: any()}
Execute a query prepared by c:handle_prepare/3. Return {:ok, query, result,
state} to return altered query query and result result and continue, {:error,
exception, state} to return an error and continue or {:disconnect, exception,
state} to return an error and disconnect.
This callback is called in the client process.
Notice the callbacks reference types like: query()
, result()
and params()
.
Let’s take a look at them too:
iex> t DBConnection.result
@type result() :: any()
iex> t DBConnection.params
@type params() :: any()
iex> t DBConnection.query
@type query() :: DBConnection.Query.t()
As far as DBConnection is concerned, result()
and params()
can be any term (it’s up to us to define these) and the query()
must implement the DBConnection.Query
protocol.
DBConnection.Query
is used for preparing queries, encoding their params, and decoding their
results. Let’s define query and result structs as well as minimal protocol implementation.
defmodule MyXQL.Result do
defstruct [:columns, :rows]
end
defmodule MyXQL.Query do
defstruct [:statement, :statement_id]
defimpl DBConnection.Query do
def parse(query, _opts), do: query
def describe(query, _opts), do: query
def encode(_query, params, _opts), do: params
def decode(_query, result, _opts), do: result
end
end
Let’s define the first callback, handle_prepare/3
:
defmodule MyXQL.Protocol do
# ...
@impl true
def handle_prepare(%MyXQL.Query{statement: statement}, _opts, state) do
data = encode_com_stmt_prepare(query.statement)
with :ok <- sock_send(data, state),
{:ok, data} <- sock_recv(state),
com_stmt_prepare_ok(statement_id: statement_id) <- decode_com_stmt_prepare_response(data) do
query = %{query | statement_id: statement_id}
{:ok, query, state}
else
err_packet(message: message) ->
{:error, %MyXQL.Error{message: "error when preparing query: #{message}"}, state}
{:error, reason} ->
{:disconnect, %MyXQL.Error{message: "error when preparing query: #{inspect(reason)}"}, state}
end
end
defp sock_send(data, state), do: :gen_tcp.recv(state.sock, data, :infinity)
defp sock_recv(state), do: :gen_tcp.recv(state.sock, :infinity)
end
The callback receives query
, opts
(which we ignore), and state
. We encode the query statement into COM_STMT_PREPARE
packet, send it, receive response, decode the COM_STMT_PREPARE Response
, and put the retrieved statement_id
into our query struct.
If we receive an ERR Packet
, we put the error message into our MyXQL.Error
exception and return that.
The only places that we could get {:error, reason}
tuple is we could get it from are the gen_tcp.send,recv
calls - if we get an error there it means there might be something wrong with the socket. By returning {:disconnect, _, _}
, DBConnection will take care of closing the socket and will attempt to re-connect with a new one.
Note, we set timeout
to :infinity
on our send/recv calls. That’s because DBConnection is managing the process these calls will be executed in and it maintains it’s own timeouts. (And if we hit these timeouts, it cleans up the socket automatically.)
Let’s now define the handle_execute/4
callback:
defmodule MyXQL.Protocol do
# ...
@impl true
def handle_execute(%{statement_id: statement_id} = query, params, _opts, state)
when is_integer(statement_id) do
data = encode_com_stmt_execute(statement_id, params)
with :ok <- sock_send(state, data),
{:ok, data} <- sock_recv(state),
resultset(columns: columns, rows: rows) = decode_com_stmt_execute_response() do
columns = Enum.map(columns, &column_definition(&1, :name))
result = %MyXQL.Result{columns: columns, rows: rows}
{:ok, query, result, state}
else
err_packet(message: message) ->
{:error, %MyXQL.Error{message: "error when preparing query: #{message}"}, state}
{:error, reason} ->
{:disconnect, %MyXQL.Error{message: "error when preparing query: #{inspect(reason)}"}, state}
end
end
end
defmodule MyXQL.Messages do
# ...
# https://dev.mysql.com/doc/internals/en/com-query-response.html#packet-ProtocolText::Resultset
defrecord :resultset, [:column_count, :columns, :row_count, :rows, :warning_count, :status_flags]
def decode_com_stmt_prepare_response(data) do
# ...
resultset(...)
end
# https://dev.mysql.com/doc/internals/en/com-query-response.html#packet-Protocol::ColumnDefinition41
defrecord :column_definition, [:name, :type]
end
Let’s break this down.
handle_execute/4
receives an already prepared query, params
to encode, opts, and the state.
Similarly to handle_prepare/3
, we encode the COM_STMT_EXECUTE
packet, send it and receive a response, decode COM_STMT_EXECUTE Response
, into a resultset
record, and finally build the result struct.
Same as last time, if we get an ERR Packet
we return an {:error, _, _}
response; on socket problems, we simply disconnect and let DBConnection handle re-connecting at later time.
We’ve mentioned that the DBConnection.Query
protocol is used to prepare queries, and in fact we could perform encoding of params and decoding the result in implementation functions. We’ve left that part out for brevity.
Finally, let’s add a public function that users of the driver will use:
defmodule MyXQL do
# ...
def prepare_execute(conn, statement, params, opts) do
query = %MyXQL.Query{statement: statement}
DBConnection.prepare_execute(conn, query, params, opts)
end
end
and see it all working.
iex> {:ok, pid} = MyXQL.start_link([])
iex> MyXQL.prepare_execute(pid, "SELECT ?", [42], [])
{:ok, %MyXQL.Query{statement: "SELECT ? + ?", statement_id: 1},
%MyXQL.Result{columns: ["? + ?"], rows: [[5]]}}
Arguments to MyXQL.start_link
are passed down to
DBConnection.start_link/2
,
so starting a pool of 2 connections is as simple as:
iex> {:ok, pid} = MyXQL.start_link(pool_size: 2)
{:ok, #PID<0.264.0>}
In this article, we’ve seen a sneak peek of integration with the DBConnection library. It gave us many benefits:
:gen_tcp
functions without worrying about OTP messages and timeouts;
DBConnection will handle these With this, we’re almost done with our adapter series. In the final article we’ll use our driver as an Ecto adapter. Stay tuned!
P.S.: This post was originally published on Plataformatec’s blog.
]]>Last time we briefly looked at encoding and decoding data over MySQL wire protocol. In this article we’ll dive deeper into that topic, let’s get started!
MySQL protocol has two “Basic Data Types”: integers and strings. Within integers we have fixed-length and length-encoded integers.
The simplest type is int<1>
which is an integer stored in 1 byte.
To recap, MySQL is using little endianess when encoding/decoding integers as binaries. Let’s define a function that takes an int<1>
from the given binary and returns the rest of the binary:
defmodule MyXQL.Types do
def take_int1(data) do
<<value::8-little-integer, rest::binary>> = data
{value, rest}
end
end
iex> MyXQL.Types.take_int1(<<1, 2, 3>>)
{1, <<2, 3>>}
We can generalize this function to accept any fixed-length integer:
def take_fixed_length_integer(data, size) do
<<value::little-integer-size(size)-unit(8), rest::binary>> = data
{value, rest}
end
iex> MyXQL.Types.take_fixed_length_integer(<<1, 2, 3>>, 2)
{513, <<3>>}
(See <<>>/1
for more information on bitstrings.)
Decoding a length-encoded integer is slightly more complicated.
Basically, if the first byte value is less than 251
, then it’s a 1-byte integer; if the first-byte is 0xFC
, then it’s a 2-byte integer and so on up to a 8-byte integer:
def take_length_encoded_int1(<<int::8-little-integer, rest::binary>>) when int < 251, do: {int, rest}
def take_length_encoded_int2(<<0xFC, int::16-little-integer, rest::binary>>), do: {int, rest}
def take_length_encoded_int3(<<0xFD, int::24-little-integer, rest::binary>>), do: {int, rest}
def take_length_encoded_int8(<<0xFE, int::64-little-integer, rest::binary>>), do: {int, rest}
iex> MyXQL.Types.take_length_encoded_int1(<<1, 2, 3>>)
{1, <<2, 3>>}
iex> MyXQL.Types.take_length_encoded_int2(<<0xFC, 1, 2, 3>>)
{513, <<3>>}
Can we generalize this function to a single binary pattern match, the same way we did with take_fixed_length_integer/2
? Unfortunately we can’t. Our logic is essentially a case
with 4 clauses and such cannot be used in pattern matches.
For this reason, the way we decode data is by reading some bytes, decoding them, and returning the rest of the binary.
It’s a shame that MySQL doesn’t encode the size of the binary in the first byte because otherwise our decode function could be easily implemented in a single binary pattern match, e.g.:
iex> <<size::8, value::little-integer-size(size)-unit(8), rest::binary>> = <<2, 1, 2, 3>>
iex> {value, rest}
{513, <<3>>}
In fact, it’s common for protocols to encode data as Type-Length-Value (TLV) which as you can see above, it’s very easy to implement with Elixir.
In any case, we can still leverage binary pattern matching in the function head. Here’s our final take_length_encoded_integer/1
function:
def take_length_encoded_integer(<<int::8, rest::binary>>) when int < 251, do: {int, rest}
def take_length_encoded_integer(<<0xFC, int::int(2), rest::binary>>), do: {int, rest}
def take_length_encoded_integer(<<0xFD, int::int(3), rest::binary>>), do: {int, rest}
def take_length_encoded_integer(<<0xFE, int::int(8), rest::binary>>), do: {int, rest}
There’s one last thing that we can do. Because take_fixed_length_integer/2
is so simple and basically uses a single binary pattern match (in particular, it does not have a case
statement), we can replace it with a macro instead. All we need to do is to emit little-integer-size(size)-unit(8)
AST so that we can use it in a bitstring; that’s easy:
defmacro int(size) do
quote do
little-integer-size(unquote(size))-unit(8)
end
end
Because it’s a macro we need to require
or import
it to use it:
iex> import MyXQL.Types
iex> <<value::int(1), rest::binary>> = <<1, 2, 3>>
iex> {value, rest}
{1, <<2, 3>>}
iex> <<value::int(2), rest::binary>> = <<1, 2, 3>>
iex> {value, rest}
{513, <<3>>}
A really nice thing about using a macro here is we get encoding for free:
iex> <<513::int(2)>>
<<1, 2>>
We could write a macro for encoding length-encoded integers (we could even invoke it as 513::int(lenenc)
to mimic the spec, by adjusting int/1
macro) but I decided against it as it won’t be usable in a binary pattern match.
Encoding/decoding MySQL strings is very similar so we will not be going over that and we’ll jump into the next section on bit flags. (Sure enough, working with strings would be easy, even in binary pattern matches, if not for an EOF-terminated string<eof>
and string<lenenc>
types.)
MySQL provides “Capability Flags” like:
CLIENT_PROTOCOL_41 0x00000200
CLIENT_SECURE_CONNECTION 0x00008000
CLIENT_PLUGIN_AUTH 0x00080000
The idea is we represent a set of capabilities as a single integer on which we can use Bitwise
operations like: 0x00000200 ||| 0x00008000
, flags &&& 0x00080000
etc.
We definitely don’t want to pass these “magic” bytes around so we should encapsulate them somehow.
We could store them as module attributes, e.g.: @client_protocol_41 0x00000200
; if we mistype the name of the flag, we’ll get a helpful compiler warning. Using functions, however, gives us a bit more flexibility as we can generate great error messages as well as “hide” usage of bitwise operations underneath.
Let’s implement a function that checks whether given flags
has a given capability:
defmodule MyXQL.Messages do
use Bitwise
def has_capability_flag?(flags, :client_protocol_41), do: (flags &&& 0x00000200) == 0x00000200
def has_capability_flag?(flags, :client_secure_connection), do: (flags &&& 0x00008000) == 0x00008000
def has_capability_flag?(flags, :client_plugin_auth), do: (flags &&& 0x00080000) == 0x00080000
# ...
end
iex> MyXQL.Messages.has_capability_flag?(0, :client_protocol_41)
false
iex> MyXQL.Messages.has_capability_flag?(0x00000200, :client_protocol_41)
true
iex> MyXQL.Messages.has_capability_flag?(0x00000200, :bad)
** (FunctionClauseError) no function clause matching in MyXQL.Messages.has_capability_flag?/2
The following arguments were given to MyXQL.Messages.has_capability_flag?/2:
# 1
512
# 2
:bad
Attempted function clauses (showing 3 out of 3):
def has_capability_flag?(flags, :client_protocol_41)
def has_capability_flag?(flags, :client_secure_connection)
def has_capability_flag?(flags, :client_plugin_auth)
This is a very useful error message, we can see what are all available capabilities. If we want something more customized, all we need to do is define an additional catch-all clause at the end:
def has_capability_flag?(flags, other) do
raise ...
end
and raise an error there. That way we could, for example, implement a “Did you mean?” hint.
Last but not least, instead of manually defining each function head by hand, we can use Elixir meta-programming capabilities to define them at compile time:
capability_flags = [
client_protocol_41: 0x00000200,
client_secure_connection: 0x00008000,
client_plugin_auth: 0x00080000,
]
for {name, value} <- capability_flags do
def has_capability_flag?(flags, unquote(name)), do: (flags &&& unquote(value)) == unquote(value)
end
Finally, let’s bring this all together to handle packets. We need a data structure that’s going to store packet fields and we basically have two options: structs and records. Structs are great when data has to be sent between modules, especially because they are polymorphic. However, when the data belongs to a single module, or separate modules that are considered private API, using records may make more sense as they are more space efficient. Let’s verify that using :erts_debug
module and instead of comparing structs and records let’s just compare their internal representations: maps and tuples, respectively:
iex> :erts_debug.size(%{x: 1})
6
iex> :erts_debug.size(%{x: 1, y: 2})
8
iex> :erts_debug.size(%{x: 1, y: 2, z: 3})
10
iex> :erts_debug.size({:Point, 1})
3
iex> :erts_debug.size({:Point, 1, 2})
4
iex> :erts_debug.size({:Point, 1, 2, 3})
5
As you can see, as we add more keys to the map our data structure grows twice as fast and the reason is we store both keys and values whereas tuple stores the size of the tuple once and then just values. Since we may be processing thousands of packets per second, this difference may add up, so we’re going to use records here.
The final packet we discussed in the last article was the OK Packet
. Let’s now write a function to decode it (it’s not fully following the spec for brevity):
# https://dev.mysql.com/doc/internals/en/packet-OK_Packet.html
defrecord :ok_packet, [:affected_rows, :last_insert_id, :status_flags, :warning_count]
def decode_ok_packet(data, capability_flags) do
<<0x00, rest::binary>> = data
{affected_rows, rest} = take_length_encoded_integer(rest)
{last_insert_id, rest} = take_length_encoded_integer(rest)
packet = ok_packet(
affected_rows: affected_rows,
last_insert_id: last_insert_id
)
if has_capability_flag?(capability_flags, :client_protocol_41) do
<<
status_flags::int(2),
warning_count::int(2)
>> = rest
ok_packet(packet,
status_flags: status_flags,
warning_count: warning_count
)
else
packet
end
end
And let’s test this with the OK packet we got at the end of the last article (00 00 00 02 00 00 00
):
iex> ok_packet(affected_rows: affected_rows) = decode_ok_packet(<<0x00, 0x00, 0x00, 0x02, 0x00, 0x00, 0x00>>, 0x00000200)
iex> affected_rows
0
It works!
In this article, we discussed encoding and decoding basic data types, handling bit flags, and finally using both of these ideas to decode packets. Using these tools we should be able to fully implement MySQL protocol specification and with examples of :gen_tcp.send/2
and :gen_tcp.recv/2
calls from Part I, we could interact with the server. However, that’s not enough to build a resilient and production-quality driver. For that, we’ll look into DBConnection
integration in Part III. Stay tuned!
P.S.: This post was originally published on Plataformatec’s blog.
]]>This also mimics how I approached the development of the library, my end goal was to integrate with Ecto and I wanted to be integrating end-to-end as soon and as often as possible. Rather than implementing each part fully, I implemented just enough to move forward knowing I can later go back and fill in remaining details. Without further ado, let’s get started!
Our “Hello World” will involve performing a “handshake”: connecting to a running MySQL server and authenticating a user. To avoid getting bogged down in authentication details, the simplest possible thing to do is to log in as user without password. Let’s create one:
$ mysql --user=root -e "CREATE USER myxql_test"
We can check if everything went well by trying to log in as that user:
$ mysql --user=myxql_test -e "SELECT NOW()"
+---------------------+
| NOW() |
+---------------------+
| 2018-10-04 18:35:11 |
+---------------------+
If you don’t have MySQL installed, I recommend setting it up via Homebrew, if you’re on macOS, or Docker. I ended up using Docker because I knew I needed to test on multiple server versions. Here’s how I set it up:
$ docker run --publish=3306:3306 --name myxql_test -e MYSQL_ROOT_PASSWORD=secret -d mysql:8.0.12
# note we connect via TCP, instead of the default UNIX domain socket:
$ mysql --protocol=tcp --user=root --password=secret -e "CREATE USER myxql_test;"
$ mysql --protocol=tcp --user=myxql_test -e "SELECT NOW()"
+---------------------+
| NOW() |
+---------------------+
| 2018-10-04 18:40:04 |
+---------------------+
We can now connect to the server from IEx session:
iex> {:ok, sock} = :gen_tcp.connect('127.0.0.1', 3306, [:binary, active: false], 5000)
{:ok, #Port<0.6>}
Let’s break this down. :gen_tcp.connect/4
accepts:
:binary
option.
active: false
means we’ll work with the socket in “passive mode”, meaning we’ll read data
using blocking :gen_tcp.recv/3
call.
Let’s now read data from the socket: (0
means we read all available bytes, 5000
is the timeout in milliseconds)
iex> {:ok, data} = :gen_tcp.recv(sock, 0, 5000)
iex> data
<<74, 0, 0, 0, 10, 56, 46, 48, 46, 49, 50, 0, 12, 0, 0, 0, 11, 9, 19, 27, 96, 108, 77, 116, 0, 255, 255, 255, 2, 0, 255, 195, 21, 0, 0, 0, 0, 0, 0, 0, 0, 0, 0, 37, 62, 29, 59, 1, ...>>
To make sense of this, we’re gonna need to look into MySQL manual.
Each MySQL packet has 3 elements: length of the payload (3-byte integer), sequence id (1-byte integer), and payload.
In this case, the actual payload is the “Initial Handshake Packet”. Let’s extract the payload part using binary matching (see <<>>/1
for more information on binary matching):
iex> <<payload_length::24, sequence_id::8, payload::binary>> = data
iex> payload_length
4849664
iex> byte_size(payload)
74
Wait, the size of the payload is 74
so why payload_length
is 4849664
?! Numerical values when stored in a binary have “endianness” which basically means whether we should read bits/bytes from “little-end” (least significant bit) or “big-end” (most significant bit).
Thus, a 3-byte integer <<74, 0, 0>>
in “big-endian” is indeed 4849664
but in “little-endian” it’s 74
. Fortunately, bitstring syntax has great support for endianess and it’s as easy as adding little
modifier (“big-endian” is the default):
iex> <<payload_length::24-little, sequence_id::8, payload::binary>> = data
iex> payload_length
74
To make sense of the remaining payload we’re gonna use the binpp package:
iex> :binpp.pprint(payload)
0000 0A 38 2E 30 2E 31 32 00 0F 00 00 00 27 73 79 59 .8.0.12.....'syY
0001 7A 34 26 3B 00 FF FF FF 02 00 FF C3 15 00 00 00 z4&;.ÿÿÿ..ÿÃ....
0002 00 00 00 00 00 00 00 43 55 6B 60 74 5A 71 08 75 .......CUk`tZq.u
0003 6F 08 2F 00 63 61 63 68 69 6E 67 5F 73 68 61 32 o./.caching_sha2
0004 5F 70 61 73 73 77 6F 72 64 00 _password.
We can see up to 16 bytes in each row and at the far right we have ASCII interpretation of each byte. Per “Initial Handshake Packet” the first byte is the protocol version, always 10
(0x0A
), and what follows is a null-terminated server version string. Let’s extract that:
iex> <<10, rest::binary>> = payload
iex> [server_version, rest] = :binary.split(rest, <<0x00>>)
iex> server_version
"8.0.12"
We can parse the server version, that’s a good start! There are other fields in this packet that in a complete adapter we’d have to handle, but for now we’ll simply ignore them. We’ll just take a note of the authentication method at the end to the packet, a null-terminated string "caching_sha2_password"
.
After receiving “Initial Handshake Packet” the client is supposed to send “Handshake Response”. We’ll again just gloss over the details:
iex> import Bitwise
iex> capability_flags = 0x00000200 ||| 0x00008000 ||| 0x00080000
iex> max_packet_size = 65535
iex> charset = 0x21
iex> username = "myxql_test"
iex> auth_response = <<0x00>>
iex> client_auth_plugin = "caching_sha2_password"
iex> payload = <<
capability_flags::32-little,
max_packet_size::32-little,
charset, 0::8*23,
username::binary, 0x00,
auth_response::binary,
client_auth_plugin::binary, 0x00
>>
iex> sequence_id = 1
iex> data = <<byte_size(payload)::24-little, sequence_id, payload::binary>>
Let’s break this down:
First, we use CLIENT_PROTOCOL_41
,CLIENT_SECURE_CONNECTION
, and CLIENT_PLUGIN_AUTH
capability flags using “bitwise OR”. Secondly, we set the max packet size, charset (0x21
is utf8_general_ci
), filler (0
s repeated 23 times), username, auth response (empty password is a null byte), and auth plugin name. Note, we encode username
and client_auth_plugin
as null-terminated strings. Finally, we generate payload
and encode it in a packet with payload length and sequence id (it’s 2nd packet so sequence id is 1
). Let’s now send this and receive response from the server:
iex> :ok = :gen_tcp.send(sock, data)
iex> {:ok, data} = :gen_tcp.recv(sock, 0)
iex> <<payload_length::24-little, sequence_id::8, payload::binary>> = data
iex> :binpp.pprint(payload)
0000 00 00 00 02 00 00 00
The first byte of the response is 0x00
which corresponds to the OK_Packet
, authentication succedded! Even though we’ve glossed over many details, we’ve shown that we can integrate with the server end-to-end and that’s going to be a foundation we’ll built upon. There are many more packets that we’ll need to encode or decode and we’re gonna need a more structured approach which we will discuss in part II.
P.S.: This post was originally published on Plataformatec’s blog.
]]>The whole upgrade was done in a single pull request, which we will break down below.
First, the required steps:
ecto_sql
and bump the postgrex dependency. Note: SQL handling have been extracted out into a separate ecto_sql
project, so we need to add that new dependency. (6b3b78cf
) pool
configuration and use the default pool implementation. (760026f3
) pool_size
is at least 2
when running migrations. e16ebd8f
) and because we were already using the recommended package, Jason, we don’t need that configuration anymore. (66f9cbdf
) time
we can’t put value with microsecond precision and similarly we can’t put into a time_usec
field a value without microsecond precision. (2e34b833
) Ecto.Changeset.unique_constraint/3
are now including in the error metadata the type and the name of the constraint, which broke our test that was overly specific. (3d19f903
) Secondly, we got a couple deprecation warnings so here are the fixes:
d3911953
) Ecto.Multi.run/3
now accepts a 2-arity function (first argument is now the Repo) instead of a 1-arity one before. (95d11cc2
)
Finally, there were a few minor glitches (or redundancies!) specific to Hex.pm: c4168977
, 21eb0bf8
, and 0929cd9e
.
Overall the update process was pretty straightforward. There were a few minor bugs along the way which were promptly fixed upstream. Having previously updated Hex.pm to Ecto 2.0, which took a few months (we started it early on, which made it a fast moving target back then), I can really appreciate the level of maturity that Ecto achieved and how easy it was to update this time around. :-)
Update: Add note about pool_size
when running migrations.
P.S.: This post was originally published on Plataformatec’s blog.
]]>We are back for one last round! This time we are going to cover improvements on three main areas: performance, upserts and migrations. If you would like to give Ecto a try right now, note Ecto v3.0.0-rc.0 has been released and we are looking forward to your feedback.
One of the most notable performance improvements in Ecto 3.0 is that schemas loaded from an Ecto repository now uses less memory.
A big part of the memory improvements seen in Ecto 3.0 comes from better management of schema metadata. Every instance you have of an Ecto.Schema
, such as a %User{}
, has a metadata field with life-cycle information about that entry, such as the database prefix or its state (was it just built or was it loaded from the database?). This metadata field takes exactly 16 words:
iex> :erts_debug.size %Ecto.Schema.Metadata{}
16
16 words for a 64-bits machine is equivalent to 128 bytes. This means that, if you were using Ecto 2.0 and you loaded 1000 entries, 128 kbytes of memory would be used only for storing this metadata. The good news is that all of those 1000 entries could use the exact same metadata! That’s what we did in this commit. This means that, if you load 1000 or 1000000 entries, the cost is always the same, only 128 bytes!
After we announced Ecto 3.0-rc, we started to hear some teams already upgraded to Ecto 3.0-rc. Some of those repos are quite big and it took them less than a day to upgrade, which is exactly how upgrading to major software versions should be.
Ben Wilson, Principal Engineer at CargoSense, upgraded one of their apps to Ecto 3.0-rc and pushed it to production. Here is the result:
You can see the drop in memory usage from Ecto 2 to Ecto 3 at the moment of the deployment. This particular app loads a bunch of data during boot and we can clearly see the impact those improvements have in the memory usage. Once the system stabilized, the average memory use is 15% less altogether.
But that’s not all!
We also changed Ecto 3.0 to make use of the Erlang VM literal pool, which allows us to share the metadata across queries. For example, if you have two queries, each returning 1000 posts, all 2000 posts will point to the same metadata. These improvements alongside other changes to reduce struct allocation should reduce Ecto’s memory usage as a whole.
Another notable performance improvement in Ecto 3.0 comes from the fact Ecto now automatically caches statements emitted by Ecto.Repo.insert/update/delete
.
Consider this code:
for i <- 1..1000 do
Repo.insert!(%Post{visits: i})
end
where Post is a schema with 13 fields. When running this code on my machine against a Postgres database with a pool of 10 connections, it takes 900ms to insert all 1000 posts. While Ecto has always cached select queries, once we also added the statement cache to Ecto.Repo.insert/update/delete
, the total operation time is reduced 610ms!
But that’s not all!
Part of the issue here is that every time we call Repo.insert!
, Ecto needs to get a new connection out of the connection pool, perform the insert, and give the connection back. For a pool with 10 connections, there is a chance the next connection we pick up is not “warm” and we may not hit the statement cache. While it is important to not hold connections for long, so we can best utilize the database resources, in this scenario we know we will perform many operations in a row.
For this reason, Ecto 3.0 includes a Repo.checkout
operation, which allows you to tell the Ecto repository you want to use the same connection, skipping the connection pool and always using a “warm” connection:
Repo.checkout(fn ->
for i <- 1..1000 do
Repo.insert!(%Post{visits: i})
end
end)
With the change above, all of the inserts take 420ms on average.
There is one final trick we could use. Since we are performing multiple inserts, we could simply replace Repo.checkout
by Repo.transaction
. The transaction also checks out a single connection but it also allows the database itself to be more efficient. With this final change, the total time falls down to 320ms. And if you really need to go faster, you can always use Ecto.Repo.insert_all
. Hooray!
Ecto 2 added support for upserts. Ecto 3 brings many improvements to the upsert API, such as the ability to tell Ecto to :replace_all_except_primary_key
in case of conflicts or to replace only certain fields by passing on_conflict: {:replace, [:foo, :bar, baz]}
. This new version of Ecto also allow custom expressions to be given as :conflict_target
by passing {:unsafe_fragment, "be careful with what goes here"}
as a value.
There are many other improvements to the Ecto.Repo
API, such as Ecto.Repo.checkout
, introduced in the previous section, and the new Ecto.Repo.exists?
.
Another area in Ecto (or to be more precise, Ecto.SQL) that saw major improvements is migrations.
The most important change was a contribution by Allen Madsen that locks the migration table, allowing multiple machines to run migrations at the same time. In previous Ecto versions, if you had multiple machines attempting to run migrations, they could race each other, leading to failures, but now it is guaranteed such can’t happen. The type of lock can be configured via the :migration_lock
repository configuration and defaults to “FOR UPDATE” or disabled if set to nil
.
Another improvement is that Ecto is now capable of logging notices/alerts/warnings emitted by the database when running migrations. In previous Ecto versions, if you had a long index name, the database would truncate and emit an alert through the TCP connection, but this alert was never extracted and printed in the terminal. This is no longer the case in Ecto 3.0.
Similarly, Ecto will now warn if you attempt to run a migration and there is a higher version number already migrated in the database. Imagine you have been working on a feature for a long period of time and you were finally able to merge it to master. Since you started working on this feature, other features and migrations were already shipped to production. This may create an issue on deployment: in case something goes wrong when deploying this new feature and you have to rollback the database, the latest migrations by timestamp does not match the migrations that have just been executed.
By emitting warnings, we help developers and production teams alike to be aware of such pitfalls.
We are very excited with the many improvements in Ecto 3.0. This short series of articles shares the most notable changes but there is much more. We hope you will enjoy them!
P.S.: This post was originally published on Plataformatec’s blog.
]]>
This time we are back to cover other improvements coming to Ecto.Query
in Ecto 3.0.
With Ecto 3.0, it is now possible to add unions/excepts/intersects to queries. For example, to get all cities for both customers and suppliers, you can now do:
customer_city_query = Customer |> select([c], c.city)
Supplier |> select([s], s.city) |> union(customer_city_query)
Keep in mind that union
will attempt to remove any duplicates and that can be expensive. In many cases, especially when you know duplicates cannot happen or you don’t care about returning duplicates, you should use union_all
instead.
Adding support for unions has been a frequently requested feature in Ecto for quite some time. However, all previous approaches to implement this feature were misguided because all of them assumed that we would need to introduce a new data-type that holds the union of two queries.
In other words, in the approaches we had in mind, union(query1, query2)
would return a new construct similar to Ecto.UnionQuery{left: query1, right: query2}
. We were skeptical about this as it could push accidental complexity to users of Ecto that would now have to handle different types of queries.
All of this changed when Timofey Martynov sent a pull request that adds UNION / UNION ALL support by simply treating the UNION / UNION ALL as a field in the Ecto.Query
, in the same way we store ORDER BY
s, LIMIT
s, WHERE
s and so on. While this direction seemed misguided at first, once we re-read the SQL specification, it became clear that this is the correct way to model UNION / UNION ALL.
Let’s see an example. Consider this SQL query:
SELECT city FROM suppliers UNION SELECT city FROM customers LIMIT 10
Which of the queries below is equivalent to the one above?
a) (SELECT city FROM suppliers) UNION (SELECT city FROM customers LIMIT 10)
b) SELECT city FROM suppliers UNION (SELECT city FROM customers) LIMIT 10
After an informal poll, many chose a)
because they expected UNION to work like some top-level, low-precedence operator, but the correct answer is b)
. The PostgreSQL documentation also discusses this:
The UNION clause has this general form:
select_statement UNION [ ALL | DISTINCT ] select_statement
select_statement is any SELECT statement without an ORDER BY, LIMIT, FOR NO KEY UPDATE, FOR UPDATE, FOR SHARE, or FOR KEY SHARE clause. (ORDER BY and LIMIT can be attached to a subexpression if it is enclosed in parentheses. Without parentheses, these clauses will be taken to apply to the result of the UNION, not to its right-hand input expression.)
In other words, UNION/INTERSECT/EXCEPTs should be modelled as WHERE
as they are both considered clauses of a given query and not a top-level operation. This is precisely how it has been implemented in Ecto. The more you know!
Ecto 3.0 finally gets support for windows. I mean WINDOWs, not Windows. We have always supported Windows. Ok. This is confusing. Let’s try again.
Ecto 3.0 finally gets support for WINDOW clauses, the OVER operator, as well as many WINDOW functions. For example, to compare each employee’s salary with the average salary in their department:
from e in Employee,
select: {e.depname, e.empno, e.salary, avg(e.salary) |> over(:department)},
windows: [department: [partition_by: e.depname]]
The over/2
operator expects either a window name or a window expression as second argument. The query below would return the same results:
from e in Employee,
select: {e.depname, e.empno, e.salary, avg(e.salary) |> over(partition_by: e.depname)}
The first argument should have an aggregator or any of the WINDOW functions. By default we support all of the built-in functions found in PostgreSQL and MySQL. They can be found in the Ecto.Query.WindowAPI
module (we are linking to the source as the docs haven’t been released yet).
This work was contributed by Anton. You can read the original discussion in the issues tracker.
There are many other exciting changes in Ecto.Query
. For example, it now has built-in support for coalesce
, such as select: coalesce(p.title, p.old_title)
, or even better with the pipe operator: p.field1 |> coalesce(p.field2) |> coalesce(p.field3)
.
We also support FILTER expressions, allowing you filter the value of aggregators: select: filter(count(), p.public == true)
Finally, order_by
now supports :asc_nulls_last
, :asc_nulls_first
, :desc_nulls_last
, and :desc_nulls_first
, allowing you to configure exactly when NULLs are returned when ordering: order_by: [desc_nulls_first: p.title]
. If you are using :desc
and :asc
, then the behaviour is the same as in Ecto 2.0, which is database dependent (and surprise, surprise! they won’t agree with each other).
This finishes the third article on our series about Ecto 3.0. There are many other things we would like to share with you, such as performance improvements, safer migrations and more. We are not quite sure how many articles we still have to write but we are certainly not done. See you soon!
P.S.: This post was originally published on Plataformatec’s blog.
]]>
Let’s get started with the improvements to Ecto.Query APIs. The Ecto.Query
API is the area that saw most improvements in Ecto 3.0, to the point we won’t be able to cover all improvement in a single article. Instead, we broke it in part 1 and part 2.
Let’s get started.
Ecto has always supported joining over multiple schemas and tables using joins:
query =
from p in Post,
join: c in Comment,
where: p.id == c.post_id,
select: c
Now imagine we want to modify the query above to only return comments that are public. We could compose on the query above as follows:
from [_, c] in query, where: c.public
As you can see in the example above, we can extract all existing bindings in a query (p
and c
) and then apply filters to them. In the example above, the bindings are positional and they depend on the order they appear in the list on the left side of in
. The names p
and c
are temporary and they are not relevant to the overall query. In other words, the query below would be equivalent to the one above:
from [_, comment] in query, where: comment.public
The problem with positional bindings is that sometimes it makes query composition quite challenging. When building complex search functionality, you may join over multiple tables, in a different order, and tracking where each positional binding is would be quite brittle and complex.
Ecto 3.0 changes this by allowing each from
and join
to have a name. Our initial query could be rewritten as:
query =
from p in Post,
join: c in Comment,
as: :comments,
where: p.id == c.post_id,
select: c
Note we have added the as
option after the join. Now to filter the existing :comments
, regardless of the order it appears on the query, we can write:
from [comments: c] in query, where: c.public
We replace the positional binding by a keyword list, where the key is the binding name and the value is a variable we will assign the join to. Once again, the c
variable here does not matter and it could have any name. The important bit is that we are binding it to the existing :comments
.
Note Ecto 3.0 chose to introduce an explicit naming mechanism via the :as
option, instead of relying on the variable names, as the variable names could lead to accidental clashing, especially as developers may shortcut the variable names to single letters in queries. Furthermore, if there is an attempt to bind to the same name more than once, an error will be raised.
Finally, keep in mind that the as
option can also be given to from
, for instance:
query =
from p in Post,
as: :posts,
join: c in Comment,
as: :comments,
where: p.id == c.post_id,
select: c
Named bindings will make Ecto much more flexible for building dynamic queries, as usually seen in complex search forms, search APIs and more. The bulk of the work was done by Adrian Gruntkowski. You can read on the proposal and the following discussion in the issues tracker.
We have two new functionalities on top of the foundation we created to add named bindings to Ecto: per from/join prefixes and index hints.
Ecto v2.0 introduced the idea of prefixes. What the prefix means depends on the database engine. For Postgres, the prefix translates to a Postgres Schema. A database in Postgres has multiple schemas and the default schema is called “public”. MySQL does not support schemas, therefore the prefix functionality in MySQL simply translates to different databases.
When Ecto v2.0 introduced prefixes, the goal was to make it straightforward to select, insert, update and delete data from different prefixes. The goal was to support multi-tenant applications. However, Ecto v2.0 was limited to only work on a single prefix at a time. For example, it was not possible to write a query that would join data across two different prefixes.
Ecto v3.0 lifts this restriction by allowing the prefix
option to be given to from
/join
, in the same way we could pass the as
option. For example, imagine that you have a system where all of the posts are public but the comments are specific to each client using the system. Therefore, you have multiple prefixes in the system, one for each client, and each prefix has its own “comments” table. You can now query across those prefixes as follows:
from p in Post,
prefix: "public",
join: c in Comment,
prefix: "client1",
where: p.id == c.post_id,
select: c
Similarly, Ecto 3.0 relies on a similar API to support the use of index hints, as found in MySQL and MSSQL databases:
from p in Post,
join: c in Comment,
hints: ["USE INDEX FOO", "USE INDEX BAR"],
where: p.id == c.post_id,
select: c
Keep in mind you want to use hints rarely, so don’t forget to read the database disclaimers about such functionality.
The prefix and hints options brings more flexibility to developers to structure and optimize their queries, allowing them to leverage Ecto.Query as much as possible, without having to fallback to SQL.
Ecto.Query now supports tuples in where
and having
, allowing queries such as where: {p.foo, p.bar} > {^foo, ^bar}
which can be used for cursor-based pagination.
We have also added support for arithmetic operators, such as +
, -
, *
, /
. Note those operators just delegate to the underlying database engine, so remember to check your database to see what are the possible types of the operands.
Finally, it is now possible to invoke database functions that expect the whole table/source as argument, by using fragments: fragment("some_function(?)", p)
.
This is it for now! If you have any questions about the features above, feel free to use the comments section below or search for the relevant discussion in Ecto’s issues tracker. Next week we will be back with further improvements and features added to Ecto.Query in Ecto 3.0.
P.S.: This post was originally published on Plataformatec’s blog.
]]>We have spent the last 3 months working hard to release Ecto 3.0. As we get closer and closer to Ecto 3.0 release, we will do a series of blog posts highlighting what is up and coming.
Despite the major version change, we have kept the number of user-facing breaking changes to a minimum, mostly around three areas:
We will start our series of posts by going over the “bad news” and discuss how those breaking changes will affect you. In the next posts, we will highlight all of the upcoming new features and performance improvements.
Let’s get started.
ecto
and ecto_sql
Ecto 3.0 will be broken in two repositories: ecto
and ecto_sql
. Since Ecto 2.0, an increased number of developers and teams have been using Ecto for data mapping and validation, without a need for a database. However, adding Ecto to your application would still bring a lot of the SQL baggage, such as adapters, sandboxes and migrations, which many considered to be a mixed message.
In Ecto 3.0, we will move all of the SQL adapters to a separate repository and Ecto will focus on the four building blocks: schemas, changesets, queries and repos. You can see the discussion in the issues tracker.
If you are using Ecto with a SQL database, migrating to Ecto 3.0 will be very straight-forward. Instead of:
{:ecto, "~> 2.2"}
You should list:
{:ecto_sql, "~> 3.0"}
And if you are using Ecto
only for data manipulation but with no database access, then it is just a matter of bumping its version. That’s it!
Ecto.Date
, Ecto.Time
and Ecto.DateTime
no longer exist. Instead, developers should use Date
, Time
, DateTime
and NaiveDateTime
that ship as part of Elixir and are the preferred types since Ecto 2.1. Odds are that you are already using the new types and not the deprecated ones.
We have used this opportunity to unify the support for microseconds across all databases. The types :time
, :naive_datetime
, :utc_datetime
will now discard any microseconds information. Ecto v3.0 introduces the types :time_usec
, :naive_datetime_usec
and :utc_datetime_usec
as an alternative for those interested in keeping microseconds. If you want to keep microseconds in your migrations and schemas, you will need to configure your repository:
config :my_app, MyApp.Repo,
migration_timestamps: [type: :naive_datetime_usec]
And then in your schema:
@timestamps_opts [type: :naive_datetime_usec]
Note that database adapters have also been standardized to work with Elixir types and they no longer return tuples when developers perform raw queries.
Ecto v3.0 moved the management of the JSON library to adapters. All adapters should default to Jason
.
The following configuration will emit a warning:
config :ecto, :json_library, CustomJSONLib
And should be rewritten as:
# For Postgres
config :postgrex, :json_library, CustomJSONLib
# For MySQL
config :mariaex, :json_library, CustomJSONLib
If you want to rollback to Poison, you need to configure your adapter accordingly:
# For Postgres
config :postgrex, :json_library, Poison
# For MySQL
config :mariaex, :json_library, Poison
We recommend everyone to migrate to Jason. Built-in support for Poison will be removed in future Ecto 3.x releases.
Now that we have unified the data types, the Ecto.DataType
protocol is no longer necessary and has been removed. If you were implementing it in the past, you can just completely remove it and everything should still just work.
We have also improved Ecto.Multi.run/5
to receive the repo module in which the transaction is executing as the first argument. Therefore, if you are passing a module-function-args
to any of the Ecto.Multi
functions, they need to be adapted to receive the repo as the first argument. This change will most likely lead to cleaner and less coupled code.
Finally, one of the changes we will cover in future posts is how the “prefix” support (called “schemas” in PostgreSQL) has been drastically improved in Ecto 3.0. Previously, you could only set a prefix for the whole query but Ecto 3.0 will give developers granular control over those. Therefore, if you are setting the @schema_prefix
attribute in a schema, you will have to remember it only affects that particular schema, and no longer the whole the query.
We are really excited with Ecto 3.0! With the breaking changes out of the way, we are ready to explore many of the upcoming new features in the next blog posts.
P.S.: This post was originally published on Plataformatec’s blog.
]]>With this in mind, Flow v0.14 has been recently released with more fine grained control on data emission. We will start with a brief recap of Flow and then go over the new features.
Flow is a library for computational parallel flows in Elixir. It is built on top of GenStage which specifies how Elixir processes should communicate with back-pressure.
Flow is inspired by the MapReduce and Apache Spark models. It is a sibling to our Broadway project, but with a focus on data aggregation. It aims to use all cores of your machines efficiently.
The “hello world” of data processing is a word counter. Here is how we would count the words in a file with <code>Flow</code>:
File.stream!("path/to/some/file")
|> Flow.from_enumerable()
|> Flow.flat_map(&String.split(&1, " "))
|> Flow.partition()
|> Flow.reduce(fn -> %{} end, fn word, acc ->
Map.update(acc, word, 1, & &1 + 1)
end)
|> Enum.to_list()
If you have a machine with 4 cores, the example above will create 9 light-weight Elixir processes that run concurrently:
Flow.from_enumerable/1
)Flow.partition/2
)Flow.partition/2
)The key operation in the example above is precisely the <code>partition/2</code> call. Since we want to count words, we need to make sure that we will always route the same word to the same partition, so all occurrences belong to a single place and not scattered around.
The other insight here is that map operations can always stream the data, as they simply transform it. The <code>reduce</code> operation, on the other hand, needs to accumulate the data until all input data is fully processed. If the Flow is unbounded (i.e. it never finishes), then you need to specify windows and triggers to check point the data (for example, check point the data every minute or after 100_000 entries or on some condition specified by business rules).
My ElixirConf 2016 keynote also provides an introduction to Flow (tickets to ElixirConf 2018 are also available!).
With this in mind, let’s see what Flow v0.14 brings.
Flow v0.14 gives more explicit control on how the reducing stage works. Let’s see a pratical example. Imagine you want to connect to Twitter’s firehose and count the number of mentions of all users on Twitter. Let’s start by adapting our word counter example:
SomeTwitterClient.stream_tweets!()
|> Flow.from_enumerable()
|> Flow.flat_map(fn tweet -> tweet["mentions"] end)
|> Flow.partition()
|> Flow.reduce(fn -> %{} end, fn mention, acc ->
Map.update(acc, mention, 1, & &1 + 1)
end)
|> Enum.to_list()
We changed our code to use some fictional twitter client that streams tweets and then proceeded to retrieve the mentions in each each tweet. The mentions are routed to partitions, which counts them. If we attempted to run the code above, the code would run until the machine eventually runs out of memory, as the Twitter firehose never finishes.
A possible solution is to use a window that controls the data accumulation. We will say that we want to accumulate the data for minute. When the minute is over, the “reduce” operation will emit its accumulator, which we will persist to some storage:
window = Flow.Window.periodic(1, :minute, :discard)
SomeTwitterClient.stream_tweets!()
|> Flow.from_enumerable()
|> Flow.flat_map(fn tweet -> tweet["mentions"] end)
|> Flow.partition(window: window)
|> Flow.reduce(fn -> %{} end, fn mention, acc ->
Map.update(acc, mention, 1, & &1 + 1)
end)
|> Flow.each_state(fn acc -> MyDb.persist_count_so_far(acc) end)
|> Flow.start_link()
The first change is in the first line. We create a window that lasts 1 minute and discards any accumulated state before starting the next window. We pass the window as argument to <code>Flow.partition/1</code>.
The remaining changes are after the <code>Flow.reduce/3</code>. Whenever the current window terminates, we see that a trigger is emitted. This trigger means that the <code>reduce/3</code> stage will stop accumulating data and invoke the next functions in the Flow. One of these functions is <code>each_state/2</code>, that receives the state accumulated so far and persists it to a database.
Finally, since the flow is infinite, we are no longer calling <code>Enum.to_list/1</code> at the end of the flow, but rather <code>Flow.start_link/1</code>, allowing it to run permanently as part of a supervision tree.
While the solution above is fine, it unfortunately has two implicit decisions in it:
each_state
only runs when the window finishes (i.e. a trigger is emitted) but this relationship is not clear in the codeeach_state
while reduce
controls its initial valueFlow v0.14 introduces a new function named <code>on_trigger/2</code> to make these relationships clearer. As the name implies, <code>on_trigger/2</code> is invoked with the reduced state whenever there is a trigger. The callback given to <code>on_trigger/2</code> must return a tuple with a list of the events to emit and the new accumulator. Let’s rewrite our example:
window = Flow.Window.periodic(1, :minute)
SomeTwitterClient.stream_tweets!()
|> Flow.from_enumerable()
|> Flow.flat_map(fn tweet -> tweet["mentions"] end)
|> Flow.partition(window: window)
|> Flow.reduce(fn -> %{} end, fn mention, acc ->
Map.update(acc, mention, 1, & &1 + 1)
end)
|> Flow.on_trigger(fn acc ->
MyDb.persist_count_so_far(acc)
{[], %{}} # Nothing to emit, reset the accumulator
end)
|> Flow.start_link()
As you can see, the window no longer controls when data is discarded. <code>on_trigger/2</code> gives developers full control on how to change the accumulator and which events to emit. For example, you may choose to keep part of the accumulator for the next window. Or you could process the accumulator to pick only the most mentioned users to emit to the next step in the flow.
Flow v0.14 also introduces a <code>emit_and_reduce/3</code> function that allows you to emit data while reducing. Let’s say we want to track popular users in two ways:
We can perform this as:
window = Flow.Window.periodic(1, :minute)
SomeTwitterClient.stream_tweets!()
|> Flow.from_enumerable()
|> Flow.flat_map(fn tweet -> tweet["mentions"] end)
|> Flow.partition(window: window)
|> Flow.emit_and_reduce(fn -> %{} end, fn mention, acc ->
counter = Map.get(acc, mention, 0) + 1
if counter == 100 do
{[mention], Map.delete(acc, mention)}
else
{[], Map.put(acc, mention, counter)}
end
end)
|> Flow.on_trigger(fn acc ->
most_mentioned =
acc
|> Enum.sort(acc, fn {_, count1}, {_, count2} -> count1 >= count2 end)
|> Enum.take(10)
{most_mentioned, %{}}
end)
|> Flow.shuffle()
|> Flow.map(fn mention -> IO.puts(mention) end)
|> Flow.start_link()
In the example above, we changed <code>reduce/3</code> to <code>emit_and_reduce/3</code>, so we can emit events as we process them. Then we changed <code>Flow.on_trigger/2</code> to also emit the most mentioned users.
Finally, we have added a call to <code>Flow.shuffle/1</code>, that will receive all of the events emitted by <code>emit_and_reduce/3</code> and <code>on_trigger/2</code> and shuffle them into a series of new stages for further parallel processing.
If you are familiar with data processing pipelines, you may be aware of two pitfalls in the solution above: 1. we are using processing time for handling events and 2. instead of a periodic window, it would probably be best to process events on sliding windows. For the former, you can learn more about the pitfalls of processing time vs event time in Flow’s documentation. For the latter, we note that Flow does not support sliding windows out of the box but they are straight-forward to implement on top of <code>reduce/3</code> and <code>on_trigger/2</code> above.
At the end of the day, the new functionality in Flow v0.14 gives developers more control over their flows while also making the code clearer. There are other additions in v0.14, such as through_stages/3
, which complements from_stages/2
and into_stages/3
, in making it easier to integrate Flow with existing GenStage pipelines.
P.S.: This post was originally published on Plataformatec’s blog.
]]>While I am obviously biased towards Elixir and the role it plays in the performance of web applications, I will do my best to explore fallacies that overplay and underplay the role of performance in web applications. I will also focus exclusively on the server-side of things (which, in many cases, is a fallacy in itself).
In my opinion, the most worrisome aspect of performance discussions is that they tend to focus exclusively on production numbers. However, performance drastically affects development and can have a large impact on developers. The most obvious examples I give in my presentations are compilation times and/or application boot times: an application that takes 2 seconds to boot compared to one that takes 10 seconds has very different effects on the developer experience.
Even response times have direct impact on developers. Imagine web application A takes 10ms on average per request. Web application B takes 50ms. If you have 100 tests that exercise your application, which is not a large number by any measure, the test suite in one application will take 1s, the other will take 5s. Add more tests and you can easily see how this difference grows. A slow feedback cycle during development hurts your team’s productivity and affects their morale. With Elixir and Phoenix, it is common to get sub-millisecond response times and the benefits are noticeable.
When discussing performance, it is also worth talking about concurrency. Everything you do in your computer should be using all cores. Booting your application, compiling code, fetching dependencies, running tests, etc. Even your wrist watch has 2 cores. Concurrency is no longer the special case.
However, you don’t even need multiple cores to start reaping the benefits of concurrency. Imagine that in the test suite above, 30% of the test time is spent on the database. While one test is waiting on the database, another test should be running. There is no reason to block your test suite while a single test waits on the database.
If multiple cores are available, you should demand even more gains in terms of performance throughout your development and test experiences. The Elixir compiler and built-in tools will use multiple cores whenever possible. The next time a library, tool or framework is taking too long to do something, ask how many cores it is using and what you can do about it.
Once we start to venture into concurrency, a common fallacy is that “if a programming language has threads, it will be equally good at concurrency as any other language”. To understand why this is not true, let’s look at Amdahl’s law.
To quote Wikipedia, Amdahl’s law is a formula which gives the theoretical speedup in latency of the execution of a task at fixed workload that can be expected of a system whose resources are improved:
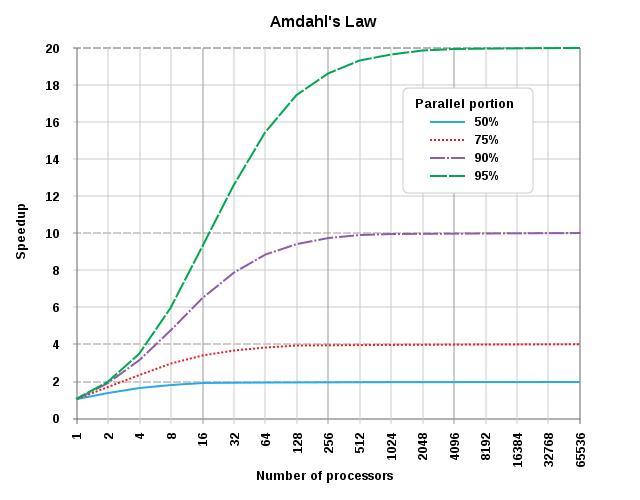
Amdahl's law applied to number of processors. [From Wikipedia, CC BY-SA 3.0.](https://en.wikipedia.org/wiki/Amdahl%27s_law#/media/File:AmdahlsLaw.svg)
The graph above shows that the speedup of a program is limited by its serial part. If only 50% of the software is parallelizable, the theoretical maximum speedup is 2 times, regardless of how many cores you have in your system.
If 50% of your software is parallelizable, going from 4 to 8 cores gives you only a 11% speed up. If 75% of the software is parallelizable, going from 4 to 8 cores gives you a 27% increase.
In other words, threads are not enough for most web application developers if they are an afterthought. Instead, concurrency must be part of the default building block. We need good programming models, efficient data structures, and tools. If only a limited part of the software is parallelizable, you will be quickly constrained by Amdahl’s law. Threads are necessary but not sufficient.
Another common fallacy in such discussions is when conclusions are drawn based on average data: “Company X handles Y req/second with an average of Zms, therefore you should be fine”.
Here is why conclusions on this data is not enough. First of all, most page loads will experience the 99% server response (also see Everything you know about latency is wrong for more discussion). Whenever you measure averages, also measure the 90%, 95% and 99% percentiles.
Furthermore, in our experience, clients rarely have performance issues during average load, but rather when there are spikes in traffic. It is easy to plan for your average load. The challenge is in measuring how your system behaves when there is a surge in access. When discussing and comparing response times, also ask for the high percentiles, delays and error rates in case of overloads.
Finally, the server response time as a metric is inherently limited. For instance, a fast server means nothing if the client-side takes seconds to load. Instead of measuring a single request, consider also measuring how the user interacts with the website within certain goals. Let’s see an example.
Imagine that your application requires the user to confirm their account in order to access part of its functionality (or all of it). Now, preparing for a spike in traffic, you cached your home page as well as your sign-up form. Requests start to pour in and you can see your website is responding fairly well, with low averages and even low 95% percentiles. You consider it a success.
The next day, you are measuring how users interacted with your application and you could notice a unusually high bounce rate when the servers were on high load. Further analysis reveal that, even though the response times were excellent, the messaging system was clogged and instead of waiting 30 seconds to receive a message with instructions to confirm their account, users had to wait 10 minutes. It is safe to say many of those users left and never came back.
For queues/jobs, you want to at least measure arrival rates, departure rates, and sojourn time. For this particular sign-up feature, you should measure the user engagement: from signing up, to scheduling the message, to delivering the message, and the final user interaction with it.
This is probably the most common fallacy of all.
If you complain a certain library or framework takes a long time to boot, someone may quickly point out that there is a tool that solves the booting problem by having a runtime always running on the background.
If your web application takes long to render certain views, you will be told to cache it.
The trouble is that those solutions are not cost-free and their cost are often left unsaid. It is often joked that “cache invalidation and naming things are the two hard things in computer science”. When there is a bug in cache invalidation, your team will spend time fixing bugs instead of developing new features. Between having a solution that addresses a certain problem and not having the problem at all, I prefer the second.
This fallacy also happens when arguing in favor of technologies that are seen as performance centric. For example, if you want to use Elixir or Go, you will have to learn the underlying abstractions for concurrency, namely processes and goroutines, which is a time investment. If you want your tests to run concurrently when talking to the database in your Phoenix applications, you need to learn the pros, cons and pitfalls of doing so, a topic we covered in depth in Ecto.SQL documentation.
It is important to make those costs explicit and part of the discussions.
Because HTTP 1.1 is said to be (mostly) a stateless protocol, many developers will conclude that their web application must be stateless too. However, this is a fallacy because most applications are not stateless, given the fact that they rely on databases, caching and storage layers to function properly.
If your application or framework stack only allows you to write stateless code, you will always find yourself in need to bring external dependencies for every bit of state you need. Besides the database, you end-up with a separate tool for caching, another for pubsub messages, and so forth. Each additional tool is another layer that you must integrate in your development, testing, and deployment workflows (precisely as we discussed in Fallacy #4). Each of those may affect the user experience too, as they include additional network round-trips.
On the other hand, if you are using a stack that supports stateful applications, such as Elixir, you will find yourself in less need of third-party dependencies. Our article, You may not need Redis, is a good example of how those trade-offs apply in relation to Redis.
Such approaches have become more relevant over the last years due to the use of WebSockets - which are stateful - for building real-time and interactive applications. We have discussed in the past how a stateful stack leads to benefits from development to deployment when WebSockets are involved.
Finally, it is important to note that a stateful stack does not mean you can get rid of all third-party dependencies. Rather, it gives you more options and flexibility when tackling certain problems. You can also learn how Moz went from stateless to stateful to build an application that is simpler, more performant, and ultimately delivers a better user experience and more features.
For the majority of companies and teams, that’s simply not the case. Therefore, if you are planning to move to another technology exclusively because of performance, you should have numbers that back up your decision.
Similarly, we often see new languages being dismissed exclusively as “performance fallbacks”, while in many of those languages performance is typically a side-effect. For example, Elixir builds on the Erlang VM and focuses on developer productivity and code maintenance. If you are looking for reducing costs, choosing a language that focuses on productivity and maintainibility will likely be more cost efficient than picking the fastest one. And if you can get extra performance, that’s a nice bonus.
At the end of the day, the discussion about performance is quite nuanced. It is important to know what to measure and how to interpret the data collected. We have learned that performance matter way beyond your production environment and have a large impact in development and testing. And there are no cost-free solutions, be it adding and maintaining a caching layer or picking up a new programming language.
P.S.: This post was originally published on Plataformatec’s blog and updated in Oct/2022 with more references.
]]>However, there is a very minimal replacement for GenEvent which can be achieved today in Elixir that uses a Supervisor and multiple GenServers. We have recently used this technique on ExUnit, Elixir’s built-in test framework, as we prepare for an eventual deprecation of GenEvent.
Let’s explore this solution.
ExUnit ships with an event manager that emits notifications any time a test cases and test suite start and finish. For example, if you implement a custom ExUnit formatter, which controls how ExUnit prints output as your test suite runs, you do so by implementing a GenEvent handler and adding it to the event manager.
The implementation of the event manager with GenEvent is quite straight-forward:
defmodule ExUnit.EventManager do
def start_link() do
GenEvent.start_link()
end
def stop(pid) do
GenEvent.stop(pid)
end
def add_handler(pid, handler, opts) do
GenEvent.add_handler(pid, handler, opts)
end
def suite_started(pid, opts) do
notify(pid, {:suite_started, opts})
end
def suite_finished(pid, run_us, load_us) do
notify(pid, {:suite_finished, run_us, load_us})
end
def case_started(pid, test_case) do
notify(pid, {:case_started, test_case})
end
def case_finished(pid, test_case) do
notify(pid, {:case_finished, test_case})
end
def test_started(pid, test) do
notify(pid, {:test_started, test})
end
def test_finished(pid, test) do
notify(pid, {:test_finished, test})
end
defp notify(pid, msg) do
GenEvent.notify(pid, msg)
end
end
The semantics in this case are didacted by GenEvent:
In case there is an error in any of the handlers, like a custom formatter, that formatter is automatically removed from the GenEvent. A custom formatter won’t be added/restarted until the test suite runs again
Events are dispatched asynchronously, with the GenEvent.notify/2
function
Multiple handlers are processed serially, GenEvent
is unable to exploit concurrency out of the box
ExUnit’s event manager is a very simple, low-profile, use case of a GenEvent. In any case, we decided it would be better to move ExUnit away from GenEvent to promote good patterns.
Given the semantics above, we have decided to replace GenEvent by a simple one for one Supervisor, where each handler is a separate GenServer added as a child of the supervisor, and each event is dispatched asynchronously to each handler using GenServer.cast/2
. Let’s see the new code.
defmodule ExUnit.EventManager do
@timeout 30_000
def start_link() do
import Supervisor.Spec
child = worker(GenServer, [], restart: :temporary)
Supervisor.start_link([child], strategy: :simple_one_for_one)
end
def stop(sup) do
for {_, pid, _, _} <- Supervisor.which_children(sup) do
GenServer.stop(pid, :normal, @timeout)
end
Supervisor.stop(sup)
end
def add_handler(sup, handler, opts) do
Supervisor.start_child(sup, [handler, opts])
end
def suite_started(sup, opts) do
notify(sup, {:suite_started, opts})
end
def suite_finished(sup, run_us, load_us) do
notify(sup, {:suite_finished, run_us, load_us})
end
def case_started(sup, test_case) do
notify(sup, {:case_started, test_case})
end
def case_finished(sup, test_case) do
notify(sup, {:case_finished, test_case})
end
def test_started(sup, test) do
notify(sup, {:test_started, test})
end
def test_finished(sup, test) do
notify(sup, {:test_finished, test})
end
defp notify(sup, msg) do
for {_, pid, _, _} <- Supervisor.which_children(sup) do
GenServer.cast(pid, msg)
end
:ok
end
end
The changes to the codebase are minimal. The semantics now are:
In case there is an error in any of the handlers, like a custom formatter, that formatter is automatically removed by the Supervisor and it is not restarted, as the :restart
strategy was set to :temporary
. A custom formatter will be restarted only when the test suite runs again
Events are dispatched asynchronously, with the GenServer.cast/2
function
Multiple handlers are now processed concurrently
On the handler side, the changes are also minimal. When using GenEvent, a handler had to implement a callback such as:
def handle_event({:test_finished, %ExUnit.Test{}}, state) do
...
{:ok, new_state}
end
Now with a GenServer:
def handle_cast({:test_finished, %ExUnit.Test{}}, state) do
...
{:noreply, new_state}
end
Overall, using GenServers is a plus since it is more likely developers are acquainted with its APIs and callbacks. Furthermore, we also gained concurrency between handlers.
The replacement above is straight-forward because the original code was a simple and low-profile usage of GenEvent. For example, both old and new implementation can afford to use asynchronous communication with handlers because we can reasonably assume most time is spent on the test suite and not on the handlers themselves.
In other words, both old and new implementations above <strong>do not provide back-pressure</strong>. So if you expect any of your handlers to perform tons of work, they will have an ever growing queue of messages to process. If desired, you can provide back-pressure by replacing GenServer.cast/2
by GenServer.call/3
. But then execution will be serial unless you call each handler inside a task:
sup
|> Supervisor.which_children()
|> Enum.map(fn {_, pid, _, _} -> Task.async(GenServer, :call, [pid, msg]) end)
|> Enum.map(&Task.await/1)
Another decision we took is to use GenServer.stop/3
to synchronously terminate handlers. This only works because we set :restart
to :temporary
. Otherwise directly shutting down handlers would cause the supervisor to restart them. Alternatively, you could also skip the GenServer.stop/3
altogether and simply let Supervisor.stop/1
do the work of shutting down all children with exit signals. Then if a particular child needs synchronous termination, it can trap exits. We avoided this on purpose because we expect all handlers to require synchronous termination. Your mileage may vary.
In any case, there you go! A short example of how to replace a GenEvent by a Supervisor and GenServer and the design decisions we took along the way.
P.S.: This post was originally published on Plataformatec’s blog.
]]><%= input f, :name %>
<%= input f, :address %>
<%= input f, :date_of_birth %>
<%= input f, :number_of_children %>
<%= input f, :notifications_enabled %>
Each generated input will have the proper markup and classes (we will use Bootstrap in this example), include the proper HTML attributes, such as required
for required fields and validations, and show any input error.
The goal is to build this foundation in our own applications in very few lines of code, without 3rd party dependencies, allowing us to customize and extend it as desired as our application changes.
Before building our input
helper, let’s first generate a new resource which we will use as a template for experimentation (if you don’t have a Phoenix application handy, run mix phoenix.new your_app
before the command below):
mix phoenix.gen.html User users name address date_of_birth:datetime number_of_children:integer notifications_enabled:boolean
Follow the instructions after the command above runs and then open the form template at “web/templates/user/form.html.eex”. We should see a list of inputs such as:
<div class="form-group">
<%= label f, :address, class: "control-label" %>
<%= text_input f, :address, class: "form-control" %>
<%= error_tag f, :address %>
</div>
The goal is to replace each group above by a single <%= input f, field %>
line.
Still in the “form.html.eex” template, we can see that a Phoenix form operates on Ecto changesets:
<%= form_for @changeset, @action, fn f -> %>
Therefore, if we want to automatically show validations in our forms, the first step is to declare those validations in our changeset. Open up “web/models/user.ex” and let’s add a couple new validations at the end of the changeset
function:
|> validate_length(:address, min: 3)
|> validate_number(:number_of_children, greater_than_or_equal_to: 0)
Also, before we do any changes to our form, let’s start the server with mix phoenix.server
and access http://localhost:4000/users/new
to see the default form at work.
input
function
Now that we have set up the codebase, we are ready to implement the input
function.
YourApp.InputHelpers
module
Our input
function will be defined in a module named YourApp.InputHelpers
(where YourApp
is the name of your application) which we will place in a new file at “web/views/input_helpers.ex”. Let’s define it:
defmodule YourApp.InputHelpers do
use Phoenix.HTML
def input(form, field) do
"Not yet implemented"
end
end
Note we used Phoenix.HTML
at the top of the module to import the functions from the Phoenix.HTML
project. We will rely on those functions to build the markup later on.
If we want our input
function to be automatically available in all views, we need to explicitly add it to the list of imports in the “def view” section of our “lib/my_app_web.ex” file:
import YourApp.Router.Helpers
import YourApp.ErrorHelpers
import YourApp.InputHelpers # Let's add this one
import YourApp.Gettext
With the module defined and properly imported, let’s change our “form.html.eex” function to use the new input
functions. Instead of 5 “form-group” divs:
<div class="form-group">
<%= label f, :address, class: "control-label" %>
<%= text_input f, :address, class: "form-control" %>
<%= error_tag f, :address %>
</div>
We should have 5 input calls:
<%= input f, :name %>
<%= input f, :address %>
<%= input f, :date_of_birth %>
<%= input f, :number_of_children %>
<%= input f, :notifications_enabled %>
Phoenix live-reload should automatically reload the page and we should see “Not yet implemented” appear 5 times.
The first functionality we will implement is to render the proper inputs, as before. To do so, we will use the Phoenix.HTML.Form.input_type
function, that receives a form and a field name and returns which input type we should use. For example, for :name
, it will return :text_input
. For :date_of_birth
, it will yield :datetime_select
. We can use the returned atom to dispatch to Phoenix.HTML.Form
and build our input:
def input(form, field) do
type = Phoenix.HTML.Form.input_type(form, field)
apply(Phoenix.HTML.Form, type, [form, field])
end
Save the file and watch the inputs appear on the page!
Now let’s take the next step and show the label and error messages, all wrapped in a div:
def input(form, field) do
type = Phoenix.HTML.Form.input_type(form, field)
content_tag :div do
label = label(form, field, humanize(field))
input = apply(Phoenix.HTML.Form, type, [form, field])
error = YourApp.ErrorHelpers.error_tag(form, field) || ""
[label, input, error]
end
end
We used content_tag
to build the wrapping div
and the existing YourApp.ErrorHelpers.error_tag
function that Phoenix generates for every new application that builds an error tag with proper markup.
Finally, let’s add some HTML classes to mirror the generated Bootstrap markup:
def input(form, field) do
type = Phoenix.HTML.Form.input_type(form, field)
wrapper_opts = [class: "form-group"]
label_opts = [class: "control-label"]
input_opts = [class: "form-control"]
content_tag :div, wrapper_opts do
label = label(form, field, humanize(field), label_opts)
input = apply(Phoenix.HTML.Form, type, [form, field, input_opts])
error = YourApp.ErrorHelpers.error_tag(form, field)
[label, input, error || ""]
end
end
And that’s it! We are now generating the same markup that Phoenix originally generated. All in 14 lines of code. But we are not done yet, let’s take things to the next level by further customizing our input function.
Now that we have achieved parity with the markup code that Phoenix generates, we can further extend it and customize it according to our application needs.
One useful UX improvement is to, if a form has errors, automatically wrap each field in a success or error state accordingly. Let’s rewrite the wrapper_opts
to the following:
wrapper_opts = [class: "form-group #{state_class(form, field)}"]
And define the private state_class
function as follows:
defp state_class(form, field) do
cond do
# The form was not yet submitted
is_nil(form.source.action) -> ""
# The field has error
form.errors[field] -> "has-error"
# The field is blank
input_value(form, field) in ["", nil] -> ""
# The field was filled successfully
true -> "has-success"
end
end
Now submit the form with errors and you should see every label and input wrapped in green (in case of success) or red (in case of input error).
We can use the Phoenix.HTML.Form.input_validations
function to retrieve the validations in our changesets as input attributes and then merge it into our input_opts
. Add the following two lines after the input_opts
variable is defined (and before the content_tag
call):
validations = Phoenix.HTML.Form.input_validations(form, field)
input_opts = Keyword.merge(validations, input_opts)
After the changes above, if you attempt to submit the form without filling the “Address” field, which we imposed a length of 3 characters, the browser won’t allow the form to be submitted. Not everyone is a fan of browser validations and, in this case, you have direct control if you want to include them or not.
At this point it is worth mentioning both Phoenix.HTML.Form.input_type
and Phoenix.HTML.Form.input_validations
are defined as part of the Phoenix.HTML.FormData
protocol. This means if you decide to use something else besides Ecto changesets to cast and validate incoming data, all of the functionality we have built so far will still work. For those interested in learning more, I recommend checking out the Phoenix.Ecto
project and learn how the integration between Ecto and Phoenix is done by simply implementing protocols exposed by Phoenix.
The last change we will add to our input
function is the ability to pass options per input. For example, for a given input, we may not want to use the type inflected by input_type
. We can add options to handle those cases:
def input(form, field, opts \\ []) do
type = opts[:using] || Phoenix.HTML.Form.input_type(form, field)
...
This means we can now control which function to use from Phoenix.HTML.Form
to build our input:
<%= input f, :new_password, using: :password_input %>
We also don’t need to be restricted to the inputs supported by Phoenix.HTML.Form
. For example, if you want to replace the :datetime_select
input that ships with Phoenix by a custom datepicker, you can wrap the input creation into an function and pattern match on the inputs you want to customize.
Let’s see how our input
functions look like with all the features so far, including support for custom inputs (input validations have been left out):
defmodule YourApp.InputHelpers do
use Phoenix.HTML
def input(form, field, opts \\ []) do
type = opts[:using] || Phoenix.HTML.Form.input_type(form, field)
wrapper_opts = [class: "form-group #{state_class(form, field)}"]
label_opts = [class: "control-label"]
input_opts = [class: "form-control"]
content_tag :div, wrapper_opts do
label = label(form, field, humanize(field), label_opts)
input = input(type, form, field, input_opts)
error = YourApp.ErrorHelpers.error_tag(form, field)
[label, input, error || ""]
end
end
defp state_class(form, field) do
cond do
# The form was not yet submitted
is_nil(form.source.action) -> ""
# The field has error
form.errors[field] -> "has-error"
# The field is blank
input_value(form, field) in ["", nil] -> ""
# The field was filled successfully
true -> "has-success"
end
end
# Implement clauses below for custom inputs.
# defp input(:datepicker, form, field, input_opts) do
# raise "not yet implemented"
# end
defp input(type, form, field, input_opts) do
apply(Phoenix.HTML.Form, type, [form, field, input_opts])
end
end
And then, once you implement your own :datepicker
, just add to your template:
<%= input f, :date_of_birth, using: :datepicker %>
Since your application owns the code, you will always have control over the inputs types and how they are customized. Luckily Phoenix ships with enough functionality to give us a head start, without compromising our ability to refine our presentation layer later on.
This article showed how we can leverage the conveniences exposed in Phoenix.HTML
to dynamically build forms using the information we have already specified in our schemas. Although the example above used the User schema, which directly maps to a database table, Ecto allows us to use schemas to map to any data source, so the input
function can be used for validating search forms, login pages, and so on without changes.
While there are projects such as Simple Form to tackle those problems in our Rails projects, with Phoenix we can get really far using the minimal abstractions that ship as part of the framework, allowing us to get most of the functionality while having full control over the generated markup.
P.S.: This post was originally published on Plataformatec’s blog and updated since then.
]]>When designing the Erlang language and the Erlang VM, Joe, Mike and Robert did not aim to implement a functional programming language, they wanted a runtime where they could build distributed, fault-tolerant applications. It just happened that the foundation for writing such systems share many of the functional programming principles. And it reflects in both Erlang and Elixir.
Therefore, the discussion becomes much more interesting when you ask about their end-goals and how functional programming helped them achieve them. The further we explore those goals, we realize how they tie in with immutability and the control of shared state, for example:
Fault-tolerance: if you have two entities in your software that work on the same piece of data and one of them fails (i.e. it raises an exception), how do you guarantee that the failed entity did not leave a corrupt state? In Elixir, you would isolate those entities into light-weight threads of execution called processes and guarantee their state is not shared (coordination happens over communication);
Concurrency: many of the issues in writing concurrent software in OO and imperative languages comes from managing shared mutable state. Since both sharing (via a global namespace) and mutability are the default mode of operations in those languages, it is harder to pinpoint the pieces of data that can get you in trouble. With immutability as a default, the mutable parts that you effectively need to focus on when writing concurrent software will stand-out and give developers more precision when tackling race conditions;
Maintainability: the foundation for writing more maintainable code in both Erlang and Elixir come from functional programming. Immutable data ensures the data no longer changes under our feet! Pattern-matching brings terseness, protocols introduce dynamic polymorphism backed by explicit contracts, etc.
The examples above are why I prefer, most of the time, to <a href=”https://www.youtube.com/watch?v=B4rOG9Bc65Q” target=”_blank” rel=”noopener”>introduce Elixir as a language for building maintainable and robust systems</a>. And while some of the functional semantics may differ between Erlang and Elixir (rebinding, pipelines, etc), they are still means to an end. Past that, the foundation for building fault-tolerance and distribution applications in both languages is precisely the same since they are both built on top of the same VM and the OTP platform.
That’s not to say the functional aspect is not important. It definitely is! I often summarize functional programming as a paradigm that forces us to make the complex parts of our system explicit and that’s an important guideline when writing software. Fortunately, many of the functional programming lessons can be applied to other non-FP languages and platforms.
However, other features in the Erlang VM are less portable. Concurrency must come from the ground-up. All languages are constrained by Amdahl’s law and it is important to maximize the parallel portion of our applications. Writing concurrent code is simpler when the runtime provides efficient abstractions and developers have good tooling to reason about concurrency.
Fault-tolerance is even trickier as it cannot be applied only to parts of your application. The whole ecosystem must be built on top of the same principles otherwise the “weakest link in the chain” will always break.
If you are building services that are meant to run 24/7 and serve multiple clients (and most network services and web applications must do precisely this), you must choose a platform that provides concurrency, robustness, and responsiveness from the ground-up. You want to give the best user experience to as many users as possible.
More importantly, those concerns go much beyond the infrastructure point of view. Developers often associate performance and concurrency with their application throughput (how many requests it can serve per second), however, such capabilities also directly affect the programmer productivity. If code compilation is slow or your application takes long to boot or your test suite spans over minutes, they become hurdles the programmer must overcome daily to write code. Hurdles that could be addressed by a more efficient and concurrent runtime. After all, in 2016, almost everything you do in your programming environment must be using all cores available.
Here is a quick exercise: imagine you have a CPU-intensive test suite that takes 2 minutes to run using a single-core. If your machine has 4 cores, its execution time could be reduced ideally to 30 seconds. However, given it is unlikely for the whole suite to be CPU intensive and to run fully in parallel, if we assume a parallelization of 80%, our suite will still take roughly only 48 seconds long, which is 2.5 times faster.
A strong foundation guarantees your users will enjoy a more fluid and robust experience and also gives developers a more productive and joyful working environment. That’s why tools <a href=”http://elixir-lang.org/getting-started/mix-otp/introduction-to-mix.html” target=”_blank” rel=”noopener”>such as Elixir’s Mix</a> puts a lot of effort into compiling your code and running your tests in parallel, so it is done as fast as possible. The abstractions that provide fault-tolerance also give developers a great deal of introspection into both production and development environments. The fact Erlang and Elixir were built with such concerns in mind is what makes them one of the best options out there for writing scalable and maintainable systems.
I would like to thank Robert Virding for reviewing the article. Still, all opinions and inaccuracies are my own. :)
P.S.: This post was originally published on Plataformatec’s blog.
]]>Of course the first question that pops up in your head is not about immutability, concurrency nor functional programming.
It is
How can I quit the Elixir shell?
Today this question will be answered.
When you start your iex
sessions, you are greeted with:
Interactive Elixir (1.2.2) - press Ctrl+C to exit (type h() ENTER for help)
iex(1)>
Ctrl-C
actually puts you into the Break command. From there, you can exit the shell using (a)bort
:
iex(1)>
BREAK: (a)bort (c)ontinue (p)roc info (i)nfo (l)oaded
(v)ersion (k)ill (D)b-tables (d)istribution
a
george:~$
What I’m used to do is to hit Ctrl-C
twice. It has the same effect as the abort
command.
The Break command can be triggered from any running Elixir code and not only iex
. But I always feel this is somewhat dirty. That by dropping into the Break command and exiting from there, I’m leaving my session opened. I know this is not the case but I went to find other ways to exit the shell.
You may have heard about Ctrl-G
. If you type it in your IEx session, you’ll see:
iex(1)>
User switch command
This drops you into the User switch command, or Job Control Mode (JCL), if you read about it in the Erlang documentation.
In this mode, you can create new shells (local and remote ones), list and terminate them:
User switch command
--> h
c [nn] - connect to job
i [nn] - interrupt job
k [nn] - kill job
j - list all jobs
s [shell] - start local shell
r [node [shell]] - start remote shell
q - quit erlang
? | h - this message
-->
If you use q
in this mode, you’ll halt your Erlang system, similar to aborting through the Break command. However Job Control Mode only works within IEx and therefore it is somewhat more restricted compared to Ctrl+C
.
You may have tried Ctrl-D
, a.k.a the End-of-Transmission character. Turns out Erlang and Elixir don’t understand it the way we are used from other REPLs.
What I didn’t know is that you can exit the shell by sending Ctrl-\
. The shell will exit immediately. As far as I know, it has the same effect as aborting the shell in the Break command, it doesn’t affect remote nodes and it also works outside of iex
(for example, you can use to terminate your tests). I only found out about it in this brief passage in the Erlang FAQ.
Now that’s a quick and proper exit. My search is complete. Now I just need to retrain my muscle memory.
P.S.: This post was originally published on Plataformatec’s blog.
]]>When we use HTTP, scaling horizontally and vertically is cheaper and easier as the server is stateless. Every request contains all the information for it to be fulfilled, like the current user id stored in a cookie, which is then fetched and processed. From this perspective, once you access a given page, it doesn’t matter much which server or operating system process is going to fulfill it.
With WebSockets, instead of isolated requests, you have a long-running conversation. In this setup, clients connect to a single machine and they will stay exchanging messages with that particular machine as long as they are online.
Before moving forward, let’s try to put some numbers on how your application is affected once you go stateful.
Imagine you run a newspaper application and you render 100 articles per second. Assuming a uniform load, your infrastructure needs only to handle 100 connections per second. Now imagine you want to use WebSockets so readers can know right away if there is a new comment to the article they are reading. If the average read time per article is of 1 minute, your server now needs to effectively handle 6000 open connections per second (100 articles/s * 60s/article). As a rough estimate, you can expect the number of open connections to be multiplied by the time users spend on the application.
The first requirement of stateful applications is to handle long-running connections. Your infrastructure must also be able to do so concurrently. From the proxy to webservers, you must be able to hold multiple long-running connections at the same time. Not only that, you want a single webserver to serve as many connections as possible, in the cheapest way as possible (since every single connection costs memory).
Let’s continue studying the scenario above. Imagine a new article is published and is receiving 100 requests per second. The article also takes 1 minute to read on average (same numbers as above for simplicity). When someone publishes a new comment, we now need to broadcast this information to all 6000 clients.
In order to quantify this, let’s imagine the worst case scenario which you would never want to run in production: where you have a single operating process per WebSocket connection. Once a new comment is published, it would have to be broadcast 6000 times, one for each process, which will then push this information to the client.
However, if you can hold 6000 connections on a single machine, in the same OS process, the data will be broadcast only once. In other words, you want a single machine to hold as many connections as possible, reducing the latency across your events. The end result will be an increased user experience and reduced infrastructure cost.
To hold as many connections as possible, your runtime must use your machine resources, like IO and CPU, as efficiently as possible. While the huge majority of languages provide threads, which won’t block on IO and will provide CPU-based concurrency, not all of them can leverage multi-core efficiently.
One of the concerns when writing stateful apps is how your web server will behave when multiple clients are connected. Because multiple clients may be sending or receiving events at the same time, your runtime needs to be efficient when multiplexing those connections. If your runtime cannot effectively handle incoming CPU activity, different actions can block the connection (or your channels) causing latency to increase considerably, really fast.
To see how this can impact your clients, imagine you have 1000 channel events from multiple clients to handle, each taking on average 10ms due to CPU. By the time you need to process the 1000th event, that client has already waited 10 seconds (1000 * 10ms). Those problems are much easier to solve in a stateless world because we can easily load balance and send requests to other machines. With WebSockets, the machine you are connected to will be the one doing the work.
It is extremely important to clarify that almost everything you do in your programming language uses the CPU: calling a method, rendering a template, parsing some data. Because the main Ruby implementation has a Global Virtual Machine Lock, there is a good amount of actions that will block you from executing more than one action at once even when multiple cores are present.
To work around this limitation in Rails, you typically queue a job that would perform the rendering and publishing of events in the background. Then Rails implements a worker that is started by the job queue and broadcasts the event. This workflow adds a whole amount of indirection which should not really be needed. You need to be careful so workers that are CPU intensive are not running on the same process as your channels as they would be competing for CPU.
Today we live in a multi-core world. We need to rely on languages that can multiplex both CPU and IO events across multiple cores without locking. And common platforms like Node.js/EventMachine/Twisted are not a solution to this problem exactly because they only cover the IO side, which is not an issue in the majority of threaded languages (including Ruby), while still forcing you to write code in a convoluted callback style way.
To exemplify how proper concurrency support leads to simpler solutions, let’s compare examples of workflows between channels in Rails and Phoenix and how it affects our infrastructure.
In Rails we typically move the CPU-intensive tasks to job queues. Therefore the flow for receiving an event from a client and broadcasting it to everyone can be done as follows:
On the other hand, let’s see how that would work in Phoenix. Phoenix runs on the Erlang VM which provides multi-core and distributed support out of the box. Receiving an event from a client and broadcasting it to everyone in Phoenix works as follows:
Phoenix does not impose a job queue because Phoenix channels run on the Erlang VM which can leverage all of your machine cores efficiently. If you have 2 or 40 cores, the machine will multiplex CPU-heavy requests, workers and channels across all cores.
Furthermore, Phoenix does not require external PubSub adapters. For a broadcast that was started on the current machine, the data is broadcast to all connected clients directly, without round-trips to Redis. When deploying to multiple machines, Phoenix runs on distributed mode and automatically broadcasts to other nodes without relying on Redis or Postgres. You get a distributed multi-server abstraction that looks like a single channel.
When running stateful applications, leveraging multi-core concurrency is preferred as it leads to simpler applications and better user experience due to reduced latency.
When such is not available, developers may need to work around such limitations. This applies to any platform without a proper concurrency model. For example, when using Socket.IO for Node.js, you need to avoid long computations from blocking Node.js’ event loop. When running on cluster mode (for multi-core usage) or in multiple nodes, broadcasts must first be sent to Redis.
On the other hand, Phoenix channels use all cores, which means developers no longer need to worry about low level details when writing channel code. Phoenix channels are as joyful and productive as any other part of the Phoenix web stack. Phoenix is able to support 2 million connections on a single node or run in distributed mode without Redis or any other adapter, giving engineers the option of scaling horizontally or vertically (or both).
The fact Phoenix PubSub does not require external tools paired with the Erlang VM fantastic support for concurrency is what allowed Phoenix to broadcast a wikipedia article to 2 million clients in about 5 seconds. Of course many developers won’t push the framework to such limits. Rather they are the guarantee you won’t have to sacrifice your productivity and code maintainability. You get beautiful code and great user experience without compromises.
These are some of the many reasons why we are excited about Phoenix. It brings back the simplicity and joy in writing modern web applications by mixing tried and true technologies with a fresh breeze of functional ideas.
You should definitely give it a try!
P.S.: This post was originally published on Plataformatec’s blog.
]]>Before we start, a short disclaimer: Elixir does not have mutable variables, it has rebinding. The value an Elixir variable points to is always fully specified at compilation time. However, when talking about mutability, the value a variable points to has to be specified at runtime, when the sopftware is running. This is true for both Elixir and Erlang.
Back on track. This article will explore the potential for hidden bugs when changing code. Those bugs exist because both Erlang and Elixir variables provide implicit behaviour. Elixir rebinds implicitly, Erlang pattern matches implicitly. Such bugs may show up if developers add or remove variables without being mindful of its context.
Let’s see some examples. Imagine the following Elixir code:
foo_bar = ...
# some code
use_foo_bar(foo_bar)
What happens if you introduce foo_bar
before the snippet above?
foo_bar = ... # newly added line
foo_bar = ...
# some code
use_foo_bar(foo_bar)
The code would work just as fine and the compiler would even warn if the newly added foo_bar
is unused. What would happen, however, if the new line is introduced after the foo_bar
definition?
foo_bar = ...
# some code
foo_bar = ... # newly added line
use_foo_bar(foo_bar)
The semantics may have potentially changed if you wanted use_foo_bar
to use the first foo_bar
variable. Indeed, careless change may cause bugs.
Let’s check Erlang. Given the code:
FooBar = ...
% some code
use_foo_bar(FooBar)
What happens if you introduce FooBar
before its definition?
FooBar = ... % newly added line
FooBar = ... % old line errors
% some code
use_foo_bar(FooBar)
The Erlang code crashes at runtime instead of silently continuing. Certainly an improvement, but it still means that introducing a variable in Erlang requires us to certify the variable is not matched later on, as FooBar
will no longer be assigned to but matched on.
What happens if we introduce it after its definition?
FooBar = ...
% some code
FooBar = ... % newly added line and it errors
use_foo_bar(FooBar)
This time, the new line crashes. In other words, due to implicit matching in Erlang, we not only need to worry about all the code after introducing a variable, but we also need to be mindful of all the code before introducing it, as introducing variables can cause future variables of the same name to become implicit matches.
However, things get more complicated when considering case expressions.
Let’s say you want to match on a new value inside a case. In Elixir you would write:
case some_expr() do
{:ok, safe_value} -> perform_something_safe()
_ -> perform_something_unsafe()
end
What would happen if you accidentally introduce a safe_value
variable in Elixir before that case statement?
safe_value = ... # newly added line
# some code
case some_expr() do
{:ok, safe_value} -> perform_something_safe()
_ -> perform_something_unsafe()
end
Nothing, the code works just fine due to rebinding.
Let’s see what happens in Erlang:
case some_expr() of
{ok, SafeValue} -> perform_something_safe();
_ -> perform_something_unsafe()
end
And what happens when you introduce a variable?
SafeValue = ... % newly added line
% some code
case some_expr() of
{ok, SafeValue} -> perform_something_safe();
_ -> perform_something_unsafe()
end
You have just silently introduced a potentially dangerous bug in your code! Again, because Erlang implicitly matches, we may now accidentaly perform an unsafe operation as the first clause no longer binds to SafeValue
but it will match against it.
Similar bug happens in Erlang when you are matching on an existing variable and you remove it. Imagine you have this working Elixir code:
safe_value = ...
# some code
case some_expr() do
{:ok, ^safe_value} -> perform_something_safe()
_ -> perform_something_unsafe()
end
Because Elixir explicitly matches, if you remove the definition of safe_value
, the code won’t even compile. Let’s see the working version of the Erlang one:
SafeValue = ...
% some code
case some_expr() of
{ok, SafeValue} -> perform_something_safe();
_ -> perform_something_unsafe()
end
If you remove the SafeValue
variable, the first clause will now bind to SafeValue
instead of matching, silently changing the behaviour of the code once again! Again, another bug while the Elixir approach has shielded us on both cases.
At this point, Elixir:
^
for explicit match while Erlang:
At the beginning, we have mentioned someone may introduce a new variable foo_bar
in the Elixir code and change the code semantics if the variable was already used later on. However, most of those cases are desired. For example, in Elixir:
foo_bar = step1()
foo_bar = step2(foo_bar)
foo_bar = step3(foo_bar)
# some code
use_foo_bar(foo_bar)
In Erlang:
FooBar0 = step1(),
FooBar1 = step2(FooBar0),
FooBar2 = step3(FooBar1),
% some code
use_foo_bar(FooBar2)
Now what happens if we want to introduce a new version of foo_bar
(step_4
) in Elixir?
foo_bar = step1()
foo_bar = step2(foo_bar)
foo_bar = step3(foo_bar)
foo_bar = step4(foo_bar) # newly added line
# some code
use_foo_bar(foo_bar)
The code just works. What about Erlang?
FooBar0 = step1(),
FooBar1 = step2(FooBar0),
FooBar2 = step3(FooBar1),
FooBar3 = step4(FooBar2),
% some code
use_foo_bar(FooBar2) % All FooBar2 must be changed
If the developer introduces a new variable and forgets to change FooBar2
later on, the code semantics changed, introducing the same bug rebinding in Elixir would. This is particularly troubling if you change all but miss one variable, since the code won’t emit “unused variable” warnings. This is even more prone to errors when adding an intermediate step (say between step2
and step3
).
Some will say that a benefit of numbered variables is that further code could use any of FooBar2
and FooBar3
, for example:
FooBar0 = step1(),
FooBar1 = step2(FooBar0),
FooBar2 = step3(FooBar1),
FooBar3 = step4(FooBar2),
% some code
use_foo_bar(FooBar2),
something_else(FooBar3)
However I would consider the code above to be a poor practice because there is nothing in the name FooBar2
that hints to why it is different than FooBar3
. In this case, the variable names would not reflect at all why part of the code would prefer to use one variable over the other. Your team will be much better off by giving explicit names instead of versioned ones.
Because both Elixir and Erlang variables provide implicit behaviour, rebinding and pattern matching respectively, both require care when adding or removing variables to existing code. Not only that, Erlang requires both previous and further knowledge of the context when introducing new variables while Elixir requires only further knowledge. The only way to circumvent those bugs is by providing an explicit operation for both rebinding and pattern match, which none of the languages do.
Of course, that’s not to say writing code in Erlang or Elixir is going to lead to more bugs in your software. After all, Erlang developers have been writing robust software for decades. Those “quirks” exist in any language and we end-up internalizing them as we gain experience.
At least, I hope this puts to rest the claim that Elixir variables are somehow unsafer than Erlang ones (or vice-versa).
Thanks to Joe Armstrong, Saša Juric, James Fish, Chris McCord, Bryan Hunter, Sean Cribbs, and Anthony Ramine for reviewing this article and providing feedback.
P.S.: This post was originally published on Plataformatec’s blog.
]]>A couple days ago I expressed my thoughts regarding mocks on Twitter:
Mocks/stubs do not remove the need to define an explicit interface between your components (modules, classes, whatever). [1/4] — José Valim (@josevalim) September 9, 2015
The blame is not on mocks though, they are actually a useful technique for testing. However our test tools often makes it very easy to abuse mocks and the goal of this post is to provide better guidelines on using them.
The wikipedia definition is excellent: mocks are simulated entities that mimic the behavior of real entities in controlled ways. I will emphasize this later on but I always consider “mock” to be a noun, never a verb.
Let’s see a common practical example: external APIs.
Imagine you want to consume the Twitter API in your web application and you are using something like Phoenix or Rails. At some point, a web request will come-in, which will be dispatched to a controller which will invoke the external API. Let’s imagining this is happening directly from the controller:
defmodule MyApp.MyController do
def show(conn, %{"username" => username}) do
# ...
MyApp.TwitterClient.get_username(username)
# ...
end
end
The code may work as expected but, when it comes to make the tests pass, a common practice is to just go ahead and mock (warning! mock as a verb!) the underlying HTTPClient
used by MyApp.TwitterClient
:
mock(HTTPClient, :get, to_return: %{..., "username" => "josevalim", ...})
You proceed to use the same technique in a couple other places and your unit and integration test suites pass. Time to move on?
Not so fast. The whole problem with mocking the HTTPClient
is that you just coupled your application to that particular HTTPClient
. For example, if you decide to use a new and faster HTTP client, a good part of your integration test suite will now fail because it all depends on mocking HTTPClient
itself, even when the application behaviour is the same. In other words, the mechanics changed, the behaviour is the same, but your tests fail anyway. That’s a bad sign.
Furthermore, because mocks like the one above change modules globally, they are particularly aggravating in Elixir as changing global values means you can no longer run that part of your test suite concurrently.
Instead of mocking the whole HTTPClient
, we could replace the Twitter client (MyApp.TwitterClient
) with something else during tests. Let’s explore how the solution would look like in Elixir.
In Elixir, all applications ship with configuration files and a mechanism to read them. Let’s use this mechanism to be able to configure the Twitter client for different environments. The controller code should now look like this:
defmodule MyApp.MyController do
def show(conn, %{"username" => username}) do
# ...
twitter_api().get_username(username)
# ...
end
defp twitter_api do
Application.get_env(:my_app, :twitter_api)
end
end
And now we can configure it per environment as:
# In config/dev.exs
config :my_app, :twitter_api, MyApp.Twitter.Sandbox
# In config/test.exs
config :my_app, :twitter_api, MyApp.Twitter.InMemory
# In config/prod.exs
config :my_app, :twitter_api, MyApp.Twitter.HTTPClient
This way we can choose the best strategy to retrieve data from Twitter per environment. The sandbox one is useful if Twitter provides some sort of sandbox for development. The HTTPClient
is our previous implementation while the in memory avoids HTTP requests altogether, by simply loading and keeping data in memory. Its implementation could be defined in your test files and even look like:
defmodule MyApp.Twitter.InMemory do
def get_username("josevalim") do
%MyApp.Twitter.User{
username: "josevalim"
}
end
end
which is as clean and simple as you can get. At the end of the day, MyApp.Twitter.InMemory
is a mock (mock as a noun, yay!), except you didn’t need any fancy library to define one! The dependency on HTTPClient
is gone as well.
Because a mock is meant to replace a real entity, such replacement can only be effective if we explicitly define how the real entity should behave. Failing this, you will find yourself in the situation where the mock entity grows more and more complex with time, increasing the coupling between the components being tested, but you likely won’t ever notice it because the contract was never explicit.
Furthermore, we have already defined three implementations of the Twitter API, so we better make it all explicit. In Elixir we do so by defining a behaviour with callback functions:
defmodule MyApp.Twitter do
@doc "..."
@callback get_username(username :: String.t) :: %MyApp.Twitter.User{}
@doc "..."
@callback followers_for(username :: String.t) :: [%MyApp.Twitter.User{}]
end
Now add @behaviour MyApp.Twitter
on top of every module that implements the behaviour and Elixir will help you provide the expected API.
It is interesting to note we rely on such behaviours all the time in Elixir: when you are using Plug, when talking to a repository in Ecto, when testing Phoenix channels, etc.
Previously, because we didn’t have a explicit contract, our application boundaries looked like this:
[MyApp] -> [HTTP Client] -> [Twitter API]
That’s why changing the HTTPClient
could break your integration tests. Now our app depends on a contract and only one implementation of such contract rely on HTTP:
[MyApp] -> [MyApp.Twitter (contract)]
[MyApp.Twitter.HTTP (contract impl)] -> [HTTPClient] -> [Twitter API]
Our application tests are now isolated from both the HTTPClient
and the Twitter API. However, how can we make sure the system actually works as expected?
Of the challenges in testing large systems is exactly in finding the proper boundaries. Define too many boundaries and you have too many moving parts. Furthermore, by writing tests that rely exclusively on mocks, your test suite become less reliable.
My general guideline is: for each test using a mock, you must have an integration test covering the usage of that mock. Without the integration test, there is no guarantee the system actually works when all pieces are put together. For example, some projects would use mocks to avoid interacting with the database during tests but in doing so, they would make their suites more fragile. These is one of the scenarios where a project could have 100% test coverage but still reveal obvious failures when put in production.
By requiring the presence of integration tests, you can guarantee the different components work as expected when put together. Besides, the requirement of writing an integration test in itself is enough to make some teams evaluate if they should be using a mock in the first place, which is always a good question to ask ourselves!
Therefore, in order to fully test our Twitter usage, we need at least two types of tests. Unit tests for MyApp.Twitter.HTTP
and an integration test where MyApp.Twitter.HTTP
is used as an adapter.
Since depending on external APIs can be unreliably, we need to run those tests only when needed in development and configure them as necessary in our build system. The @tag
system in ExUnit, Elixir’s test library, provides conveniences to help us with that. For the unit tests, one could do:
defmodule MyApp.Twitter.HTTPTest do
use ExUnit.Case, async: true
# All tests will ping the twitter API
@moduletag :twitter_api
# Write your tests here
end
In your test helper, you want to exclude the Twitter API test by default:
ExUnit.configure exclude: [:twitter_api]
But you can still run the whole suite with the tests tagged :twitter_api
if desired:
mix test --include twitter_api
Or run only the tagged tests:
mix test --only twitter_api
Although I prefer this approach, external conditions like rate limiting may make such solution impractical. In such cases, we may actually need a fake HTTPClient. This is fine as long as we follow the guidelines below:
If you change your HTTP client, your application suite won’t break but only the tests for MyApp.Twitter.HTTP
You won’t mock (warning! mock as a verb) your HTTP client. Instead, you will pass it as a dependency via configuration, similar to how we did for the Twitter API
Alternatively, you may avoid mocking the HTTP client by running a dummy webserver that emulates the Twitter API. bypass is one of many projects that can help with that. Those are all options you should discuss with your team.
I would like to finish this article by bringing up some common concerns and comments whenever the mock discussion comes up.
Quoting from elixir-talk mailing list:
So the proposed solution is to change production code to be “testable” and making production code to call Application configuration for every function call? This doesn’t seem like a good option as it’s including a unnecessary overhead to make something “testable”.
I’d argue it is not about making the code “testable”, it is about improving the design of your code.
A test is a consumer of your API like any other code you write. One of the ideas behind TDD is that tests are code and no different from code. If you are saying “I don’t want to make my code testable”, you are saying “I don’t want to decouple some modules” or “I don’t want to think about the contract behind these components”.
Just to clarify, there is nothing wrong with “not wanting to decouple some modules”. For example, we invoke modules such as URI
and Enum
from Elixir’s standard library all the time and we don’t want to hide those behind contracts. But if we are talking about something as complex as an external API, defining an explicit contract and making the contract implementation configurable is going to do your code wonders and make it easier to manage its complexity.
Finally, the overhead is also minimum. Application configuration in Elixir is stored in ETS tables which means they are directly read from memory.
Although we have used the application configuration for solving the external API issue, sometimes it is easier to just pass the dependency as argument. Imagine this example in Elixir where some function may perform heavy work which you want to isolate in tests:
defmodule MyModule do
def my_function do
# ...
SomeDependency.heavy_work(arg1, arg2)
# ...
end
end
You could remove the dependency by passing it as an argument, which can be done in multiple ways. If your dependency surface is tiny, an anonymous function will suffice:
defmodule MyModule do
def my_function(heavy_work \\ &SomeDependency.heavy_work/2) do
# ...
heavy_work.(arg1, arg2)
# ...
end
end
And in your test:
test "my function performs heavy work" do
heavy_work = fn _, _ ->
# Simulate heavy work by sending self() a message
send self(), :heavy_work
end
MyModule.my_function(heavy_work)
assert_received :heavy_work
end
Or define the contract, as explained in the previous section of this post, and pass a module in:
defmodule MyModule do
def my_function(dependency \\ SomeDependency) do
# ...
dependency.heavy_work(arg1, arg2)
# ...
end
end
Now in your test:
test "my function performs heavy work" do
# Simulate heavy work by sending self() a message
defmodule TestDependency do
def heavy_work(_arg1, _arg2) do
send self(), :heavy_work
end
end
MyModule.my_function(TestDependency)
assert_received :heavy_work
end
Finally, you could also make the dependency a data structure and define the contract with a protocol.
In fact, passing the dependency as argument is much simpler and should be preferred over relying on configuration files and Application.get_env/3
. When not possible, the configuration system is a good fallback.
Another way to think about mocks is to treat them as nouns. You shouldn’t mock an API (verb), instead you create a mock (noun) that implements a given API.
Most of the bad uses of mocks come when they are used as verbs. That’s because, when you use mock as a verb, you are changing something that already exists, and often those changes are global. For example, when we say we will mock the SomeDependency
module:
mock(SomeDependency, :heavy_work, to_return: true)
When you use mock as a noun, you need to create something new, and by definition it cannot be the SomeDependency
module because it already exists. So “mock” is not an action (verb), it is something you pass around (noun). I’ve found the noun-verb guideline to be very helpful when spotting bad use of mocks. Your mileage may vary.
With all that said, should you discard your mock library?
It depends. If your mock library uses mocks to replace global entities, to change static methods in OO or to replace modules in functional languages, you should definitely consider how the library is being used in your codebase and potentially discard it.
However there are mock libraries that does not promote any of the “anti-patterns” above and are mostly conveniences to define “mock objects” or “mock modules” that you would pass to the system under the test. Those libraries adhere to our “mocks as nouns” rule and can provide handy features to developers.
Part of testing your system is to find the proper contracts and boundaries between components. If you follow closely a guideline that mocks will be used only if you define a explicit contract, it will:
protect you from overmocking as it will push you to define contracts for the parts of your system that matters
help you manage the complexity between different components. Every time you need a new function from your dependency, you are required to add it to the contract (a new @callback
in our Elixir code). If the list of @callback
s are getting bigger and bigger, it will be noticeable as the knowledge is in one place and you will be able to act on it
make it easier to test your system because it will push you to isolate the interaction between complex components
Defining contracts allows us to see the complexity in our dependencies. Your application will always have complexity, so always make it as explicit as you can.
P.S.: This post was originally published on Plataformatec’s blog.
]]>This article expects basic knowledge Ecto, particularly how repositories, schema and the query syntax work. You can learn more about those in Ecto docs.
Associations in Ecto are used when two different sources (tables) are linked via foreign keys.
A classic example of this setup is “Post has many comments”. First create the two tables in migrations:
create table(:posts) do
add :title, :string
add :body, :text
timestamps
end
create table(:comments) do
add :post_id, references(:posts)
add :body, :text
timestamps
end
Each comment contains a post_id
column that by default points to a post id
.
And now define the schemas:
defmodule MyApp.Blog.Post do
use Ecto.Schema
schema "posts" do
field :title
field :body
has_many :comments, MyApp.Blog.Comment
timestamps
end
end
defmodule MyApp.Blog.Comment do
use Ecto.Schema
schema "comments" do
field :body
belongs_to :post, MyApp.Blog.Post
timestamps
end
end
All the schema definitions like field
, has_many
and others are defined in Ecto.Schema
.
Similar to has_many/3
, a schema can also invoke has_one/3
when the parent has at most one child entry. For example, you could think of a metadata association where “Post has one metadata” and the “Metadata belongs to post”.
The difference between has_one/3
and belongs_to/3
is that the foreign key is always defined in the schema that invokes belongs_to/3
. You can think of the schema that calls has_*
as the parent schema and the one that invokes belongs_to
as the child one.
One of the benefits of defining associations is that they can be used in queries. For example:
Repo.all from p in Post,
preload: [:comments]
Now all posts will be fetched from the database with their associated comments. The example above will perform two queries: one for loading all posts and another for loading all comments. This is often the most efficient way of loading associations from the database (even if two queries are performed) because we need to receive and parse only POSTS + COMMENTS results.
It is also possible to preload associations using joins while performing more complex queries. For example, imagine both posts and comments have votes and you want only comments with more votes than the post itself:
Repo.all from p in Post,
join: c in assoc(p, :comments),
where: c.votes > p.votes
preload: [comments: c]
The example above will now perform a single query, finding all posts and the respective comments that match the criteria. Because this query performs a JOIN, the number of results returned by the database is POSTS * COMMENTS, which Ecto then processes and associates all comments into the appropriate post.
Finally, Ecto also allows data to be preloaded into structs after they have been loaded via the Repo.preload/3
function:
Repo.preload posts, :comments
This is specially handy because Ecto does not support lazy loading. If you invoke post.comments
and comments have not been preloaded, it will return Ecto.Association.NotLoaded
. Lazy loading is often a source of confusion and performance issues and Ecto pushes developers to do the proper thing. Therefore Repo.preload/3
allow associations to be explicitly loaded anywhere, at any time.
While Ecto allows you insert a post with multiple comments in one operation:
Repo.insert!(%Post{
title: "Hello",
body: "world",
comments: [
%Comment{body: "Excellent!"}
]
})
Many times you may want to break it into distinct steps so you have more flexibility in managing those entries. For example, you could use changesets to build your posts and comments along the way:
post = Ecto.Changeset.change(%Post{}, title: "Hello", body: "world")
comment = Ecto.Changeset.change(%Comment{}, body: "Excellent!")
post_with_comments = Ecto.Changeset.put_assoc(post, :comments, [comment])
Repo.insert!(post_with_comments)
Or by handling each entry individually inside a transaction:
Repo.transaction fn ->
post = Repo.insert!(%Post{title: "Hello", body: "world"})
# Build a comment from the post struct
comment = Ecto.build_assoc(post, :comments, body: "Excellent!")
Repo.insert!(comment)
end
Ecto.build_assoc/3
builds the comment using the id currently set in the post struct. It is equivalent to:
%Comment{post_id: post.id, body: "Excellent!"}\
The Ecto.build_assoc/3
function is specially useful in Phoenix controllers. For example, when creating the post, one would do:
Ecto.build_assoc(current_user, :post)
As we likely want to associate the post to the user currently signed in the application. In another controller, we could build a comment for an existing post with:
Ecto.build_assoc(post, :comments)
Ecto does not provide functions like post.comments << comment
that allows mixing persisted data with non-persisted data. The only mechanism for changing both post and comments at the same time is via changesets which we will explore when talking about embeds and nested associations.
When defining a has_many/3
, has_one/3
and friends, you can also pass a :on_delete
option that specifies which action should be performed on associations when the parent is deleted.
has_many :comments, MyApp.Blog.Comment, on_delete: :delete_all
Besides the value above, :nilify_all
is also supported, with :nothing
being the default. Check has_many/3
docs for more information.
Besides associations, Ecto also supports embeds in some databases. With embeds, the child is embedded inside the parent, instead of being stored in another table.
Databases like PostgreSQL uses a mixture of JSONB (embeds_one/3
) and ARRAY columns to provide this functionality (both JSONB and ARRAY are supported by default and first-class citizens in Ecto).
Working with embeds is mostly the same as working with another field in a schema, except when it comes to manipulating them. Let’s see an example:
defmodule MyApp.Blog.Permalink do
use Ecto.Schema
embedded_schema do
field :url
timestamps
end
end
defmodule MyApp.Blog.Post do
use Ecto.Schema
schema "posts" do
field :title
field :body
has_many :comments, MyApp.Comment
embeds_many :permalinks, MyApp.Permalink
timestamps
end
end
It is possible to insert a post with multiple permalinks directly:
Repo.insert!(%Post{
title: "Hello",
permalinks: [
%Permalink{url: "example.com/thebest"},
%Permalink{url: "another.com/mostaccessed"}
]
})
Similar to associations, you may also manage those entries using changesets:
# Generate a changeset for the post
changeset = Ecto.Changeset.change(post)
# Let's track the new permalinks
changeset = Ecto.Changeset.put_embed(changeset, :permalinks,
[%Permalink{url: "example.com/thebest"},
%Permalink{url: "another.com/mostaccessed"}]
)
# Now insert the post with permalinks at once
post = Repo.insert!(changeset)
Now if you want to replace or remove a particular permalink, you can work with permalinks as a collection and then just put it as a change again:
# Remove all permalinks from example.com
permalinks = Enum.reject post.permalinks, fn permalink ->
permalink.url =~ "example.com"
end
# Let's create a new changeset
changeset =
post
|> Ecto.Changeset.change
|> Ecto.Changeset.put_embed(:permalinks, permalinks)
# And update the entry
post = Repo.update!(changeset)
The beauty of working with changesets is that they keep track of all changes that will be sent to the database and we can introspect them at any time. For example, if we called before Repo.update!/3
:
IO.inspect(changeset.changes.permalinks)
We would see something like:
[%Ecto.Changeset{action: :delete, changes: %{},
data: %Permalink{url: "example.com/thebest"}},
%Ecto.Changeset{action: :update, changes: %{},
data: %Permalink{url: "another.com/mostaccessed"}}]
If, by any chance, we were also inserting a permalink in this operation, we would see another changeset there with action :insert
.
Changesets contain a complete view of what is changing, how they are changing and you can manipulate them directly.
This section was written for Phoenix v1.6 and earlier and therefore it does not use the Phoenix.Component and conveniences.
The same way we have used changesets to manipulate embeds, we can also use them to change child associations at the same time we are manipulating the parent.
One of the benefits of this feature is that we can use them to build nested forms in a Phoenix application. While nested forms in other languages and frameworks can be confusing and complex, Ecto uses changesets and explicit validations to provide a straightforward and simple way to manipulate multiple structs at once.
To finish this post, let’s see an example of how to use what we have seen so far to work with nested associations in Phoenix.
First, create a new Phoenix application if you haven’t yet. The Phoenix guides can help you get started with that if it is your first time using Phoenix.
The example we will build is a classic to do list, where a list has many items. Let’s generate the TodoList
resource inside the Tasks namespace:
mix phx.gen.html Tasks TodoList todo_lists title
Follow the steps printed by the command above and after let’s generate a TodoItem
schema:
mix phx.gen.schema Tasks TodoItem todo_items body:text todo_list_id:references:todo_lists
Open up the MyApp.Tasks.TodoList
module at “lib/my_app/tasks/todo_list.ex” and add the has_many
definition inside the schema
block:
has_many :todo_items, MyApp.Tasks.TodoItem
Next let’s also cast “todo_items” on the TodoList
changeset function:
def changeset(todo_list, params \\ %{}) do
todo_list
|> cast(params, [:body])
|> cast_assoc(:todo_items, required: true)
end
Note we are using cast_assoc
instead of put_assoc
in this example. Both functions are defined in Ecto.Changeset
. cast_assoc
(or cast_embed
) is used when you want to manage associations or embeds based on external parameters, such as the data received through Phoenix forms. In such cases, Ecto will compare the data existing in the struct with the data sent through the form and generate the proper operations. On the other hand, we use put_assoc
(or put_embed
) when we aleady have the associations (or embeds) as structs and changesets loaded in memory, and we simply want to tell Ecto to take those entries as is.
Because we have added todo_items
as a required field, we are ready to submit them through the form. So let’s change our template to submit todo items too. Open up “lib/my_app_web/templates/todo_list/form.html.eex” and add the following between the title input and the submit button:
<%= inputs_for f, :todo_items, fn i -> %>
<div class="form-group">
<%= label i, :body, "Task ##{i.index + 1}", class: "control-label" %>
<%= text_input i, :body, class: "form-control" %>
<%= if message = i.errors[:body] do %>
<span class="help-block"><%= message %></span>
<% end %>
</div>
<% end %>
The inputs_for/4
function comes from Phoenix.HTML.Form and it allows us to generate fields for an association or an embed, emitting a new form struct (represented by the variable i
in the example above) for us to work with. Inside the inputs_for/4
function, we generate a text input for each item.
Now that we have changed the template, the final step is to change the new
action in the controller to include two empty todo items by default in the todo list:
changeset = TodoList.changeset(%TodoList{todo_items: [%MyApp.TodoItem{}, %MyApp.TodoItem{}]})
Head to “http://localhost:4000/todo_lists” and you can now create a todo list with both items! However, if you try to edit the newly created todo list, you should get an error:
attempting to cast or change association :todo_items for MyApp.TodoList that was not loaded.
Please preload your associations before casting or changing the schema.
As the error message says we need to preload the todo items for both edit
and update
actions in MyApp.TodoListController
. Open up your controller and change the following line on both actions:
todo_list = Repo.get!(TodoList, id)
to
todo_list = Repo.get!(TodoList, id) |> Repo.preload(:todo_items)
Now it should also be possible to update the todo items alongside the todo list.
Both insert and update operations are ultimately powered by changesets, as we can see in our controller actions:
changeset = TodoList.changeset(todo_list, todo_list_params)
All the benefits we have discussed regarding changesets in the previous section still apply here. By inspecting the changeset before calling Repo.insert
or Repo.update
, it is possible to see a snapshot of all the changes that are going to happen in the database.
Not only that, the validation process behind changesets is explicit. Since we added todo_items
as a required field in the todo list schema, every time we call MyApp.Tasks.TodoList.changeset/2
, MyApp.Tasks.TodoItem.changeset/2
will be called for every todo item sent through the form. The changesets returned for each todo item is then stored in the main todo list changeset (it is effectively a tree of changes).
To help us build our intuition regarding changesets a bit more, let’s add some validations to todo items and also allow them to be deleted.
Ecto v3.10 and later supports an option called
:drop_param
and:sort_param
oncast_assoc
, which allows you to specify a list of IDs to be dropped from the association as well a custom sorting order. With these new features, you no longer need to specify a virtual field for deletion as shown below. Instead you define a checkbox which will submit the current item ID for deletion once checked.
Open up MyApp.Tasks.TodoItem
at “lib/my_app/tasks/todo_item.ex” and add a virtual field named :delete
to the schema:
field :delete, :boolean, virtual: true
As we know the MyApp.Tasks.TodoItem.changeset/2
function is the one invoked by default when manipulating todo items through todo lists. So let’s change it to the following:
def changeset(todo_item, params \\ :empty) do
todo_item
|> cast(params, [:body, :delete])
|> validate_required([:body])
|> validate_length(:body, min: 3)
|> mark_for_deletion() # 2. Call mark for deletion
end
defp mark_for_deletion(changeset) do
# If delete was set and it is true, let's change the action
if get_change(changeset, :delete) do
%{changeset | action: :delete}
else
changeset
end
end
We have added a call to validate_length
as well as a private function that checks if the :delete
field changed and, if so, we mark the changeset action to be :delete
.
The functions cast
, validate_length
, get_change
and more are all part of the Ecto.Changeset
module, which is automatically imported into Ecto schemas.
Let’s now change our view to include the delete field. Add the following somewhere inside the inputs_for/4
call in “web/templates/todo_list/form.html.eex”:
<%= if i.data.id do %>
<span class="pull-right">
<%= label i, :delete, "Delete?", class: "control-label" %>
<%= checkbox i, :delete %>
</span>
<% end %>
And that’s all. Our todo items should now validate the body as well as allow deletion on update pages!
Notice we had control over the changeset and validations at all times. There are no special fields for deletion or implicit validation. Still, we were able to wire everything up with very few lines of codes.
And while the default is to call MyApp.TodoItem.changeset/2
, it is possible to customize the function to be invoked when casting todo items from the todo list changeset via the :with
option:
|> cast_assoc(:todo_items, required: true, with: &custom_changeset/2)
Therefore if an association has different validation rules depending if it is sent as part of a nested association or when managed directly, we can easily keep those business rules apart by providing two different changeset functions. And because we just use functions, all the way down, they are easy to compose and test.
In this blog post we have learned the foundations for working with associations and embeds, up to a more complex example using nested associations. If you want to further customize their behavior, read the docs for declaring the associations/embeds in Ecto.Schema
or how to further manipulate changesets via Ecto.Changeset
.
When it comes to the view, you can find more information on the Phoenix.HTML
project, specially under the Phoenix.HTML.Form
, where the inputs_for/4
function is defined.
P.S.: This post was originally published on Plataformatec’s blog.
]]>In this article, we will outline the design decisions behind such abstraction, often exploring ideas from Haskell, Clojure and Scala that eventually led us to develop this new abstraction called reducees, focusing specially on the constraints and performance characteristics of the Erlang Virtual Machine.
Elixir is a functional programming language that runs on the Erlang VM. All the examples on this article will be written in Elixir although we will introduce the concepts bit by bit.
Elixir provides linked-lists. Lists can hold many items and, with pattern matching, it is easy to extract the head (the first item) and the tail (the rest) of a list:
iex> [h|t] = [1, 2, 3]
iex> h
1
iex> t
[2, 3]
An empty list won’t match the pattern [h|t]
:
[h|t] = []
** (MatchError) no match of right hand side value: []
Suppose we want to recurse every element in the list, multiplying each element by 2. Let’s write a double function:
defmodule Recursion do
def double([h | t]) do
[h * 2 | double(t)]
end
def double([]) do
[]
end
end
The function above recursively traverses the list, doubling the head at each step and invoking itself with the tail. We could define a similar function if we wanted to triple every element in the list but it makes more sense to abstract our current implementation. Let’s define a function called map
that applies a given function to each element in the list:
defmodule Recursion do
def map([h | t], fun) do
[fun.(h) | map(t, fun)]
end
def map([], _fun) do
[]
end
end
double
could now be defined in terms of map
as follows:
def double(list) do
map(list, fn x -> x * 2 end)
end
Manually recursing the list is straight-forward but it doesn’t really compose. Imagine we would like to implement other functional operations like filter
, reduce
, take
and so on for lists. Then we introduce sets, dictionaries, and queues into the language and we would like to provide the same operations for all of them.
Instead of manually implementing all of those operations for each data structure, it is better to provide an abstraction that allows us to define those operations only once, and they will work with different data structures.
That’s our next step.
The idea behind iterators is that we ask the data structure what is the next item until the data structure no longer has items to emit.
Let’s implement iterators for lists. This time, we will be using Elixir documentation and doctests to detail how we expect iterators to work:
defmodule Iterator do
@doc """
Each step needs to return a tuple containing
the next element and a payload that will be
invoked the next time around.
iex> next([1, 2, 3])
{1, [2, 3]}
iex> next([2, 3])
{2, [3]}
iex> next([3])
{3, []}
iex> next([])
:done
"""
def next([h|t]) do
{h, t}
end
def next([]) do
:done
end
end
We can implement map
on top of next
:
def map(collection, fun) do
map_next(next(collection), fun)
end
defp map_next({h, t}, fun) do
[fun.(h)|map_next(next(t), fun)]
end
defp map_next(:done, _fun) do
[]
end
Since map
uses the next
function, as long as we implement next
for a new data structure, map
(and all future functions) should work out of the box. This brings the polymorphism we desired but it has some downsides.
Besides not having ideal performance, it is quite hard to make iterators work with resources (events, I/O, etc), leading to messy and error-prone code.
The trouble with resources is that, if something goes wrong, we need to tell the resource that it should be closed. After all, we don’t want to leave file descriptors or database connections open. This means we need to extend our next
contract to introduce at least one other function called halt
.
halt
should be called if the iteration is interrupted suddenly, either because we are no longer interested in the next items (for example, if someone calls take(collection, 5)
to retrieve only the first five items) or because an error happened. Let’s start with take:
def take(collection, n) do
take_next(next(collection), n)
end
# Invoked on every step
defp take_next({h, t}, n) when n > 0 do
[h|take_next(next(t), n - 1)]
end
# If we reach this, the collection finished
defp take_next(:done, _n) do
[]
end
# If we reach this, we took all we cared about before finishing
defp take_next(value, 0) do
halt(value) # Invoke halt as a "side-effect" for resources
[]
end
Implementing take
is somewhat straight-forward. However we also need to modify map
since every step in the user supplied function can fail. Therefore we need to make sure we call halt
on every possible step in case of failures:
def map(collection, fun) do
map_next(next(collection), fun)
end
defp map_next({h, t}, fun) do
[try do
fun.(h)
rescue
e ->
# Invoke halt as a "side-effect" for resources
# in case of failures and then re-raise
halt(t)
raise(e)
end|map_next(next(t), fun)]
end
defp map_next(:done, _fun) do
[]
end
This is not elegant nor performant. Furthermore, it is very error prone. If we forget to call halt
at some particular point, we can end-up with a dangling resource that may never be closed.
Not long ago, Clojure introduced the concept of reducers.
Since Elixir protocols were heavily inspired on Clojure protocols, I was very excited to see their take on collection processing. Instead of imposing a particular mechanism for traversing collections as in iterators, reducers are about sending computations to the collection so the collection applies the computation on itself. From the announcement: “the only thing that knows how to apply a function to a collection is the collection itself”.
Instead of using a next
function, reducers expect a reduce
implementation. Let’s implement this reduce
function for lists:
defmodule Reducer do
def reduce([h|t], acc, fun) do
reduce(t, fun.(h, acc), fun)
end
def reduce([], acc, _fun) do
acc
end
end
With reduce, we can easily calculate the sum of a collection:
def sum(collection) do
reduce(collection, 0, fn x, acc -> x + acc end)
end
We can also implement map in terms of reduce. The list, however, will be reversed at the end, requiring us to reverse
it back:
def map(collection, fun) do
reversed = reduce(collection, [], fn x, acc -> [fun.(x)|acc] end)
# Call Erlang reverse (implemented in C for performance)
:lists.reverse(reversed)
end
Reducers provide many advantages:
map
, filter
, etc are easier to implement than the iterators one since the recursion is pushed to the collection instead of being part of every operation
The last bullet is the most important for us. Because the collection is the one applying the function, we don’t need to change map
to support resources, all we need to do is to implement reduce
itself. Here is a pseudo-implementation of reducing a file line by line:
def reduce(file, acc, fun) do
descriptor = File.open(file)
try do
reduce_next(IO.readline(descriptor), acc, fun)
after
File.close(descriptor)
end
end
defp reduce_next({line, descriptor}, acc, fun) do
reduce_next(IO.readline(descriptor), fun.(line, acc), fun)
end
defp reduce_next(:done, acc, _fun) do
acc
end
Even though our file reducer uses something that looks like an iterator, because that’s the best way to traverse the file, from the map
function perspective we don’t care which operation is used internally. Furthermore, it is guaranteed the file is closed after reducing, regardless of success or failure.
There are, however, two issues when implementing reducers as proposed in Clojure into Elixir.
First of all, some operations like take
cannot be implemented in a purely functional way. For example, Clojure relies on reference types on its take implementation. This may not be an issue depending on the language/platform (it certainly isn’t in Clojure) but it is an issue in Elixir as side-effects would require us to spawn new processes every time take is invoked. Or use the process dictionary, which is generally considered a poor practice.
Another drawback of reducers is, because the collection is the one controlling the reducing, we cannot implement operations like zip
that requires taking one item from a collection, then suspending the reduction, then taking an item from another collection, suspending it, and starting again by resuming the first one and so on. Again, at least not in a purely functional way.
With reducers, we achieve the goal of a single abstraction that works efficiently with in-memory data structures and resources. However, it is limited on the amount of operations we can support efficiently, in a purely functional way, so we had to continue looking.
It was at Code Mesh 2013 that I first heard about iteratees. I attended a talk by Jessica Kerr and, in the first minutes, she described exactly where my mind was at the moment: iterators and reducers indeed have their limitations, but they have been solved in scalaz-stream.
After the talk, Jessica and I started to explore how scalaz-stream solves those problems, eventually leading us to the Monad.Reader issue that introduces iteratees. After some experiments, we had a prototype of iteratees working in Elixir.
With iteratees, we have “instructions” going “up and down” between the source and the reducing function telling what is the next step in the collection processing:
defmodule Iteratee do
@doc """
Enumerates the collection with the given instruction.
If the instruction is a `{:cont, fun}` tuple, the given
function will be invoked with `{:some, h}` if there is
an entry in the collection, otherwise `:done` will be
given.
If the instruction is `{:halt, acc}`, it means there is
nothing to process and the collection should halt.
"""
def enumerate([h|t], {:cont, fun}) do
enumerate(t, fun.({:some, h}))
end
def enumerate([], {:cont, fun}) do
fun.(:done)
end
def enumerate(_, {:halt, acc}) do
{:halted, acc}
end
end
With enumerate
defined, we can write map
:
def map(collection, fun) do
{:done, acc} = enumerate(collection, {:cont, mapper([], fun)})
:lists.reverse(acc)
end
defp mapper(acc, fun) do
fn
{:some, h} -> {:cont, mapper([fun.(h)|acc], fun)}
:done -> {:done, acc}
end
end
enumerate
is called with {:cont, mapper}
where mapper
will receive {:some, h}
or :done
, as defined by enumerate
. The mapper
function then either returns {:cont, mapper}
, with a new mapper
function, or {:done, acc}
when the collection has told no new items will be emitted.
The Monad.Reader publication defines iteratees as teaching fold (reduce) new tricks. This is precisely what we have done here. For example, while map
only returns {:cont, mapper}
, it could have returned {:halt, acc}
and that would have told the collection to halt. That’s how take
could be implemented with iteratees, we would send cont
instructions until we are no longer interested in new elements, finally returning halt
.
So while iteratees allow us to teach reduce new tricks, they are much harder to grasp conceptually. Not only that, functions implemented with iteratees were from 6 to 8 times slower in Elixir when compared to their reducer counterpart.
In fact, it is even harder to see how iteratees are actually based on reduce since it hides the accumulator inside a closure (the mapper
function, in this case). This is also the cause of the performance issues in Elixir: for each mapped element in the collection, we need to generate a new closure, which becomes very expensive when mapping, filtering or taking items multiple times.
That’s when we asked: what if we could keep what we have learned with iteratees while maintaining the simplicity and performance characteristics of reduce?
Reducees are similar to iteratees. The difference is that they clearly map to a reduce operation and do not create closures as we traverse the collection. Let’s implement reducee for a list:
defmodule Reducee do
@doc """
Reduces the collection with the given instruction,
accumulator and function.
If the instruction is a `{:cont, acc}` tuple, the given
function will be invoked with the next item and the
accumulator.
If the instruction is `{:halt, acc}`, it means there is
nothing to process and the collection should halt.
"""
def reduce([h|t], {:cont, acc}, fun) do
reduce(t, fun.(h, acc), fun)
end
def reduce([], {:cont, acc}, _fun) do
{:done, acc}
end
def reduce(_, {:halt, acc}, _fun) do
{:halted, acc}
end
end
Our reducee implementations maps cleanly to the original reduce implementation. The only difference is that the accumulator is always wrapped in a tuple containing the next instruction as well as the addition of a halt
checking clause.
Implementing map
only requires us to send those instructions as we reduce:
def map(collection, fun) do
{:done, acc} =
reduce(collection, {:cont, []}, fn x, acc ->
{:cont, [fun.(x)|acc]}
end)
:lists.reverse(acc)
end
Compared to the original reduce implementation:
def map(collection, fun) do
reversed = reduce(collection, [], fn x, acc -> [fun.(x)|acc] end)
:lists.reverse(reversed)
end
The only difference between implementations is the accumulator wrapped in tuples. We have effectively replaced the closures in iteratees by two-item tuples in reducees, which provides a considerably speed up in terms of performance.
The tuple approach allows us to teach new tricks to reducees too. For example, our initial implementation already supports passing {:halt, acc}
instead of {:cont, acc}
, which we can use to implement take
on top of reducees:
def take(collection, n) when n > 0 do
{_, {acc, _}} =
reduce(collection, {:cont, {[], n}}, fn
x, {acc, count} -> {take_instruction(count), {[x|acc], n-1}}
end)
:lists.reverse(acc)
end
defp take_instruction(1), do: :halt
defp take_instruction(n), do: :cont
The accumulator in given to reduce
now holds a list, to collect results, as well as the number of elements we still need to take from the collection. Once we have taken the last item (count == 1
), we halt
the collection.
At the end of the day, this is the abstraction that ships with Elixir. It solves all requirements outlined so far: it is simple, fast, works with both in-memory data structures and resources as collections, and it supports both take
and zip
operations in a purely functional way.
Elixir developers mostly do not need to worry about the underlying reducees abstraction. Developers work directly with the module Enum which provides a series of operations that work with any collection. For example:
iex> Enum.map([1, 2, 3], fn x -> x * 2 end)
[2, 4, 6]
All functions in Enum are eager. The map
operation above receives a list and immediately returns a list. None the less, it didn’t take long for us to add lazy variants of those operations:
iex> Stream.map([1, 2, 3], fn x -> x * 2 end)
#Stream<...>
All the functions in Stream are lazy: they only store the computation to be performed, traversing the collection just once after all desired computations have been expressed.
In addition, the Stream
module provides a series of functions for abstracting resources, generating infinite collections and more.
In other words, in Elixir we use the same abstraction to provide both eager and lazy operations, that accepts both in-memory data structures or resources as collections, all conveniently encapsulated in both Enum and Stream modules. This allows developers to migrate from one mode of operation to the other as needed.
An enormous thank you to Jessica Kerr for introducing me to iteratees and pairing with me at Code Mesh. Also, thanks to Jafar Husein for the conversations at Code Mesh and the team behind Rx which we are exploring next. Finally, thank you to James Fish, Pater Hamilton, Eric Meadows-Jönsson and Alexei Sholik for the countless reviews, feedback and prototypes regarding Elixir’s future.
P.S.: This post was originally published on Plataformatec’s blog.
]]>
Imagine you have a string with format "foo=bar&token=value&bar=baz"
where you want to extract the value for the key token
which may appear anywhere or not at all in the string.
Here is one solution a developer not very-acquainted with pattern matching would try:
def get_token(string) do
parts = String.split(string, "&")
Enum.find_value(parts, fn pair ->
key_value = String.split(pair, "=")
Enum.at(key_value, 0) == "token" && Enum.at(key_value, 1)
end)
end
At first the code seems to work fine but once we go deeper we can see it makes many assumptions we have not really planned for!
For example, what happens if someone passes "foo=bar&token=some=value&bar=baz"
as argument? The code will work and will return the string "some"
. But is that what we really want? Maybe we wanted "some=value"
instead? Or maybe we wanted to reject it all together?
There are other examples where the code above would work by accident, possibly adding complexity to the codebase as other users may start to rely on such behaviour.
The most idiomatic way of writing the code above in Elixir is by using pattern matching:
def get_token(string) do
parts = String.split(string, "&")
Enum.find_value(parts, fn pair ->
[key, value] = String.split(pair, "=")
key == "token" && value
end)
end
With pattern matching, we are asserting that String.split/2
is going to return a list with two elements. If someone passes "foo=bar&token&bar=baz"
, it will crash as the list will have only one element. If someone passes "token=some=value"
, it will crash too as it contains 3 items.
Our new code does not contain any of the accidental complexity of the previous one and it will also be faster. Any input that does not match the given pattern will lead to a crash, giving us the perfect opportunity to discuss and decide how to handle those corner cases.
Elixir provides protocols as a mechanism for polymorphism. A protocol allows developers to express they are willing to work with any data type, as long as it implements the protocols X, Y and Z.
One nice aspect of Elixir protocols is that they are explicit, you need to explicitly outline and define a protocol for data structures to implement.
For example, one protocol in Elixir is the String.Chars
protocol, which converts any data type to a string, if that data type can be converted to a human-readable string. The to_string
function uses such protocol for conversions:
iex> to_string("hello")
"hello"
iex> to_string(1)
"1"
iex> to_string URI.parse("https://dashbit.co/blog")
"https://dashbit.co/blog"
iex> to_string %{hello: :world}
** (Protocol.UndefinedError) protocol String.Chars not implemented for %{hello: :world}
Imagine you have a function that converts underscores to dashes in a string:
def dasherize(string), do: String.replace(string, "_", "-")
Now imagine that at some point you decide to call to_string/1
before calling replace/3
:
def dasherize(data), do: String.replace(to_string(data), "_", "-")
Albeit small, this is a drastic change to our code. Our dasherize function went from supporting only strings as argument to support a large number of data types. In other words, our code became less assertive and more generic.
That said, before adding protocols to our code, we should ask if we really intend to open our function to all types. Maybe we want dasherize to support only atoms and strings? If so, we should rather write:
def dasherize(data) when is_atom(data), do: dasherize(Atom.to_string(data))
def dasherize(data), do: String.replace(data, "_", "-")
However, if we are confident we want a protocol, then we should indeed use the protocol and write a test case that guarantees our function works for at least a couple types that implement such protocol. Such tests are extremely important to guarantee we don’t make a different assumption somewhere in the same function.
Elixir provides maps, known as dictionaries in other languages, as a key-value data structure. Maps are created as follows:
map = %{name: "john", age: 42}
Maps allow two types of access. A strict access, that requires the field name to exist in the map, and a dynamic access, that returns nil if the field does not exist in the map:
# Strict access
iex> map.name
"john"
iex> map.address
** (KeyError) key :address not found in: %{age: 42, name: "john"}
# Dynamic access
iex> map[:name]
"john"
iex> map[:address]
nil
Both syntaxes have their use cases but we should prefer the strict syntax when possible as it helps us find bugs early on. The same applies to structs, which are named maps:
defmodule User do
defstruct [:first_name, :last_name, :age]
def name(user) do
"#{user.first_name} #{user.last_name}"
end
end
User.name %User{first_name: "John", last_name: "Doe"}
#=> "John Doe"
In the example above, we have defined a User struct and a name/1
function that receives the struct and returns its name. Since we are using user.first_name
, if we accidentally pass a struct that does not contain such a field, it will crash immediately, with a nice error message!
In fact, the strict aspect of the user.first_name
syntax is one of the reasons why structs do not support the dynamic syntax out of the box:
user = %User{first_name: "John", last_name: "Doe"}
user[:first_name]
** (Protocol.UndefinedError) protocol Access not implemented for %User{...}
In case you want to use the dynamic syntax, you need to derive the Access protocol for the User struct:
defmodule User do
@derive [Access]
defstruct [:first_name, :last_name, :age]
def name(user) do
"#{user.first_name} #{user.last_name}"
end
end
However, only derive Access when you truly need to do so, as it is much better to push yourself to rely more on the strict syntax. I would even say relying on Access for structured data is an anti-pattern itself!
The most interesting aspect of all examples above is that writing in the assertive style leads to faster, more concise and maintainable code. Even more, it allows us to focus on specific scenarios, postponing any complexity (incidental or accidental) to only when we need them, if we need them.
P.S.: This post was originally published on Plataformatec’s blog.
]]>